GoldSource Mapping Tips
Created 18 years ago2006-01-02 09:43:42 UTC by
 Kasperg
Created 18 years ago2006-01-02 09:43:42 UTC by
![]() Kasperg
Kasperg
Posted 18 years ago2006-03-10 21:29:04 UTC
Post #167601
Important mapping tip: the rooms we build in our maps have different purposes. Adding height variation is essential to architecture and consequently to level design. A small office will have a lower ceiling than a conference room. This might sound obvious, but there are countless maps in which all rooms and halls are 128 units high all along. Different room sizes, lighting and ambience are essential if you dont want a repetitive and boring map.

Posted 18 years ago2006-03-16 16:50:53 UTC
Post #168786
Kasperg ftw


Posted 18 years ago2006-03-16 19:00:24 UTC
Post #168818
Good thing. I'd also recommend using height to your advantage when designing the maps layout. Why fight on the same level in a 3D world? You can use height to give players advantages or disadvanteges. Fighting on multiple height levels adds more variation to levels and keeps players alert in such area's.
As for corridors, these should serve a gameplay purpose as well. For me, they're basically connections between combat zone's or area's of interest. I'd keep them short, at best about a 2 - 3 seconds long, so players won't waste much time travelling from one good fighting scene to another one. Combat in simple corridors often isn't very interesting, but that's not their purpose either.
Of course, that doesn't mean every corridor should be that short and simple - adding some pillars for players to take cover can live them up greatly and bending a path somewhat or branching often works well.
You may want to keep the number of routes down a bit - sometimes a route is just too similar to another one: both take the player from area A to area B. When only one route is used, you may want to cut out the other. Keep It Stupid Simple. Players will appreciate it when the map becomes easier to learn. Landmarks serve that purpose greatly, too.


Posted 18 years ago2006-04-06 04:02:17 UTC
Post #172620
Speaking of detail:
I've decided thats it's best to get you floor plan done before addong desks, tables, and other furniture.
Go slow, one floor/room at a time.
Align your textures right when you finish a rooms walls, floor, and ceiling. It seems easier then waiting till your map is done to realign your textures.
Off Topic: What's up with these posted pictures? They all come up with an "X" for me, save one. MuzzleFlash's fourth pic is the only one that I can see in this thread.

Posted 18 years ago2006-04-06 04:09:32 UTC
Post #172622
A usual approach for a starter, to do room by room.
But with that approach, I found myself getting stuck on the layout so often though, that I decided to take a different approach: creating the basic layout first, with simple blocks to indicate cover objects and simple textures, so I wouldn't loose myself in the details but focus on the layout and gameplay elements instead.
After the layout works and the map plays well, you can give each area the time it deserves. An additional advantage here is that doing the whole map step by step means all area's will have roughly the same amount of detail, or quality so to say.
Posted 18 years ago2006-04-06 05:21:41 UTC
Post #172629
I don't see doing the map room by room a bad thing, because I almost always use this method. The important thing is to have a layout somewhere. It doesn't always have to be in the map. You can have it in your head or in a piece of paper.
There are problems of course, because sometimes you need to connect two areas and it's not clear how. But I always like that bit of challenge!
I also tend to detail rooms right away, because I need to see how it will look in the completed version. Some little ideas can be lost (if you dont write them down of course) if you abandon one area and work on other parts of a map.
Posted 18 years ago2006-04-06 08:21:13 UTC
Post #172645
Different methods suit different people, that's true. Sketching down a layout beforehand helps me a lot, and most professionals do it, but some pro's don't. Depends on who you are I guess.
As for idea's, I usually create one or more test maps, for the theme, mood, feeling and such and of course some layout test maps. I sketch and note down a lot of idea's on paper beforehand and during the process, to keep track of things.
As for idea's, I usually create one or more test maps, for the theme, mood, feeling and such and of course some layout test maps. I sketch and note down a lot of idea's on paper beforehand and during the process, to keep track of things.

Posted 18 years ago2006-04-06 12:53:34 UTC
Post #172679
If you feel sick and tired of a map stop building it. After a brake your will will be resurrected!


Posted 18 years ago2006-04-06 16:32:59 UTC
Post #172709
Planning is almost an impossible feat when you are doing complex landscapes like me. Pretty much, I build the land as I go along, and do what feels right. The method I use takes a LONG time, but it pays off in the end when every single section of landscape looks exactly how I want it too.
Landscapes add a lot to a map, since the entire verticle quality of a map is totally penetrated. There is no flat floor... except the areas that have been beated down (or poured concrete) for the player to walk on. It gives it a nice look, and a great mood that you actually are walking along mesas, the desert, the forest, or whatever else, shooting aliens as you go.
The main goal and purpose of level design is to try and pull the player into the game, getting them hooked, imersing them into a new world where they can shoot the hell out of aliens. Personally, I believe the main focus of game creation in general is to try and make the player care about the character they are. If they do care about the character, and try and avoid hurting it, or wasting ammo, the game is succesful.

Posted 18 years ago2006-04-20 14:11:51 UTC
Post #175575
Can anybody recommend good ways to find leaks? I use leakmarker and it's quite helpfull but it never points exectly at my leaks, and so does the point file. I had one leak that leakmarker pointed to one part of the room and the leak was in another one.
There has to be a better way then just searching for it a long time.
There has to be a better way then just searching for it a long time.

Posted 18 years ago2006-04-20 15:15:04 UTC
Post #175597
I like the big block method.


Posted 18 years ago2006-04-20 15:21:41 UTC
Post #175606
You should use the .lin file in hammer. If it askes you to open the .pts then refuse it and select your .lin file. Its in the same directory. Now follow it from bleu to red, somewhere along that line it should pass through the leak. Press Shift-Z in the 3dview to max it out so you can better trace it down.


Posted 18 years ago2006-04-20 16:50:03 UTC
Post #175656
Here's a quick way of 90-degree corners in hammer. It's really not very advanced, but quite useful for, uh, cutting stuff. Here we have a corner. The walls're overlapping eachother, and we want to cut all of the pieces with a 45c angle across so they line up. This is quite useful for aligning and I think it's recommended to do so because of something. Uh... it's good. Anyway...
1. Select both walls and all of their brushes.
2. Use the clipping tool (shift+x, very useful) to cut through them in a 45 degree angle. 3. Press enter. Don't deselect any of the brushes just yet.
4. Ctrl+click (Deselect) the brushes you want to keep, leaving the deletable brushes selected. 5. Hit delete.
Kazaam. You've got this perfectly good corner.
1. Select both walls and all of their brushes.
2. Use the clipping tool (shift+x, very useful) to cut through them in a 45 degree angle.
4. Ctrl+click (Deselect) the brushes you want to keep, leaving the deletable brushes selected.
Kazaam.

Posted 18 years ago2006-04-20 17:48:03 UTC
Post #175677
Pepper does it really matter if I use the .lin file or leakmarker? Leakmarker just marks the spot the lin file says the leak is in.
Posted 18 years ago2006-04-20 18:01:29 UTC
Post #175684
ZL: Waste of time and resources. The 45 degree surface adds a plane as far as I know, and is generally harder to manage in case you need to shift around some brushes. This may be an interesting read, too bad the images are lost: Mitered Corners: The Undying Myth.
Personally I believe such methods don't give significant results. A well-planned layout is much more worth than things like nullifying surfaces and that kind of tricks. Not that those aren't usefull, but they come at a whole lower level and I think they should (only?) be used in the latest stage. Some programmer (I think) once said: "premature optimization is the root of all evil". The same goes for level-design.
Ok, I might exaggerate a bit here and there but the idea is clear, methinks.
Posted 18 years ago2006-04-20 18:08:32 UTC
Post #175689
Sucks to be me. Dunno where I picked it up, really.
Posted 18 years ago2006-04-20 19:14:08 UTC
Post #175698
Oh, no problem. It seems to have been a quite popular method 'back in the days'. I know at least I did it some times.
Posted 18 years ago2006-04-20 19:40:12 UTC
Post #175702
Same here! I got tired of stretching those brushes and messing up the corners, so it's been quite a long time since I haven't used it. It is useful if the texture on top of those brushes is seen and needs to bend in the corner (as seen in the base map for the current competition)
In terms of compiling (not ingame r_speeds), it still does a minimal job because there will be no face splitting (both brushes have one face in common). The number of polygons will be the same though.
As I've said in the Compo 20 thread, things that are only noticeable in the RMF are not worth fighting for. The BSP result is more important.

Posted 18 years ago2006-04-20 21:21:25 UTC
Post #175717
I just use the vertex manipulation tool for that, works well. You'll see in my compo map I did this at the first of the map on the floor.


Posted 18 years ago2006-04-20 23:47:27 UTC
Post #175735
i only miter corners where you see the sharp side of them
|
| ---
| |
the / represents the corner I mitered
| ---- |
| ---
| |
the / represents the corner I mitered

Posted 18 years ago2006-04-20 23:52:21 UTC
Post #175736
I miter any corner i can now! Damn, it looks so neat in Hammer but.


Posted 18 years ago2006-04-20 23:53:10 UTC
Post #175737
I miter when I want textures to flow properly (which is all the time). As Captain P mentioned, mitering has no effect on performance. It's better than overlapping brushes though (something I haven't done since I started mapping, more than 3 years ago).


Posted 18 years ago2006-04-21 00:13:18 UTC
Post #175738
Displacement is great for destroyed walls, bent warped doors, objects, etc.

Posted 18 years ago2006-04-21 02:37:18 UTC
Post #175749
Just don't waste your time mitering corners. It won't help, instead it'll make modifying the map more difficult. Plus, simply applying the same texture to the face of the other brush in case of an outside corner is faster anyway. Using the Alt key while texturing does a good job.
As for looking tidy in the editor, using visgroups for that helps a lot. Though these aren't as handy to use as in Hammer 4.0, they can still be valuable. Actually, when looking for leaks, I put all entities in a single visgroup and hide them before I start flying through the map.
As for looking tidy in the editor, using visgroups for that helps a lot. Though these aren't as handy to use as in Hammer 4.0, they can still be valuable. Actually, when looking for leaks, I put all entities in a single visgroup and hide them before I start flying through the map.

Posted 18 years ago2006-04-21 03:57:02 UTC
Post #175761
Mitering. Is that a freakin' word or what? :/
I use ZL method all the time, especially when making pipes, or and other cillinder objects that needs a corner.
I use ZL method all the time, especially when making pipes, or and other cillinder objects that needs a corner.


Posted 18 years ago2006-04-21 04:49:11 UTC
Post #175762
Mitering's a word, yah. Basically making your corners meet diagonally.

Posted 18 years ago2006-04-21 07:04:05 UTC
Post #175780
Oh ok. Tnx.
Posted 18 years ago2006-04-21 08:03:24 UTC
Post #175786
For pipes, it's good, since it actually affects their shape and all. For wall corners, it's useless.
Posted 18 years ago2006-04-21 08:19:36 UTC
Post #175787
Unless you want to have bits cut off of your brushes to create extra depth. Like this:
    |
    |
___/
Posted 18 years ago2006-04-21 09:05:09 UTC
Post #175795
Uhm, you mean? Extra depth?
Posted 18 years ago2006-04-21 12:20:29 UTC
Post #175867
I think he means depth of realism/detail.

Posted 18 years ago2006-04-21 13:31:51 UTC
Post #175894
Lol, that arrow key nudging will be much more convenient. It gets annoying when you go to click a brush, move it, then click again and miss -_-

Posted 18 years ago2006-04-21 18:24:20 UTC
Post #175964
Oh, in that case, but that's not mitering (well, not in the meaning I give it ;)) - it's not clipping two brushes to line up, you'd simply clip one of them.

Posted 18 years ago2006-04-23 16:29:52 UTC
Post #176291
Nudging Part II
Not only have I found nudging--using the ARROW KEYS to move around brushes and verticies, described earlier in this thread--extremely useful the more I've used it, I've also found scaling the grid very complimentary to it.
If you want to move a brush/vertex across a large expanse, and the the grid is set to it's smallest size--1-unit--it will take quite a long time. Using the ] key to make the grid larger, will make the brush or vertex "hop" from the larger grid lines to another, making it much much faster.
Once you've moved the brush close to where you want it, use the [ key to scale the grid back down, to allow you to line things up perfectly.
I've found nudging and scaling in this way makes complex VM and much eaiser, because you can effortlessly move around CTRL-selected verticies--much like modelling. Also great for moving brushes or CTRL-selected groups of brushes.

Posted 18 years ago2006-04-23 17:44:59 UTC
Post #176300
Great tip, Rowley. Thats exactly my method too.
Posted 18 years ago2006-04-28 17:48:10 UTC
Post #177256
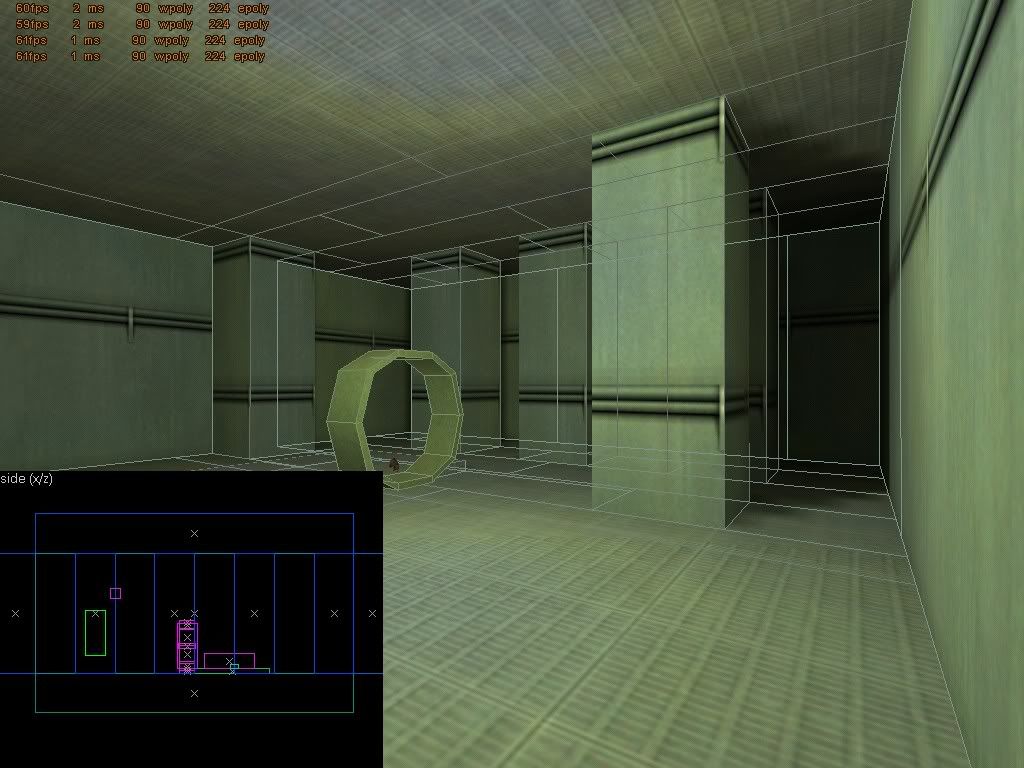
Since two people have talked to me about it in the past two weeks, I'd like to destroy the myth of the overlapping brushes.
While I do agree that overlapping will make HLVIS take longer (needs to make extra face splitting calculations) it will not affect HLRAD since HLRAD uses the information that has been decided in the previous process. When the RAD process occurs, those extra bits of brush have already been discarded and have absolutely no effect in the process.
In the following screenshots, I have made a version where there is no overlapping, and another one in which the pillars go through both floor and ceiling. As you can see by the r_speeds and gl_wireframe, they are absolutely the same. Their differences have been solved in HLBSP and HLVIS.
No overlapping
Overlapping pillars
Conclusion. If you want a tidy compile, avoid overlapping brushes. If you are worrying about ingame frames per second, this has nothing to do with it.
Edit: there's another kind of overlap consisting of simultaneous brush faces occupying the same place in the map. This should of course be avoided!
Posted 18 years ago2006-04-30 06:06:35 UTC
Post #177461
Using CTRL-M to open the "Transformation" Menu is invariably the most precise way to rotate your objects in Hammer, but it seems sometimes it's not a good idea to use it.
While messing around with my Torus map, I noticed rotating multiple complex objects at once using CTRL-M caused a SHITLOAD of "invalid solid" errors.
I tried all sorts of things to try and figure out what was wrong, but no luck. It didn't make sense, because I was using the same method as the first version of the map: build one quarter of the torus, and then copy/rotate it 3 times to for the complete product.
Finally after much aggravation, I stumbled upon what was happening. In the previous version, I was just SHIFT-rotating using the mouse, and not using CTRL-M. Shift-rotating in this case was the ONLY real choice, and did the job perfectly.
For whatever reason, rotating multiple compex objects using CTRL-M will cause 100's of Erroneous "Invalid" errors!
Posted 18 years ago2006-04-30 07:56:43 UTC
Post #177468
For whatever reason, rotating multiple compex objects using CTRL-M will cause 100's of Erroneous "Invalid" errors!The actual reason is as following:
Surfaces must be planar, that is, completely flat. Programming-wise, grid locations are integers (0, 1, 2, etc), not floats (0.5, 2.0, etc). As a result, rotating brushes may cause vertices to go off the grid. In the editor, that's fine, seemingly they're treated as floats there. But the compilers will cast these to integers, causing some (usually minor) differences, often enough to make surfaces not completely planar. That's where errors start popping up.
So, I would advise not to stick to degrees as a valuable measurement. Personally I don't really stick to precise and exact placement of objects anymore, as it often results in over-tidy, too clean feeling maps. In real-life, not everything matches precisely, not everything is rotated perfectly or constructed exactly to the millimeter. Take some care with the technical aspects for performance and workability reasons, but don't limit yourself with artificial rules like tidyness. Of course, sometimes there's a place for these, some map themes require tidy placement, but keep in mind it's just a rule that you should break when you need to.
Edit: there's another kind of overlap consisting of simultaneous brush faces occupying the same place in the map. This should of course be avoided!It's called z-fighting, two surfaces 'fighting' to be drawn first. May also happen on large distances, when the distance between each other is relatively small compared to their distance to you. Not a pretty sight indeed.
Posted 18 years ago2006-04-30 08:05:10 UTC
Post #177469
Here's how to get sprites visible in Hammer, just like the models:
First, you need a .pak extracting utility. Get PakScape.
Now, open the pak0.pak located in your Half-Life/valve directory. Once the .pak file is open, open the sprites directory (in PakScape). Highlight all files, except the hud.txt, and hit Ctrl+C. Now, go to your Half-Life/valve/sprites directory and hit Ctrl+V. All sprites will now be copied in that directory.
Now, you need a fgd file with support for sprites that are visible in Hammer. Get is here: Half-Life Game Data File with sprite and mode support in Hammer. Note that model support only works with Hammer 3.5 beta.

Posted 18 years ago2006-05-20 13:26:26 UTC
Post #181177


Posted 18 years ago2006-05-26 11:44:06 UTC
Post #182149
Kasperg, I have noticed that when using Ctrl-M, when I go to rotate an object -90, it always rotates 1-unit to much.. watch out for this. Either use vertex-manipulation afterwards, or rotate it 90, and then 180.
Ctrl+M, can also be used for an assortment of things.. such as, if you had a Light_environment shining in one direction at a 45 degree angle, and you want a fade showing a sunbeam, then make your brush with the fade textures, and Press Ctrl+M, and rotate it to 45 degrees (Make sure which ever window your looking at is correct)
Remember:
X/Y (Top) Is Z
Y/Z (Front) Is X
X/Z (Side) is Y
Posted 18 years ago2006-05-26 11:56:22 UTC
Post #182150
I always keep the "rotate by 15?" option to prevent strange angles.
Posted 18 years ago2006-05-26 12:06:09 UTC
Post #182151
yea, that works too. 
Also remember.. Most textures can be your inspiration for architect, as ZombieLoffe has shown in his 'Detail' Maps.
Also remember.. Most textures can be your inspiration for architect, as ZombieLoffe has shown in his 'Detail' Maps.
Posted 18 years ago2006-06-01 06:31:38 UTC
Post #183086

The Solid Entity [func_wall] is empty errors, undetected, can add LOADS of time to your VIS compile.
Removing about 15 of these from one version of a map to another--which I had previously not detected--, decreased VIS compile time over 10 minutes!!!!!
I always assumed these "Solid Entity empty" errors were just minor annoyances, with no real toll on the compile time...boy was I wrong!!

Posted 18 years ago2006-06-02 21:22:02 UTC
Post #183419
I know this is a late post, but I have a problem with ansith's theory - don't carve. Carving can be a very successful tool if done well. The number one thing is to never just carve, always make sure the end land on a unit vertex. When carving intricate objects, it's best to make layers to avoid corrupting the brush. However, if your looking for intricate objects, I would strongly suggest just using vertex manipulation. Carving is good to do quick jobs if you want to create angles or extra faces.

Posted 18 years ago2006-06-21 07:20:32 UTC
Post #186178
Posted 18 years ago2006-06-21 07:22:27 UTC
Post #186179
What the... hell?
Looks like a killbox on acid.
Looks like a killbox on acid.

Posted 18 years ago2006-06-21 07:28:00 UTC
Post #186183
"church light effect"  Incredeble!
Incredeble!
Posted 18 years ago2006-06-21 07:29:32 UTC
Post #186184
Ill explain how this is done very soon.Clue in the filename?

Posted 18 years ago2006-06-21 07:38:30 UTC
Post #186185
Edit: Do not reply! Im writing the explanatioon now.
You must be logged in to post a response.