Entity Programming - Writing New Entities Last edited 3 years ago2021-11-06 21:38:09 UTC
You are viewing an older revision of this wiki page. The current revision may be more detailed and up-to-date.
Click here to see the current revision of this page.
Half-Life Programming
- Entity Programming - Overview
- Entity Programming - Writing New Entities
- Entity Programming - Timer Entity
- Entity Programming - Inheritance VS Duplication (Creating Simple Variants of Existing Entities)
- Entity Programming - Player Interaction
- Entity Programming - Handling Player Input
- Entity Programming - Introduction to Entities with Animated Models
- Entity Programming - Temporary Entity Effects
- Entity Programming - Save/restore
The previous page outlined many features found in
To get the hang of entity writing, let's start with something that is extremely simple, yet still potentially useful for mappers. The idea is an entity that, when triggered, will print a custom message (set by the mapper) to the console. It can be used to debug some entity setups and sequences, or for subtle Easter eggs in the console.
Next, we declare the entity class itself:
Now, stop for a moment, and think about what the entity is supposed to do. This entity, when it spawns, will basically do nothing, so it doesn't really need a Spawn method. The only thing that will really happen is when the entity is triggered by another entity, whether it's a button or something else. So, we will override Use.
Generally, we can approach this in 2 ways, either:
Since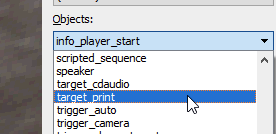 And edit its properties nicely:
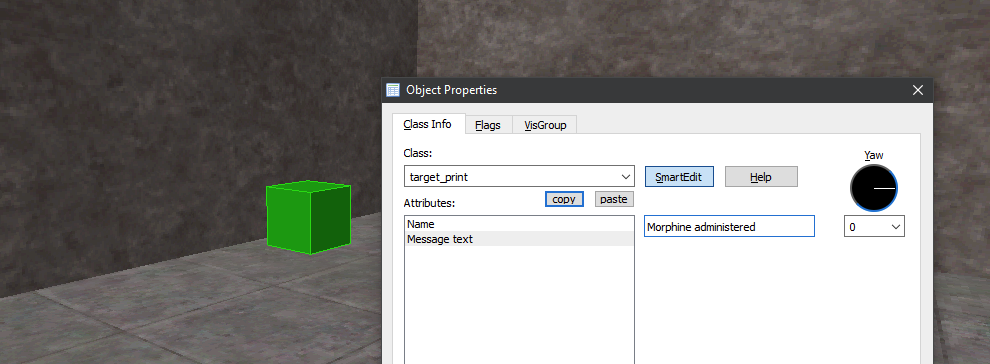 Finally, in-game, you can see the message:
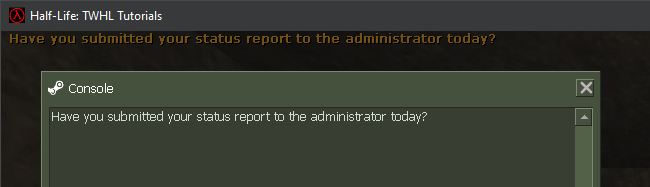 Note: you need to turn on developer mode (
This entity still isn't entirely done. You can complete it and enhance it with the following:
CBaseEntity that you can override and/or use to write entities. Here, you will learn how to write a standard map entity, as well as how to write entries in the FGD for the map editor.To get the hang of entity writing, let's start with something that is extremely simple, yet still potentially useful for mappers. The idea is an entity that, when triggered, will print a custom message (set by the mapper) to the console. It can be used to debug some entity setups and sequences, or for subtle Easter eggs in the console.
target_print - implementation
Assuming that you've already created a new .cpp file for the entity, in thedlls folder, we will start off by including the necessary headers:
#include "extdll.h"
#include "util.h"
#include "cbase.h"Next, we declare the entity class itself:
class CTargetPrint : public CBaseEntity
{

};LINK_ENTITY_TO_CLASS below:
LINK_ENTITY_TO_CLASS( target_print, CTargetPrint );LINK_ENTITY_TO_CLASS declares a global, exported function, which the engine will look up. It's quite dirty and very insecure, but it worked for Valve back in the 90s. Now, stop for a moment, and think about what the entity is supposed to do. This entity, when it spawns, will basically do nothing, so it doesn't really need a Spawn method. The only thing that will really happen is when the entity is triggered by another entity, whether it's a button or something else. So, we will override Use.
class CTargetPrint : public CBaseEntity
{
public:
   void Use( CBaseEntity* pActivator, CBaseEntity* pOther, USE_TYPE useType, float value ) override;
};

LINK_ENTITY_TO_CLASS( target_print, CTargetPrint );

void CTargetPrint::Use( CBaseEntity* pActivator, CBaseEntity* pOther, USE_TYPE useType, float value )
{

}ALERT( at_console, "Hello world\n" );Generally, we can approach this in 2 ways, either:
- use one of the pev variables, or
- declare a member variable and initialise it in KeyValue from a custom keyvalue
entvars_t variables are automatically loaded from entity data in the BSP. By default, they're 0. So it's just a matter of choosing which variable we want to use. Let's use netname.Since
netname is a string_t, we will need to convert it to a C string:
ALERT( at_console, "%s\n", STRING( pev->netname ) );target_print - FGD
Of course, this isn't user-friendly. Mappers would rather want to use the entity tool to easily place the entity into the map, and have all relevant properties already listed to them. This is why we write FGDs. You could take 2 approaches, yet again, either:- copy and modify your Half-Life FGD to be your mod's FGD (replacement FGD), or
- create a new one with only this single entity, so you can add it to your map editor's FGD list (additive FGD)
targetname, so it can be triggered by other entities, and netname, to store the message.
@PointClass base( Targetname ) = target_print
[
   netname(string) : "Message text"
]
Conclusion
If everything went right, you should see your brand new entity in the map editor's entity list:developer 1) in order to actually see it in the console.This entity still isn't entirely done. You can complete it and enhance it with the following:
- if
pev->netnameis empty, delete the entity and warn the mapper - allow the mapper to choose the type of printing (currently, we're only using
at_console)
- Categories
- Tutorials
- Programming
- Goldsource Tutorials
- Article Credits
-
 Admer456
–
Original author
Admer456
–
Original author
Comments
You must log in to post a comment. You can login or register a new account.