Weapons Programming - High-Level Overview Last edited 2 years ago2022-06-26 10:49:04 UTC
Half-Life Programming
- Weapons Programming - High-Level Overview
- Weapons Programming - Custom Ammo Types
- Weapons Programming - Standard Weapons
One of the most common changes people want for their mod is to add new weapons to it or make changes to existing weapons. This article attempts to be a high-level overview of the weapons system in the Half-Life SDK. This guide assumes that you have experience programming in C++ and a programming environment. Also, your custom mod should already be set up.
This article specifically provides you with a guided tour around the Half-Life code base, with a focus on showing all the different areas that you will need to consider when modifying existing weapons or adding new ones.
If you search the rest of the code base for the ID constants (for example,
If you look at the code for existing weapons, you'll find lines that look like these:
If you search for
Anyway, simply declare your event method in the
Aside from the hl_events.cpp file you've just changed, the only other place these functions are found is the ev_hldm.cpp file. There's another
Essentially, the weight defines if a weapon that has been picked up is "better" than the weapon that is currently equipped. If the weight is higher, the new weapon will be automatically equipped. Otherwise, it will be added to the player's inventory and they will have to switch to it themselves. The weight value is assigned to
Skill cvars are defined game.cpp:
These cvars have a default value of 0, so that needs to be changed. When the game starts, the skill.cfg file is loaded and the cvar values are read from them. The actual values for the skill cvars should be added to this file.
Weapon sounds are fairly straightforward - you should have sounds for shooting, reloading, and so on. There's nothing special about them aside from the standard audio encoding settings that the engine needs.
The text file has a relatively simple format. The first line is the number of lines in the file, not counting the first line. Subsequent lines are formatted like so: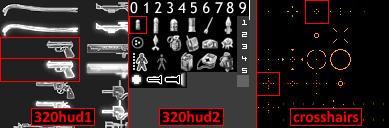
This article specifically provides you with a guided tour around the Half-Life code base, with a focus on showing all the different areas that you will need to consider when modifying existing weapons or adding new ones.
The weapon class hierarchy
We'll start by looking at one weapon, to see what the class hierarchy looks like:CCrowbar
└ CBasePlayerWeapon
└ CBasePlayerItem
└ CBaseAnimating
└ CBaseDelay
└ CBaseEntityCBaseEntity
This is the base class for all entities. There are a lot of virtual methods on this class, but only a few need to be considered when working with weapons.| Method | Details |
|---|---|
Precache | This is used to preload sounds, models, and graphics required for the weapon. Implemented by: all weapons |
Spawn | This is called when the map loads and will initialise everything required for the entity to function correctly in-game. For weapons, this typically means loading the weapon's model and anything else it needs. Implemented by: all weapons |
SetObjectCollisionBox | This is used to update the bounding box of the model, for pickup purposes. Aside from the tripmine, all weapons use the default bounding box. Implemented by: tripmine |
Save & Restore | Save and Restore are key methods for all entities, and this is no different for weapons. If a weapon has custom fields that need to be persisted across saves, then both of these methods should be implemented. Notably, this is only implemented on the server DLL, not the client (using #ifndef CLIENT_DLL directives). Implemented by: shotgun, rpg, gauss, egon, satchel |
CBasePlayerItem
This is the base class for "items" that the player has in their inventory that can be selected using the HUD and used by the player. However, in the final release of Half-Life, this only applies to weapons. Because of this, onlyCBasePlayerWeapon directly derives from this class. This class does, however, contain a lot of functionality relevant to weapons.
| Method | Details |
|---|---|
AddToPlayer | This method is called when the weapon is added to the player, and the player doesn't already have the weapon in their inventory. Most weapons override this method in order to send a custom message to the client, so it can be displayed on the HUD. Implemented by: all weapons except for weapons that are their own ammo (crowbar, snarks, grenades and tripmines) |
AddDuplicate | This method is called when the weapon is picked up by the player, but they already have the weapon in their inventory. Since this typically just adds extra ammo, it rarely needs to be changed. The satchel has a special code to ensure that the number of thrown unexploded satchels is accounted for before allowing the additional ammo to be picked up. Implemented by: satchel |
CanDeploy | This method tests if a weapon can be selected using the HUD. The default implementation will return FALSE if the player has no ammo for the weapon. Satchels have a custom implementation so the player can select the detonator if there are unexploded satchels in the level. Implemented by: satchel |
CanHolster | This method tests if a weapon can be switched out by selecting a different weapon. In most cases, this is always TRUE. However, the RPG and grenade have custom code in order to prevent the current weapon from changing while a rocket is in flight, or a grenade is primed. Implemented by: RPG, grenade |
Deploy | This function is called when the weapon should be "taken out" and equipped by the player. Implemented by: all weapons |
GetItemInfo | This function is called to fetch information about the weapon such as name, ammo type, maximum clip sizes, and other properties. The data is sent to the client. All weapons should implement this method. Implemented by: all weapons |
Holster | This function is called when the weapon should be "put away", in order for a different one to be equipped. Implemented by: all weapons that have a custom "put away" animation |
iItemSlot | This method returns the "slot" in the HUD that the weapon fits into. In the default HUD, the valid slot numbers are from 1 to 5. Implemented by: all weapons |
SecondaryAmmoIndex | This method should be implemented if the secondary fire uses a different ammo type than the primary ammo type. In Half-Life, only the MP5 fits this category. Implemented by: MP5 |
CBasePlayerWeapon
This is the base class that all weapons inherit. Your custom weapon will almost certainly inherit directly from this class as well.| Method | Details |
|---|---|
IsUseable | This method determines if the weapon can be fired. By default, this will be FALSE if there is no ammo in the clip. Satchels have a custom implementation as the detonator can be fired even when the player has no satchel ammo. The hornet gun also has a custom implementation, as it recharges its own ammo automatically. Implemented by: satchel, hornet gun |
PrimaryAttack | This method is called when the player presses the primary fire button (usually mouse1). Implemented by: all weapons |
Reload | This method is called when the player presses the reload button (usually R). Implemented by: weapons with a clip that can be reloaded - including the hornet gun, even though it "reloads" automatically |
SecondaryAttack | This method is called when the player presses the secondary fire button (usually mouse2). Implemented by: all weapons with a secondary fire |
ShouldWeaponIdle | This method should return TRUE if WeaponIdle should be called even if the weapon is being fired or reloaded. This is typically not what you want, however, if you need to perform a particular operation every frame, it might be useful. The RPG uses this method to ensure the laser spot is continuously updated. Implemented by: RPG |
WeaponIdle | This method is called after every frame if the weapon is not firing or reloading. Typically, this is used to play idle animations for the weapons. Implemented by: weapons with an idle animation |
Other weapon references
Aside from the main classes for weapons, weapons are referenced in several other areas of the code, as well as game resources. To fully set up a custom weapon, all of these must be considered in your changes.Code: Weapon ID
If you open weapons.h, you'll find this block of code defining an ID for each weapon:#define WEAPON_NONE 0
#define WEAPON_CROWBAR 1
#define WEAPON_GLOCK 2
#define WEAPON_PYTHON 3
#define WEAPON_MP5 4
#define WEAPON_CHAINGUN 5
#define WEAPON_CROSSBOW 6
#define WEAPON_SHOTGUN 7
#define WEAPON_RPG 8
#define WEAPON_GAUSS 9
#define WEAPON_EGON 10
#define WEAPON_HORNETGUN 11
#define WEAPON_HANDGRENADE 12
#define WEAPON_TRIPMINE 13
#define WEAPON_SATCHEL 14
#define WEAPON_SNARK 15Spawn method to set m_iId, and in the GetItemInfo method to set the p->iId value. Refer to an existing weapon's implementation to see these in use - for example, the glock:
void CGlock::Spawn( )
{
    // code
    m_iId = WEAPON_GLOCK;
    // more code
}

int CGlock::GetItemInfo(ItemInfo *p)
{
    // code
    p->iId = m_iId = WEAPON_GLOCK;
    // more code
}
Code: Client side changes
Most of the "real work" with a weapon is done on the server - bullets are fired, ammo counts are changed, and damage is done. However, the client-side also needs to do some work in order for a weapon to function correctly - typically, this is playing the "shoot" sound, applying bullet decals, ejecting empty shells, and similar audio-visual effects that the server doesn't particularly need to care about. Here's a quick rundown of what client code needs to be changed when programming with weapons.If you search the rest of the code base for the ID constants (for example,
WEAPON_GLOCK), you'll find only one other reference. It's in hl_weapons.cpp, in a method named HUD_WeaponsPostThink:
case WEAPON_GLOCK:
    pWeapon = &g_Glock;
break;g_Glock for your weapon, as well as the HUD_PrepEntity call. All this code is in the hl_weapons.cpp file in the client project.If you look at the code for existing weapons, you'll find lines that look like these:
// In the Precache method
m_usFirePython = PRECACHE_EVENT( 1, "events/python.sc" );

// In the PrimaryAttack (or similar) method
PLAYBACK_EVENT_FULL( flags, m_pPlayer->edict(), m_usFirePython, 0.0, (float *)&g_vecZero, (float *)&g_vecZero, vecDir.x, vecDir.y, 0, 0, 0, 0 );If you search for
python.sc in the code, you'll only find it in two places. The first is in the weapon code, in the PRECACHE_EVENT call. The other is in hl_events.cpp, in a method called Game_HookEvents. If you look at the comments for Game_HookEvents, you can see a helpful explanation from a Valve programmer about why the contents of the .sc file aren't used.Anyway, simply declare your event method in the
extern "C" block at the top of this file, and then a gEngfuncs.pfnHookEvent call for your weapon/event inside Game_HookEvents. Next, grab one of those event function names, such as EV_FirePython, and do another search to see what you find.Aside from the hl_events.cpp file you've just changed, the only other place these functions are found is the ev_hldm.cpp file. There's another
extern "C" block to put the function definition in and then the function implementations later on in the file. Your best bet is to copy an existing method and tweak it to suit your weapon.
Code: Weights (for auto-switching)
Back in weapons.h, you'll find another block of defines:#define CROWBAR_WEIGHT 0
#define GLOCK_WEIGHT 10
#define PYTHON_WEIGHT 15
#define MP5_WEIGHT 15
#define SHOTGUN_WEIGHT 15
#define CROSSBOW_WEIGHT 10
#define RPG_WEIGHT 20
#define GAUSS_WEIGHT 20
#define EGON_WEIGHT 20
#define HORNETGUN_WEIGHT 10
#define HANDGRENADE_WEIGHT 5
#define SNARK_WEIGHT 5
#define SATCHEL_WEIGHT -10
#define TRIPMINE_WEIGHT -10Essentially, the weight defines if a weapon that has been picked up is "better" than the weapon that is currently equipped. If the weight is higher, the new weapon will be automatically equipped. Otherwise, it will be added to the player's inventory and they will have to switch to it themselves. The weight value is assigned to
p->iWeight in the GetItemInfo method.
Code: Ammo constants
Still in weapons.h, after the weights you'll find 4 blocks of defines for ammo limits:#define _9MM_MAX_CARRY 250
//
#define GLOCK_MAX_CLIP 17
//
#define GLOCK_DEFAULT_GIVE 17
//
#define AMMO_GLOCKCLIP_GIVE GLOCK_MAX_CLIPMAX_CARRY constant. If you're adding a new ammo box type, you should define a new AMMO_GIVE constant. For new weapons, define both MAX_CLIP and DEFAULT_GIVE constants:
MAX_CLIP- If your weapon has a reload function, this should be the size of the clip. Otherwise, set it toWEAPON_NOCLIP.DEFAULT_GIVE- Set this to the amount of ammo the player will be given when they pick up the weapon.
Code: Weapon precaching
In weapons.cpp, you'll find a function calledW_Precache. This method will, as you might expect, precache the weapons when a level is loaded. Simply add lines for each new weapon (and ammo box) entity you add to your mod. For example, for the glock:
UTIL_PrecacheOtherWeapon( "weapon_9mmhandgun" );
UTIL_PrecacheOther( "ammo_9mmclip" );UTIL_PrecacheOtherWeapon and UTIL_PrecacheOther is a class name. This is the class name as defined in the LINK_ENTITY_TO_CLASS line in your weapon code. If your weapon has multiple class names (e.g. the glock is both weapon_glock and weapon_9mmhandgun) it does not have to be precached twice. All these methods do is create an entity of that classname, call the Precache() method on it, and remove the entity.
Code: New ammo types
It's easiest to use the existing ammo types for your new weapons, but usually, you'll probably want to add new types. This requires making a sequence of changes across multiple files. This will be covered in depth in the Custom Ammo Types article, but a quick summary would be:- In cbase.h, in the class definition for
CBaseEntity, add a field for your ammo type (afterint ammo_argrens;) - You'll need to define some skill cvars for the damage done by the new ammo types.
- Go into game.cpp and create new cvars by copying the existing ones for a different ammo type and changing the names.
- Still in game.cpp, make sure the new cvars are registered in the
GameDLLInitmethod, using theCVAR_REGISTERmacro. - In skill.h, add new
floatvariables forplrDmgNewAmmoType. - In gamerules.cpp, in the
RefreshSkillDatamethod, add code to set the value ofplrDmgNewAmmoTypeusing theGetSkillCvarmethod and the name of your new cvar. - Add the default values for the new cvars in the skill.cfg file.
- If your ammo type is a bullet, and you plan on using the
FireBulletsPlayerfunction:- Find the
Bulletenum in both weapons.h and ev_hldm.h and add your new bullet type to it. - Add code to handle your new bullet type to combat.cpp, in the
FireBulletsPlayerfunction.
- Find the
- If your ammo type isn't a bullet or you're not using
FireBulletsPlayer, you'll need special handling for handling damage in each weapon's code. - Create new ammo box entities so the player can pick up some of your new type of ammo. Be sure to define new
MAX_CARRYandAMMO_GIVEconstants in weapons.h while doing this. - Make the client-side changes:
- In ev_hldm.cpp, add your new bullet type to
EV_HLDM_DecalGunshotandEV_HLDM_FireBullets. Eventually, it'll end up in theEV_YourNewWeaponFirefunction too. - Your ammo count needs to be transferred to the client as well, which requires changing
UpdateClientDatain client.cpp andHUD_WeaponsPostThinkin hl_weapons.cpp. Since new fields can't be added, you'll need to use one of theuservariables. Be careful, because Valve already used a bunch of them - you can only use the ones that aren't currently used.
- In ev_hldm.cpp, add your new bullet type to
Code: Ammo boxes
If you want to add a new ammo box, it's actually very simple. Just copy and paste an existing ammo box, change properties like the model, the pickup sound, ammo types or numbers, and link it to a new class name. For full details, see the Zoomable Weapons article, which has a section on adding custom ammo types.Code: Skill settings
Skill settings let your weapon do more (or less) damage based on the selected difficulty. If your weapon uses standard bullets, then your skill values should come from the ammo's skill values. But other weapons have their own custom skill values.Skill cvars are defined game.cpp:
// Shotgun buckshot
cvar_t    sk_plr_buckshot1 = {"sk_plr_buckshot1","0"};
cvar_t    sk_plr_buckshot2 = {"sk_plr_buckshot2","0"};
cvar_t sk_plr_buckshot3 = {"sk_plr_buckshot3","0"};GameDLLInit method:
// Shotgun buckshot
CVAR_REGISTER ( &sk_plr_buckshot1 );// {"sk_plr_buckshot1","0"};
CVAR_REGISTER ( &sk_plr_buckshot2 );// {"sk_plr_buckshot2","0"};
CVAR_REGISTER ( &sk_plr_buckshot3 );// {"sk_plr_buckshot3","0"};skilldata_t struct, in skill.h:
float plrDmgBuckshot;RefreshSkillData method:
// Shotgun buckshot
gSkillData.plrDmgBuckshot = GetSkillCvar( "sk_plr_buckshot");GetSkillCvar method will select the value for 1, 2, or 3, based on whether the user has selected easy, medium, or hard (in that order) when they started the game.These cvars have a default value of 0, so that needs to be changed. When the game starts, the skill.cfg file is loaded and the cvar values are read from them. The actual values for the skill cvars should be added to this file.
// Shotgun buckshot
sk_plr_buckshot1    "5"
sk_plr_buckshot2    "5"
sk_plr_buckshot3 "5"RefreshSkillData method:
// Shotgun buckshot
gSkillData.plrDmgBuckshot = 20;FireBulletsPlayer function is called, which has the following code:
case BULLET_PLAYER_BUCKSHOT:
    pEntity->TraceAttack(pevAttacker, gSkillData.plrDmgBuckshot, vecDir, &tr, DMG_BULLET);
    break;
Code: Impulse 101
Something that isn't always immediately obvious is that you want your weapon to be added when you run theimpulse101 command in the console. Adding this is fairly straightforward if you know where to look - in player.cpp, find the CheatImpulseCommands function. towards the top of that function, you'll see a bunch of GiveNamedItem calls under the case 101: statement. Simply add another GiveNamedItem call with your weapon's classname, and you're good to go.
Code: func_breakable
Another option that might be forgotten about is allowing the weapon (and your new ammo, if applicable) to be placed inside a func_breakable entity. You can find the relevant code in func_break.cpp, near the top of the file. Add your desired classnames to theCBreakable::pSpawnObjects array, and you're done. Be sure to make the relevant changes to the FGD as well!
Resources: Weapon models and sounds
This should be obvious, but when you're adding a new model, you'll need new models and sounds. Weapons generally have two models:- A lower-detail "world" model, which is what you see when the weapon is lying on the ground, prior to pickup.
- A higher-detail "view" model, which is what you see when the player is holding and shooting the weapon.
$sequence "shoot" "shoot" fps 25 { event 5001 0 "11" }
$sequence "shoot_empty" "shoot_empty" fps 25 { event 5001 0 "11" }
$sequence "reload" "reload" fps 18 { event 5004 4 "items/9mmclip2.wav" } { event 5004 23 "items/9mmclip1.wav" }
$sequence "reload_noshot" "reload_noshot" fps 18 { event 5004 4 "items/9mmclip2.wav" } { event 5004 23 "items/9mmclip1.wav" }event syntax. It looks like this:
{ event event_id frame_number event_options }HUD_StudioEvent function:
switch( event->event )
{
    case 5001:
        gEngfuncs.pEfxAPI->R_MuzzleFlash( (float *)&entity->attachment[0], atoi( event->options) );
        break;
    case 5011:
        gEngfuncs.pEfxAPI->R_MuzzleFlash( (float *)&entity->attachment[1], atoi( event->options) );
        break;
    case 5021:
        gEngfuncs.pEfxAPI->R_MuzzleFlash( (float *)&entity->attachment[2], atoi( event->options) );
        break;
    case 5031:
        gEngfuncs.pEfxAPI->R_MuzzleFlash( (float *)&entity->attachment[3], atoi( event->options) );
        break;
    case 5002:
        gEngfuncs.pEfxAPI->R_SparkEffect( (float *)&entity->attachment[0], atoi( event->options), -100, 100 );
        break;
    case 5004:
        gEngfuncs.pfnPlaySoundByNameAtLocation( (char *)event->options, 1.0, (float *)&entity->attachment[0] );
        break;
    default:
        break;
}Weapon sounds are fairly straightforward - you should have sounds for shooting, reloading, and so on. There's nothing special about them aside from the standard audio encoding settings that the engine needs.
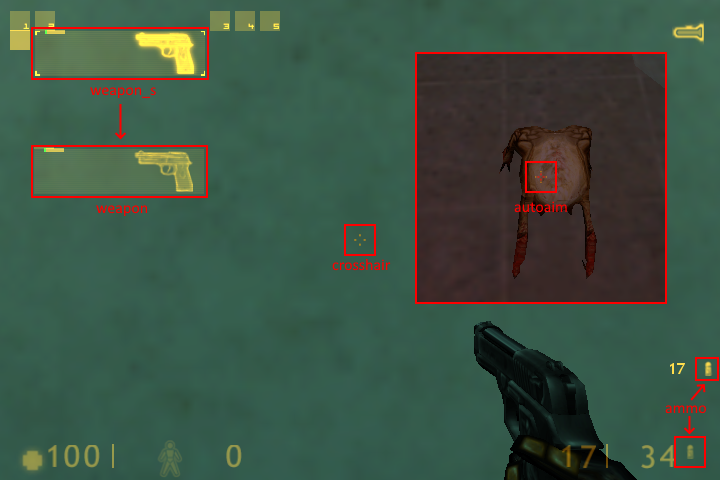
Resources: HUD sprites
Setting up HUD sprites is a bit of a pain because they're defined in "sprite sheets" inside the hud sprites. Each weapon has a text file inside the sprites folder which matches the weapon's entity name, as defined inpszName in the weapon's GetItemInfo function.The text file has a relatively simple format. The first line is the number of lines in the file, not counting the first line. Subsequent lines are formatted like so:
type hud_size filename x y width height- type: The type of sprite the line is describing. The HUD code has a predefined list for each type:
weapon- The image of the weapon in the HUD (as seen when switching between weapons)weapon_s- The image of the weapon in the HUD when it's "selected"ammo- The ammo icon displayed in the ammo counter, as well as in the item pickup logammo2- The secondary ammo icon displayed in the ammo counter, as well as in the item pickup logcrosshair- The standard crosshair for the weaponautoaim- The autoaim crosshair for the weapon (when autoaim is enabled, and pointing at an enemy)zoom- The crosshair for the weapon when it's zoomed in (for weapons that zoom, e.g. the crossbow)zoom_autoaim- The autoaim crosshair for the weapon when it's zoomed in
- hud_size: Either 320 or 640. The "320" HUD is used for smaller resolutions. For maximum compatibility, all icons should be defined at both resolutions.
- filename: The name of the sprite sheet file that the icon is found in, without the sprites/ prefix or the .spr suffix.
- x: The X coordinate of the top-left pixel of the icon inside the sprite sheet
- y: The Y coordinate of the top-left pixel of the icon inside the sprite sheet
- width: The width of the icon, in pixels
- height: The height of the icon, in pixels
10
weapon        320 320hud1      0    40    80    20
weapon_s      320 320hud1      0    60    80    20
ammo          320 320hud2      0    16    18    18
crosshair     320 crosshairs   24    0    24    24
autoaim       320 crosshairs   0    72    24    24
weapon        640 640hud1      0    45    170   45
weapon_s      640 640hud4      0    45    170   45
ammo          640 640hud7      0    72    24    24
crosshair     640 crosshairs   24    0    24    24
autoaim 640 crosshairs 0 72 24 24Resources: FGD definitions
The last thing to worry about when adding any new entities to the game is to modify the FGD so you can use it in your level editor. For weapons and ammo boxes, this is pretty simple - just copy an existing one and change the names. Weapons and ammo don't typically have any special keyvalues, so they'll be one-liners.@PointClass base(Weapon, Targetx) studio("models/w_9mmhandgun.mdl") = weapon_9mmhandgun : "9mm Handgun" []
@PointClass base(Weapon, Targetx) studio("models/w_9mmclip.mdl") = ammo_9mmclip : "9mm Pistol Ammo" []- Categories
- Tutorials
- Programming
- Goldsource Tutorials
- Article Credits
-
 Penguinboy
–
Original author
Penguinboy
–
Original author
Comments
You must log in to post a comment. You can login or register a new account.