Half-Life Programming - Getting Started Last edited 3 years ago2021-12-01 16:36:20 UTC
You are viewing an older revision of this wiki page. The current revision may be more detailed and up-to-date.
Click here to see the current revision of this page.
Half-Life Programming
- Half-Life Programming - Getting Started
- Half-Life Programming - Debugging
While developing your mod, you might end up wanting to modify the built-in entities or add entirely new ones, add weapons or NPCs, make changes to the HUD, or a number of other things that require using the Half-Life SDK to update your mod's code. This book (once complete) attempts to guide you through most of the common changes you might want to make.
With that out of the way, let's get started!
If you would like to learn more about using Git, visit: https://git-scm.com/book
The summary of your options is basically:
Linux users: Valve's default repository require some files to be updated in order to work properly, existing code might require an update as well on modern GCC/G++ versions. It's recommended that you use the
Mac users: Just follow the Linux instructions and hope it works. OSX likes to break things and Valve doesn't like to fix them, so it's possible Half-Life just doesn't run at all any more due to OSX dropping support for 32-bit applications.
Once you've chosen which repository to get, use Git to clone it by running this on the command line (substitute the URL for the repository you want to use):
Based on your decision on which repository and VS version you'll be using, these instructions will be different. However, this guide assumes you're using the latest version of VS2019. 2017 is extremely similar, whereas 2010 is a little different, but mostly only when you're installing - after that, it's much the same.
The free Community edition of VS can be downloaded here: https://visualstudio.microsoft.com/downloads/
When installing, make sure you select Desktop development with C++ in the workloads section. Make sure the following optional components are selected as well, in the Individual components section:
Then restart Steam to get it to appear in the game list.
The important things to note in the liblist.gam file are:
This change will simply print
Now let's make sure they worked properly. Start your build by following the instructions above, and copy the compiled binaries into to the correct place in your mod.
Before you launch the mod, make sure that you go into the launch properties in Steam (right click on mod > Properties... > Set launch options...) and set them to
Assuming everything is working, you should see the messages appear somewhere in the console (there's a lot of messages, so don't miss them!).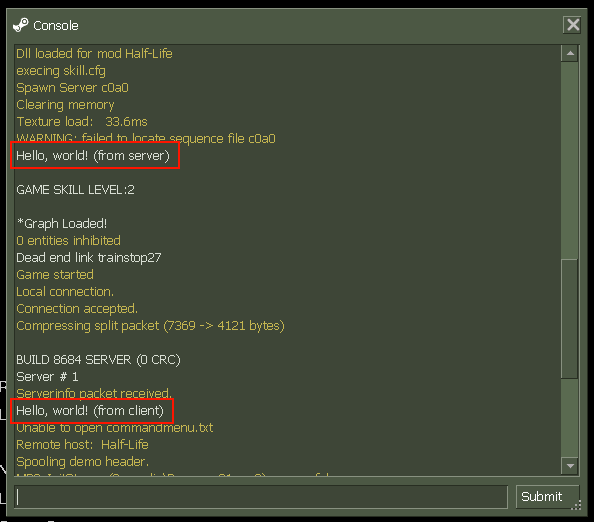 If you see the message, you're all set up!
What you will need
First of all, you'll need to get your programming environment set up. In Windows, this is Visual Studio. Don't try and avoid it, you need it. On other platforms, use the editor of your choice, as the approach is quite a bit different to Windows.Git
If you've done any programming, you probably already know how to use Git, or at least are familiar with it. Make sure Git is installed on your computer before you continue. On Windows, download Git from https://git-scm.com/. On Linux, you probably already have Git installed - otherwise, use your distribution's package manager to install it (e.g.sudo apt-get install git on Debian/Ubuntu, adapt the command if you use another Linux distribution).If you would like to learn more about using Git, visit: https://git-scm.com/book
The Half-Life SDK
You have a few options here. Valve's official SDK is hosted on GitHub - if you want to start from the official base, then this is the code you need. However, the project is configured for Visual Studio 2010 only, and the newer versions are easier to find and use. A lot of people have forked the Valve repository and make various updates to it - such as fixing the code and project files to work properly with newer versions of VS. TWHL member Solokiller has such a fork called halflife-updated which updates the project to support new versions of Visual Studio and GCC/G++, as well as some changes to reduce the number of warnings or potential issues. This is the repository that these guides will be referencing. Each tutorial has a branch in this fork of halflife-updated, which is maintained by Penguinboy for the purposes of this guide.The summary of your options is basically:
- Valve's official repository - https://github.com/ValveSoftware/halflife
- Pros: It's official
- Cons: You must use VS2010, or go through the migration process to VS2019 manually, Linux requires some files to be updated before they'll work and updating the existing code might be required on modern GCC/G++ versions
- Solokiller's
halflife-updatedrepository - https://github.com/Solokiller/halflife-updated- Pros: VS2017 and VS2019 support, modern GCC/G++ support
- Cons: It's not official (but it's trustworthy, you can see the changes that were made)
halflife-updated repository - however, all of the changes will work in any version of Visual Studio.Linux users: Valve's default repository require some files to be updated in order to work properly, existing code might require an update as well on modern GCC/G++ versions. It's recommended that you use the
halflife-updated repository as well.Mac users: Just follow the Linux instructions and hope it works. OSX likes to break things and Valve doesn't like to fix them, so it's possible Half-Life just doesn't run at all any more due to OSX dropping support for 32-bit applications.
Once you've chosen which repository to get, use Git to clone it by running this on the command line (substitute the URL for the repository you want to use):
git clone https://github.com/Solokiller/halflife-updated.gitVisual Studio
Linux/Mac users: Obviously this doesn't apply to you. However, you do need to install some things, if you don't already have them. This command will take care of that:sudo apt-get install build-essential gcc-multilib g++-multilib. This is for 64-bit Ubuntu/Debian, you will need to change this command to suit your own distro if required.Based on your decision on which repository and VS version you'll be using, these instructions will be different. However, this guide assumes you're using the latest version of VS2019. 2017 is extremely similar, whereas 2010 is a little different, but mostly only when you're installing - after that, it's much the same.
The free Community edition of VS can be downloaded here: https://visualstudio.microsoft.com/downloads/
When installing, make sure you select Desktop development with C++ in the workloads section. Make sure the following optional components are selected as well, in the Individual components section:
- Windows 10 SDK (only the latest version)
- MSVC v142 - VS 2019 C++ x64/x86 build tools (only the latest version)
- If you want Windows XP support, select:
- MSVC v141 - VS 2017 C++ x64/x86 build tools
- C++ Windows XP Support for VS2017 (v141) tools [Deprecated]
Your first compile
Now that your environment is set up, let's compile the project and make sure the changes work in your mod. If you've not set up a mod already, do it now. The key is to make a liblist.gam file. Here's mine:game "Test Mod"
hlversion "1110"
type "singleplayer_only"
startmap "c0a0"
trainmap "t0a0"
allowspectators "0"
mpentity "info_player_deathmatch"
gamedll "dlls/hl.dll"
gamedll_linux "dlls/hl.so"
cldll "1"cl_dlls and dlls directories.Then restart Steam to get it to appear in the game list.
The important things to note in the liblist.gam file are:
- gamedll - this needs to be set to get custom code loading properly. If you like, you can change the name of your DLL to something else.
- gamedll_linux - same as above, for Linux.
- cldll - set this to 1 in order to get custom client-side code to load properly. You can't change the name of the client DLL.
How to compile
How to compile will depend on which operating system you're on. See the section below that's appropriate for you:Windows (Visual Studio)
- Before your first compile, go into the properties of each project in the solution and make sure the Windows SDK Version and Platform Toolset settings are configured correctly for the tools that you have installed.
- For XP support, the platform tools should be v141_xp. Otherwise, it should be either v141 (VS2017) or v142 (VS2019).
- The Windows SDK Version doesn't matter, you just need one installed for it to work. Drop down the box and select one that you have installed - if one of the options is "Latest installed version", select that.
- In Visual Studio, press
Ctrl+Shift+Bor go to Build -> Build Solution. Wait for it to finish. - Next, you'll need to copy the DLL files into your mod. The hl.dll file goes into the mod's dlls folder, and client.dll goes into the cl_dlls folder. You'll find them here:
- halflife-updated\projects\vs2019\Debug\hldll\hl.dll
- halflife-updated\projects\vs2019\Debug\hl_cdll\client.dll
- Run your mod and hope it works!
Linux (make)
These instructions are for thehalflife-updated repository - if you're using Valve's official repository, it's going to be tough to get Linux going, because some files require an update as well as some code changes for modern GCC/G++ versions to work.
- If you haven't already, install the dependencies you'll need to build. This is what you'll need to run in a terminal to get everything needed:
sudo apt-get install build-essential gcc-multilib g++-multilib. - In a terminal, navigate to the linux folder of the repository, and run
make. Wait for it to finish. - The compiled files are in the linux/release folder. Copy hl.so into you mod's dlls folder, and client.so into the cl_dlls folder.
- Run your mod and hope it works!
Making your first changes
Let's make a small change to make sure everything is working properly. Open world.cpp inside the hldll project and find the methodvoid CWorld :: Precache( void ). Let's add a line to the beginning of this:
Before:
void CWorld :: Precache( void )
{
    g_pLastSpawn = NULL;
    // .... more code
After:
void CWorld :: Precache( void )
{
    ALERT(at_console, "Hello, world! (from server)\n");
    g_pLastSpawn = NULL;
    // .... more code
Hello, world! to the console when any map is loaded. This is the server project, so let's make a similar change to the client project to make sure that's working as well. Open hud.cpp inside the hl_cdll project and find the method void CHud :: VidInit( void ). Here's the change to make here:
Before:
void CHud :: VidInit( void )
{
    m_scrinfo.iSize = sizeof(m_scrinfo);
    // .... more code
After:
void CHud :: VidInit( void )
{
    gEngfuncs.Con_Printf("Hello, world! (from client)\n");
    m_scrinfo.iSize = sizeof(m_scrinfo);
    // .... more code
Before you launch the mod, make sure that you go into the launch properties in Steam (right click on mod > Properties... > Set launch options...) and set them to
-console -dev. This ensures that you see developer messages in the console. Now launch your mod and start a new game.Assuming everything is working, you should see the messages appear somewhere in the console (there's a lot of messages, so don't miss them!).
- Categories
- Tutorials
- Programming
- Goldsource Tutorials
- Article Credits
-
 Penguinboy
–
Original author
Penguinboy
–
Original author
2 Comments
You must log in to post a comment. You can login or register a new account.
after eight months, i now have the build solution option. it doesn't work. my brain is fried
i was an idiot and didn't change the build path to where i actually want the dlls to go to