Tutorial: 3D Skyboxes Last edited 3 months ago2024-09-20 03:06:55 UTC
3D Skybox Basics
✔️ Download example VMFWhat is a 3D Skybox?
The Source engine has a lot of new features for mappers. One of these is the 3D skybox. 3D skyboxes enable the mapper to make the map to appear bigger than it really is - without increasing the compile time significantly.How does this Work?
The basic concept of a 3D skybox is that the skybox texture around the main part of your map displays, instead of a sky texture, a 3D environment seen from the point of view of a sky_camera entity. The sky_camera is inside its own 'minimap' surrounded by the skybox texture. The minimap is only 1/16th of the size of your normal map. it can contain whatever the mapper wants, for example entities, brushes, displacements or models. When compiled and played, the 3D skybox is scaled up by 16 so it appears to be full sized. Because its so small, any increase in compile times are minimal. For an example of a 3D skybox look at de_dust2 in Counter-Strike: Source.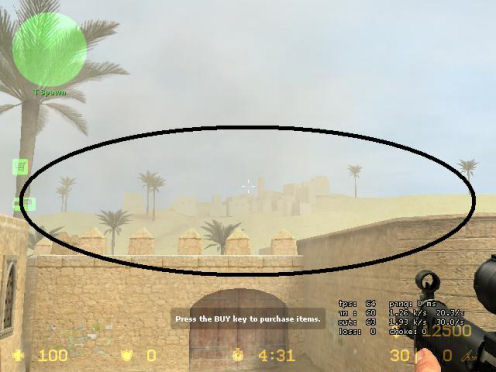 These buildings and trees...
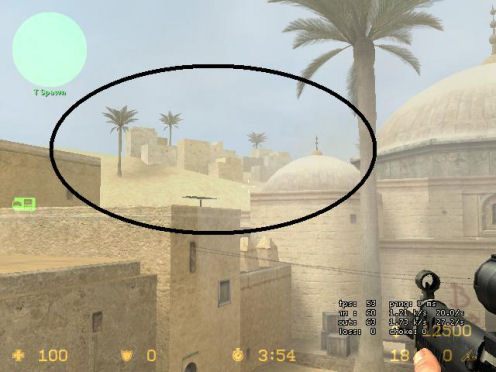 ...are all in the 3d skybox.
How to make a 3D skybox
Step 1: Make your mapObviously, a 3D skybox is only useful on outdoor maps, otherwise you wont be able to see it. For the example, I will be making a very simple map consisting of a floor with low walls all the way around it. IMPORTANT: Make your map around the co-ordinates 0,0,0. THIS IS VERY IMPORTANT! Your map must contain the 0,0,0 point. If you look at the grid in Hammer, you should see two very faint green lines, one going horizontally, and one going vertically. Where they meet is the point 0,0,0.
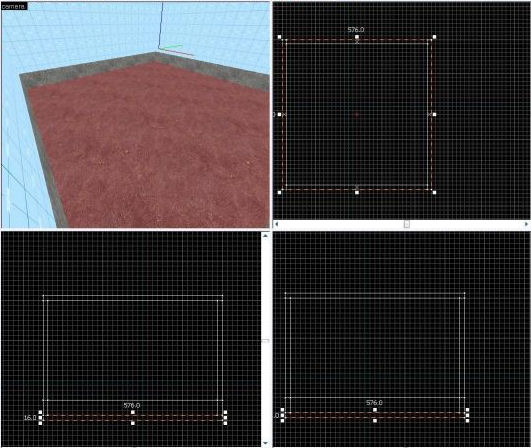 Starting with an empty room...
There are 3 entities that are nescessary for your 3D skybox to work:
1. info_player_start (anywhere)
2. light_environment (anywhere)
3. sky_camera (at 0,0,0)
It is very important that the sky_camera is placed at 0,0,0 or your skybox will be off-centre.
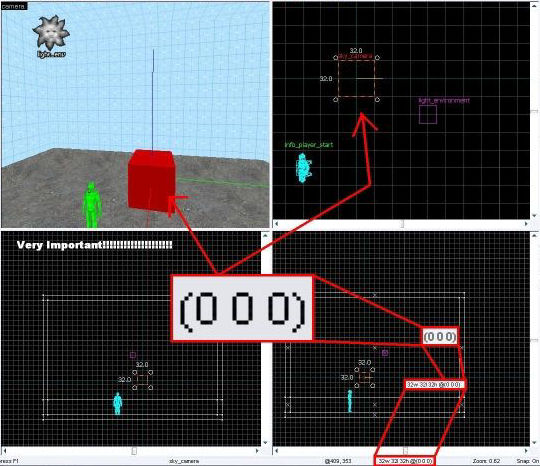 add the entities.
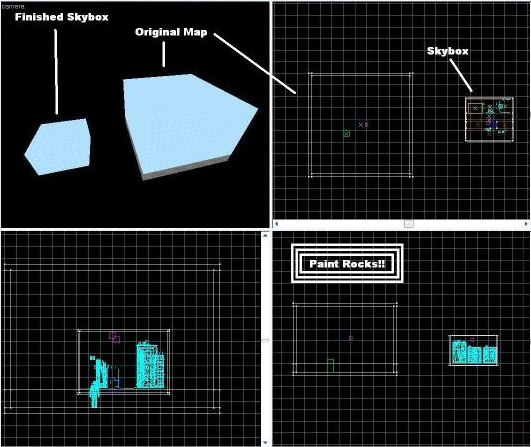
This is why I placed the walls around the floor. You need to find some brushes in your map to use as a reference to build your skybox around. Outer walls are usually the way to go - and sometimes the floor so you know high to make the skybox. Select the reference brushes and the sky_camera, hold shift, and drag it out of your map completely, making a copy. Keeping everything selected, go to tools -> transform, select the 'scale' radio button and type '0.0625' in all 3 x, y, and z text boxes and click OK. You should now have a very small version of your reference brushes, as well as another sky_camera.
Make sure you don't move the reference brushes or the sky_camera from now on. This sky_camera is the main one - it has to be in the right place as it is in relation to where 0,0,0 is in your map.
Step 4: Make the Skybox
For the example, I'll just make a simple skybox, but it can be as complex as you want. Use a brush or displacement for the ground - I'll use a brush. (you can uncheck the entity visgroup so you can work around the sky_camera). I've also put a nice road down (texture scale is 0.0625).
Next, some models. Don't use normal models unless you want a massive dumpster or something. Only use models with '_skybox' on the end. I've just gone into props_buildings and selected a few of the _skybox models. Remember: models are not necessary, but they add a nice touch. You'll be using the prop_static entity for stuff in the skybox. Also:
- A 3D skybox can not contain prop_physics and other physics entities, info_player_start, NPCs or monsters.
- A 3D skybox can be constructed with brushes, displacements, static and dynamic props, lights, brush entities, and point entities (such as env_sprite).
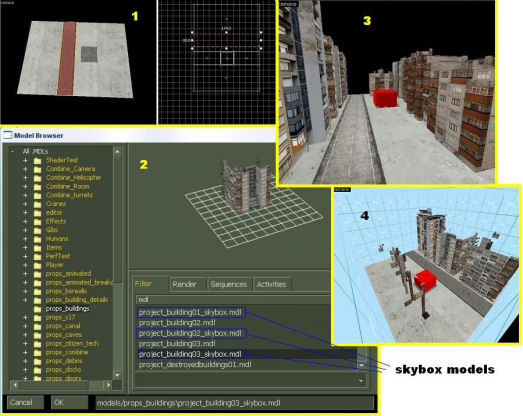 Use Skybox models to build your skybox.
These two steps are important:
1. delete the reference brushes from the skybox (or visgroup them)
2. delete the sky_camera from your original map (the one at 0,0,0) (or visgroup it)
Compile and gaze at your new 3D skybox!
 View from hammer
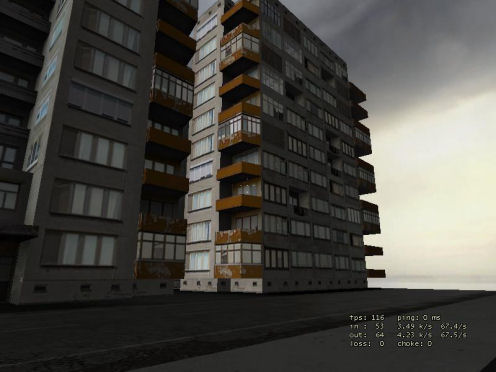 From in-game
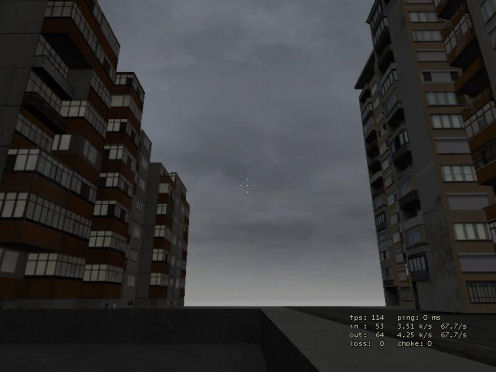 Another compiled screenshot
Applications
Of course, this example skybox is very basic, but the theory can be used in very creative ways. For example, say you were mapping a very long bridge. You could map the whole thing, and scale half down into a 3d skybox and make a level change to reduce lag. Also, the sky_camera entity itself has some useful properties including fog in the 3d skybox, and an option that lets you change the scale of the skybox - the default is 16.3D Skyboxes and Water
Skybox scaling can be very finicky: sometimes you'll notice that the scaled down stuff is off the grid, thus preventing you from lining up your skybox stuff properly. The most commmon area where this is a problem is the creation of seamless water. Here's a way to do it that can save you strife.- Create your map as usual and add your water brushes. Follow the tutorial up to the point of adding your extra brushes.
- Most of the time, your water brushes will be off the grid, so you won't be able to add the seamless bits without screwing everything. There's two things you can do here: you can either hold down alt while aligning the new brushes, which'll disable the snap to grid settings. You have to be very precise, however. The second method, which is a little harder but more accurate is to resize the water brushes in the 3D skybox so that they're on the grid. Try and match it to the exist shape. After you've done that, select the water and scale it up 16. Take this scaled up version of the water and place it into your map, making adjustments to the skybox where nessecary.
- Now you'll be able to make seamless water! As an added precaution, copy the water in your map and the sky_camera again and scale it down, just to make sure everything's aligned.
- Categories
- Tutorials
- Beginner Tutorials
- Mapping
- Source Tutorials
- Article Credits
-
 Penguinboy
–
Original author
Penguinboy
–
Original author
8 Comments
You must log in to post a comment. You can login or register a new account.
Sorry noob (new to source mapping) question - hard to see in the picture - you have the floor and a wall? then the skybox touches the walls completely? Seals map preventing leak? Then when in game the sky you're seeing the image from the little box is this correct?
How does doing it this way effect compiling times? Do you know?
also off topic do u have to pay for half-life 2 deathmatch to create your own server thx
also great tutorial
If i want to add displacements to my 3d skybox, do i add them before or after i shrink the whole thing down to .0625?
I also found that if you have your 3dskybox texture right next to a the same texture in your normal map, if you scale it to 1.00, it will match perfectly with your 3dskybox textures scaled .0625.
I also found "rounding" the outer edges of your 3dskybox makes it blend with the sky textures very well, i.e., you don't see a square on the horizon if the player is able to get up somewhere high to see the horizon.
)