Tutorial: Coding NPCs in GoldSrc Last edited 13 years ago2011-08-07 22:24:10 UTC
You are viewing an older revision of this wiki page. The current revision may be more detailed and up-to-date.
Click here to see the current revision of this page.
Download attachment
Since the dawn of Half Life, people have been making maps for it. Occasionally, models, or "reskins" were made. But in only a fraction of the mods were whole new NPCs made. The process is fairly easy, but not done too often. This tutorial will tell you how to do it, getting further into detail the farther you go.IMPORTANT: This tutorial requires you to have downloaded and installed the HLSDK and Visual C++ 6. If you haven't, you should, it's pretty fun to mess around with. You also need to know some C++ basics.
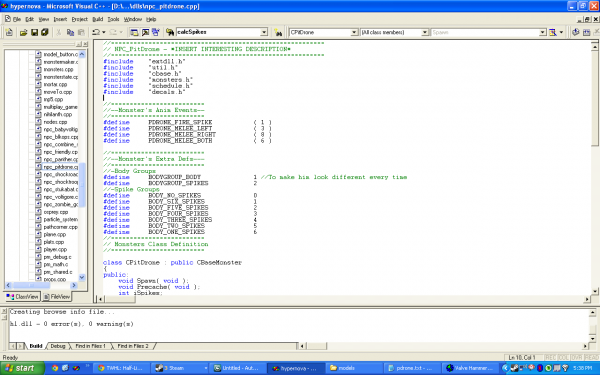 Visual C++ 6 - the world of coding starts here.
NPCs stand for Non-Player Characters. Without them, SP mods would be fairly bland (except if you're going for an Amnesia feel). They can be Marines, Scientists, aliens or even the cockroaches you see. Artificial Intelligence is the code behind it. Now, these NPCs usually use models (the visual representation of the NPCs) and send signals back and forth from the code to the models. For example, the code first tells the NPC to play a shooting animation, and then uses events to trigger certain...events. More about that later.
Now, on to the topic of Monster States, Schedules and Tasks. This is a system that Half Life uses to make NPC development easier and cleaner, as well as more efficient and better.
A monster state is how a monster feels. In the default HLSDK, these were MONSTERSTATE_NONE, MONSTERSTATE_IDLE, MONSTERSTATE_COMBAT, MONSTERSTATE_ALERT, MONSTERSTATE_HUNT, MONSTERSTATE_PRONE, MONSTERSTATE_SCRIPT, MONSTERSTATE_PLAYDEAD, and MONSTERSTATE_DEAD. These are all pretty self-explanatory except for Script and Prone. Prone is done when barnacles are eating their victims. Script is for Scripted Sequences and stuff.
Schedules are what the NPC wants to do, depending on his mood and certain set conditions. Tasks are the steps in each schedule for him to complete his goal. There are too many of either of these to mention, but the following two paragraphs contains a few notable ones. You can skip it, if you want. There's a list in the "schedules.h" file in the HLSDK's dlls folder. More of these can be defined in each monster, or types of monsters.
There are three types of attacks for each NPC, as well as two subtypes. There is Melee, Ranged, and Special. The subtypes are differentiated between by 1 and 2 after the names (IE: SCHED_MELEE_ATTACK1 and SCHED_MELEE_ATTACK2). SCHED_COMBAT_FACE tells the NPC to look at something. SCHED_COWER is something that the Scientist does a lot (after this tutorial, you can change that, though), and SCHED_TAKE_COVER_FROM_ENEMY, SCHED_TAKE_COVER_FROM_BEST_SOUND and SCHED_TAKE_COVER_FROM_ORIGIN are things all NPCs do (all self explanatory.) There's also SCHED_RELOAD for Marines.
There are tasks for each type of attack, as well as two NOTURN under each subtype. There's, of course, also a SCHED_RELOAD
NPCs use a GET_PATH system to understand where to go, while they use TASK_RUN_PATH or TASK_WALK_PATH to get there. Use TASK_WAIT to tell an NPC to do the next task AFTER the RUN or WALK_PATH tasks.
 Half-Life's A.I. was extraordinary for it's age. Can YOU master it?
So, now let's make an NPC. First, choose a base class. You could start with the CScientist (or some other cheap base, you lazy readers) if you really wanted to, but we'll go with CBaseMonster. For the lolz. Also, decide whether you want to start a new .cpp file (best choice for cleanliness, but requires a bit more space byte-wise (not too much), or to use the baseclass's .cpp file. You also should choose whether or not you want a seperate .h file (Seperating makes it harder to edit, but you can't include a .cpp file - just .h-es). Forgive me if it's a little blocky, but they ARE calling it blocks of code.
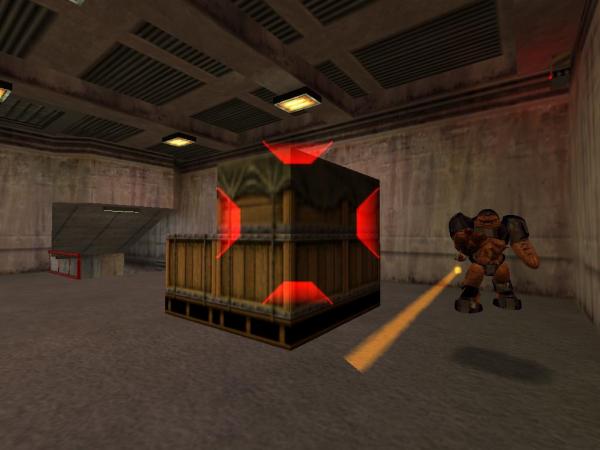
For the tutorial's sake, we'll go with a Pit Drone, from Opposing Force (really a great game), and Sven Coop (really a great mod). Be sure to insert all the sounds and models into their proper folders.
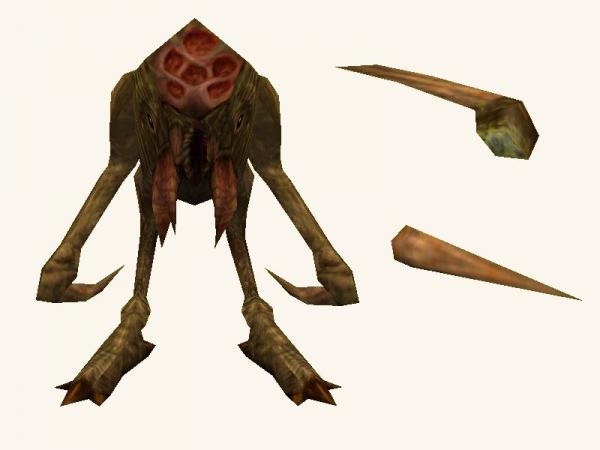 The models we'll work with - the main body, the launched spike, and gibs.
[blue]#include[/blue]	"extdll.h"
[blue]#include[/blue]	"util.h"
[blue]#include[/blue]	"cbase.h"
[blue]#include[/blue]	"monsters.h"
[blue]#include[/blue]	"schedule.h"
[blue]#include[/blue] "decals.h"Oh, and I forgot to mention. Above that, you can create a block of comments saying how awesome you are, though nobody will ever read it unless you release the code or show it to someone else. Use * * to create a block of comments (with all the contents in between) and use // to create a line of code (with the comments AFTER the //)
Now, you can go on and create some #defines to say values that you'll use a lot. Mainly numbers.
[green]//=========================
//--Monster's Anim Events--
//=========================[/green]
[blue]#define[/blue]		PDRONE_FIRE_SPIKE			( 1 )
[blue]#define[/blue]		PDRONE_MELEE_LEFT			( 3 )
[blue]#define[/blue]		PDRONE_MELEE_RIGHT			( 8 )
[blue]#define[/blue]		PDRONE_MELEE_BOTH			( 6 )
[green]//=========================
//--Monster's Extra Defs---
//=========================
//-Body Groups[/green]
[blue]#define[/blue]		BODYGROUP_BODY				1
[blue]#define[/blue]		BODYGROUP_SPIKES			2
[green]//-Spike Groups[/green]
[blue]#define[/blue]		BODY_NO_SPIKES				0
[blue]#define[/blue]		BODY_SIX_SPIKES				1
[blue]#define[/blue]		BODY_FIVE_SPIKES			2
[blue]#define[/blue]		BODY_FOUR_SPIKES			3
[blue]#define[/blue]		BODY_THREE_SPIKES			4
[blue]#define[/blue]		BODY_TWO_SPIKES				5
[blue]#define[/blue] BODY_ONE_SPIKES 6Afterwards, we have to body groups. if you've ever messed around in a HL Model Viewer (Which you should have by now - I suggest Jed's Half Life Model Viewer), you should know what this does. Body does nothing yet. It's there if you're a cool guy who wants to add some variation even to the aliens. There's also 6 bodys for the spike numbers. Next to it, it says how many there are (In the model, though, it goes 0, then 6, and then decreases to 1).
Okay, on to the "fun" stuff. Create the class. Type this hunk of code in. Or copy it. I'm a tutorial, not a cop:
[blue]class[/blue] CPitDrone : [blue]public[/blue] CBaseMonster
{
[blue]public:[/blue]
	[blue]void[/blue] Spawn( [blue]void[/blue] );
	[blue]void[/blue] Precache( [blue]void[/blue] );
	[blue]int[/blue] iSpikes;
	[blue]int[/blue] Classify ( [blue]void[/blue] );
	[blue]void[/blue] SetYawSpeed( [blue]void[/blue] );
};Okay, now to make him get into the game as an entity (so you can put him in, duh).
LINK_ENTITY_TO_CLASS( monster_pitdrone, CPitDrone );[blue]void[/blue] CPitDrone :: Spawn()
{
Precache( ); [green]// So the model loads[/green]
SET_MODEL(ENT(pev), "models/npcs/pit_drone.mdl"); [green]// So you can see him[/green]
UTIL_SetSize(pev, VEC_HUMAN_HULL_MIN, VEC_HUMAN_HULL_MAX); [green]// Let's make his size human. If you're smart enough (or have lots of patience) you can get replace the VEC_ stuff with "Vector( x, y, z)".[/green]
pev->solid = SOLID_SLIDEBOX; [green]// They see me slidin', they hating. This actually tells the engine for it to be Solid. Snakes can GTHO.[/green]
pev->movetype = MOVETYPE_STEP; [green]// 'cause monsters walk - they don't drive (Nightmares will follow)[/green]
m_bloodColor = BLOOD_COLOR_GREEN; [green]// Green blood - just like this comment. Freaked out much? (The blood's actually yellow, though)[/green]
pev->health = 100; [green]// Health - let's keep it as an integer, as opposed to a changeable variable for now.[/green]
pev->view_ofs = Vector ( 0, 0, 20 ); [green]// Eyes' offset (He sees you doing stuff you shouldn't)[/green]
m_flFieldOfView = 0.5; [green]// How far he can see.[/green]
m_MonsterState = MONSTERSTATE_NONE; [green]// Afet he spawns, make him sit there like an idiot, doing nothing.[/green]
MonsterInit(); [green]// Starts the monsters AI[/green]
iSpikes = 6; [green]// Default, he's fully loaded with spikes. AGAIN, NO PUNS YOU SICKOS![/green]
}[blue]void[/blue] CPitDrone :: Precache()
{
PRECACHE_MODEL("models/pit_drone_spike.mdl"); [green]//Loads the model for the spike[/green]
PRECACHE_MODEL("models/npcs/pit_drone.mdl"); [green]//Loads the NPC model in the game[/green]
[green]//Bunch of pretty self-explanatory sounds[/green]
PRECACHE_SOUND("pitdrone/pit_drone_melee_attack1.wav" );
PRECACHE_SOUND("pitdrone/pit_drone_melee_attack2.wav" );
PRECACHE_SOUND("pitdrone/pit_drone_attack_spike1.wav" );
PRECACHE_SOUND("pitdrone/pit_drone_eat.wav");
PRECACHE_SOUND("pitdrone/pit_drone_die1.wav");
PRECACHE_SOUND("pitdrone/pit_drone_die2.wav");
PRECACHE_SOUND("pitdrone/pit_drone_die3.wav");
PRECACHE_SOUND("pitdrone/pit_drone_hunt3.wav");
}[blue]int[/blue] CPitDrone :: Classify ( [blue]void[/blue] )
{
[blue]return[/blue] CLASS_ALIEN_MONSTER;
}
[blue]void[/blue] CPitDrone::SetYawSpeed( [blue]void[/blue] ) {
	pev->yaw_speed = 90;
}
 Say hi! Also, no matter how cool this looks, it's GoldSrc. You can find the Dev WAD I made myself [url=http://www.mediafire.com/?pqs6vhkbevk1pb9
Okay, you should have a monster sitting in your room...if you've added him to one. We'll go into detail in the next page! Stay tuned (Very cliché, I know).
If you approach the pitdrone right now, you should notice that he TRIED to attack back, even though nothing happens. He even chases you! This is thanks to our base - that's what's doing the work for us. In the QC (which you can find when you decompile a model), in the lines with the animations, you'll see some have ACT_s. These are invoked when necessary by the code.
Here's an example line. The act is in red.:
$sequence "range" "range" fps 30 [red]ACT_RANGE_ATTACK1[/red] 1 [blue]{ event 1 11 } { event 1008 1 "pitdrone/pit_drone_attack_spike1.wav" }[/blue]
On to the events. How do we get him to shoot while he's playing the event? First, add
[blue]void[/blue] HandleAnimEvent( MonsterEvent_t *pEvent );Schedule_t *GetSchedule( [blue]void[/blue] ); [green]// Handles some schedules[/green][blue]class[/blue] CPitDrone : [blue]public[/blue] CBaseMonster
{
[blue]public:[/blue]
[blue]void[/blue] Spawn( [blue]void[/blue] );
[blue]void[/blue] Precache( [blue]void[/blue] );
[blue]int[/blue] iSpikes;
[blue]int[/blue] Classify ( [blue]void[/blue] );
[blue]void[/blue] SetYawSpeed( [blue]void[/blue] );
[blue]void[/blue] HandleAnimEvent( MonsterEvent_t *pEvent );
Schedule_t *GetSchedule( [blue]void[/blue] ); [green]// Handles some schedules[/green]
};[blue]class[/blue] CPitDroneSpike : [blue]public[/blue] CBaseEntity
{
[blue]public:
void[/blue] Spawn( [blue]void[/blue] );
[blue]void[/blue] Touch( CBaseEntity *pOther );
Vector waterSpeed;
};
LINK_ENTITY_TO_CLASS( pitdrone_spike, CPitDroneSpike );
[blue]void[/blue] CPitDroneSpike :: Spawn( [blue]void[/blue] )
{
Precache();
pev->solid = SOLID_SLIDEBOX;
pev->movetype = MOVETYPE_FLY;
pev->classname = MAKE_STRING( "pitdrone_spike" );
SET_MODEL( ENT(pev), "models/npcs/pit_drone_spike.mdl");
}
[blue]void[/blue] CPitDroneSpike :: Touch ( CBaseEntity *pOther )
{
[blue]if[/blue] ( !pOther->pev->takedamage ) {
[green]// If the entity doesn't take damage[/green]
[blue]if[/blue] (UTIL_PointContents(pev->origin) == CONTENTS_WATER)
{
pev->velocity = waterSpeed; [green]// Go slower while in water[/green]
}
[blue]else[/blue] {
pev->solid = SOLID_NOT;
pev->movetype = MOVETYPE_FLY;
pev->velocity = Vector( 0, 0, 0 );
UTIL_Sparks( pev->origin );
EMIT_SOUND( ENT(pev), CHAN_VOICE, "npcs/pitdrone/pit_drone_eat.wav", 1, ATTN_NORM );
}
}
[blue]else[/blue] {
[green]// If it does take damage[/green]
pOther->TakeDamage ( pev, pev, gSkillData.pitdroneSpikeDmg, DMG_GENERIC ); [green]// Give damage to whatever it is[/green]
UTIL_Remove( [blue]this[/blue] ); [green]// Remove it[/green]
}
}
[blue]void[/blue] CPitDrone :: HandleAnimEvent( MonsterEvent_t *pEvent ) { [blue]switch[/blue] ( pEvent->event ) {
[blue]case[/blue] PDRONE_RELOAD:
{
iSpikes = 6;
SetBodygroup( BODYGROUP_SPIKES, 1 );
[blue]break[/blue];
}
Get ready, here's the second case that shoots the spike, and it's long as hell.
[blue]case[/blue] PDRONE_FIRE_SPIKE:
	{
		[green]// Define the vectors - an offset and a direction[/green]
		Vector	vecspikeOffset;
		Vector	vecspikeDir;

		[green]// This stores pev->angles into 3 vectors, v_forward, v_up, and v_right, so we can use them in offsets.[/green]
		UTIL_MakeVectors ( pev->angles );

		[green]// Move the origin to a relative offset[/green]
		vecspikeOffset = ( gpGlobals->v_forward * 22 + gpGlobals->v_up * 40 );

		[green]// Now make the origin absolute, by adding the monster's origin[/green]
		vecspikeOffset = ( pev->origin + vecspikeOffset );

		[green]// Setting the Direction, by taking the enemy's origin and view offset (so we hit him in his head, not his feet) and the spike offset, and then normalizing it, so 1 is the maximum.[/green]
		vecspikeDir = ( ( m_hEnemy->pev->origin + m_hEnemy->pev->view_ofs ) - vecspikeOffset ).Normalize();

		[green]// Randomizing the Direction up a bit, so he's not a perfect shot.[/green]
		vecspikeDir.x += RANDOM_FLOAT( -0.01, 0.01 );
		vecspikeDir.y += RANDOM_FLOAT( -0.01, 0.01 );
		vecspikeDir.z += RANDOM_FLOAT( -0.01, 0.01 );

		[green]// Create the spike, place it and turn it.[/green]
		CPitDroneSpike *pSpike = (CPitDroneSpike *)CBaseMonster::Create( "pitdrone_spike", vecspikeOffset, pev->angles, edict() );
		[green]// Actually setting the velocity. This is why we normalized it, so we can have different speeds.[/green]
		pSpike->pev->velocity = vecspikeDir * 900;
		[green]// Same for water velocity[/green]
		pSpike->waterSpeed = vecspikeDir * 300;

		[green]// Remember the pitdrone, so we can say who killed the enemy[/green]
		pSpike->pev->owner = ENT(pev);

		[green]// No friction FTW[/green]
		pSpike->pev->friction = 0;

		[green]// Set the angles to correspond to the velocity[/green]
		pSpike->pev->angles = UTIL_VecToAngles(pSpike->pev->velocity);

		[green]// Take a spike out[/green]
		iSpikes--;

		[green]// Set the body to match the spikes.[/green]
		[blue]if[/blue] (iSpikes == 0) {
			SetBodygroup( BODYGROUP_SPIKES, 0 );
		}
		[blue]else[/blue] {
			SetBodygroup( BODYGROUP_SPIKES, GetBodygroup( BODYGROUP_SPIKES )+1 );
		}
		[blue]break[/blue];
	}
Now for the melee! NINJA STYLE.
[blue]case[/blue] PDRONE_MELEE_LEFT:
	{
		[green]// Only gonna comment on this one, cuz the rest are basically the same.[/green]
		[green]// This gets the enemy and attacks at the same time.[/green]
		[green]// The parameters after CheckTraceHullAttack are distance, amount of damage, and type[/green]
		CBaseEntity *pHurt = CheckTraceHullAttack( 85, 20, DMG_SLASH );

		[green]// If you did hurt someone...[/green]
		[blue]if[/blue] ( pHurt )
		{
			[green]// ...make him change his view angle a bit (only players)...[/green]
			pHurt->pev->punchangle.y = 15;
			pHurt->pev->punchangle.x = 8;
			[green]// ... and push him back a bit.[/green]
			pHurt->pev->velocity = pHurt->pev->velocity + gpGlobals->v_up * -100;
		}
		[blue]break[/blue];
	}
	[blue]case[/blue] PDRONE_MELEE_RIGHT:
	{
		CBaseEntity *pHurt = CheckTraceHullAttack( 85, 20, DMG_SLASH );

		[blue]if[/blue] ( pHurt )
		{
			pHurt->pev->punchangle.y = -15;
			pHurt->pev->punchangle.x = 8;
			pHurt->pev->velocity = pHurt->pev->velocity + gpGlobals->v_up * -100;
		}
		[blue]break[/blue];
	}
	[blue]case[/blue] PDRONE_MELEE_BOTH:
	{
		CBaseEntity *pHurt = CheckTraceHullAttack( 85, 30, DMG_SLASH );

		[blue]if[/blue] ( pHurt )
		{
			pHurt->pev->punchangle.x = 15;
			pHurt->pev->velocity = pHurt->pev->velocity + gpGlobals->v_up * -100;
		}
		[blue]break[/blue];
	}
	[blue]default[/blue]:
		CBaseMonster::HandleAnimEvent( pEvent );
		[blue]break[/blue];
	}
}
Okay, if you compile now (don't), you'll see that he doesn't reload. He just fires infinitely. He also doesn't fight very efficiently. Remember, his attacks aren't very accurate, so should come closer, and run after you if you're too close. I'm doing this on the next page, because this is a mess.
Now, we'll get down to choosing schedules. We won't invent new schedules or tasks because the pitdrone doesn't need them. Look at the last page for that.
So, in the last page, we already defined the function, so we don't have to go back to that. Let's go right to the function body.
Schedule_t *CPitDrone :: GetSchedule( [blue]void[/blue] )
{
	[green]// Call another switch class, to check the monster's attitude[/green]
	[blue]switch[/blue]	( m_MonsterState )
	{
		[green]// Manly monster needs to fight[/green]
		[blue]case[/blue] MONSTERSTATE_COMBAT:
		{
			[blue]if[/blue] ( HasConditions( bits_COND_ENEMY_DEAD ) )
			{
				[green]// The enemy is dead - call base class, all code to handle dead enemies is centralized there.[/green]
				[blue]return[/blue] CBaseMonster :: GetSchedule();
			}

			[green]// Can I attack melee style?[/green]
			[blue]if[/blue] ( HasConditions( bits_COND_CAN_MELEE_ATTACK1 ) )
			{
				[green]// Randomize my melee attacks, so it's a bit different[/green]
				[blue]switch[/blue] (RANDOM_LONG ( 0, 1 )) {
					[blue]case[/blue] 0:
						[blue]return[/blue] GetScheduleOfType ( SCHED_MELEE_ATTACK1 );
						[blue]break[/blue];
					[blue]case[/blue] 1:
						[blue]return[/blue] GetScheduleOfType ( SCHED_MELEE_ATTACK2 );
						[blue]break[/blue];
				}
			}

			[green]// I can range attack! HELLZ YEAH![/green]
			[blue]if[/blue] ( HasConditions( bits_COND_CAN_RANGE_ATTACK1 ) )
			{
				[green]// TOO CLOSE! USE MELEE.[/green]
				[blue]if[/blue] ((pev->origin - m_hEnemy->pev->origin).Length() <= 256)
				{
					return GetScheduleOfType ( SCHED_CHASE_ENEMY );
				}
				[blue]if[/blue] ((pev->origin - m_hEnemy->pev->origin).Length() <= 512)
				{
					[green]// Do I have spikes?[/green]
					[blue]if[/blue] (pev->body != BODY_NO_SPIKES) {
						[green]// Yes. Fire![/green]
						[blue]return[/blue] GetScheduleOfType ( SCHED_RANGE_ATTACK1 );
					}
					[blue]else[/blue] {
						[green]// No.[/green]
						[blue]if[/blue] ((pev->origin - m_hEnemy->pev->origin).Length() <= 312) {
							[green]// I'm close, I can go and attack.[/green]
							[blue]if[/blue] ( HasConditions( bits_COND_CAN_MELEE_ATTACK1 ) ) {
								[blue]switch[/blue] (RANDOM_LONG ( 0, 1 )) {
									[blue]case[/blue] 0:
										[blue]return[/blue] GetScheduleOfType ( SCHED_MELEE_ATTACK1 );
										[blue]break[/blue];
									[blue]case[/blue] 1:
										[blue]return[/blue] GetScheduleOfType ( SCHED_MELEE_ATTACK2 );
										[blue]break[/blue];
								}
							}
							[green]// Lemme get a bit closer, so I can attack[/green]
							[blue]else[/blue] {
								[blue]return[/blue] GetScheduleOfType ( SCHED_CHASE_ENEMY );
							}
						}
						[green]// He's too far to melee. I'll just reload[/green]
						[blue]else[/blue] {
							[blue]return[/blue] GetScheduleOfType ( SCHED_RELOAD );
						}
					}
				}
				[green]// Too far to either fire the spikes or melee, so lemme just get closer, so I'm more accurate.[/green]
				[blue]else[/blue] {
					[blue]return[/blue] GetScheduleOfType ( SCHED_CHASE_ENEMY );
				}
			}
			[green]// If I can do nothing, just chase after him[/green]
			[blue]return[/blue] GetScheduleOfType ( SCHED_CHASE_ENEMY );
			[blue]break[/blue];
		}
	}
	[green]// The base probably knows what to do [/green]
	[blue]return[/blue] CBaseMonster :: GetSchedule();
}
Now, you should have a well-functioning pit drone. You can use this base for most other enemies. For more advanced coding, go in to the next page. There, I'll discuss how to add schedules, and some other stuff. It's long, I know, so take a short break.
Now, for some monster basic AI stuff.
There are four functions:
[blue]virtual[/blue] BOOL CheckRangeAttack1( [blue]float[/blue] flDot, [blue]float[/blue] flDist );
[blue]virtual[/blue] BOOL CheckRangeAttack2( [blue]float[/blue] flDot, [blue]float[/blue] flDist );
[blue]virtual[/blue] BOOL CheckMeleeAttack1( [blue]float[/blue] flDot, [blue]float[/blue] flDist );
[blue]virtual[/blue] BOOL CheckMeleeAttack2( [blue]float[/blue] flDot, [blue]float[/blue] flDist );
Here's a basic Melee2:
BOOL CBaseMonster :: CheckMeleeAttack2 ( [blue]float[/blue] flDot, [blue]float[/blue] flDist ) {
	[blue]if[/blue] ( flDist <= 64 && flDot >= 0.7 )
	{
		[blue]return[/blue] TRUE;
	}
	[blue]return[/blue] FALSE;
}
Now, to go on to GetSchedule. Remember that last page? That function is necessary, because it chooses what schedule to use for now. I won't go into that, because I did it in the last page.
In the GetSchedule command, there were a lot of GetScheduleOfType-s, right? Those switch the schedule name to the name of the list, and return that.
EXAMPLE:
Schedule_t* CBaseMonster :: GetScheduleOfType ( int Type )
{
	[blue]switch[/blue]	( Type )
	{
	[blue]case[/blue] SCHED_CHASE_ENEMY:
		{
			[blue]return[/blue] &slChaseEnemy[ 0 ];
		}
	[blue]default[/blue]:
		{
			ALERT ( at_console, "GetScheduleOfType()nNo CASE for Schedule Type %d!n", Type );

			[blue]return[/blue] &slIdleStand[ 0 ];
			[blue]break[/blue];
		}
	}

	[blue]return[/blue] NULL;
}
Okay, now to go on to making new schedules themseleves.
In your class, be sure that you have this (just what's in red):
...
	void Precache( void );
	[red]CUSTOM_SCHEDULES;[/red]
};
[pre]

Now, go on to the schedule names.

[pre]
enum
{
	SCHED_GET_BEST_ITEM = LAST_TALKMONSTER_SCHEDULE + 1,

	SCHED_COVER_AND_GET_ITEM,

	LAST_HEVSCIENTIST_SCHEDULE,		// MUST be last
};
Now, you can write down the name of the lists.
DEFINE_CUSTOM_SCHEDULES( CHEVScientist )
{
	slGetBestItem,
	slCoverAndGetItem,
};

IMPLEMENT_CUSTOM_SCHEDULES( CHEVScientist, CTalkMonster );
Now, you should add something along the lines of this, where you get to add your actual lists:
Task_t	tlHeal[] =
{
	{ TASK_MOVE_TO_TARGET_RANGE,(float)50		},	// Move within 60 of target ent (client)
	{ TASK_SET_FAIL_SCHEDULE,	(float)SCHED_TARGET_CHASE },	// If you fail, catch up with that guy! (change this to put syringe away and then chase)
	{ TASK_FACE_IDEAL,			(float)0		},
	{ TASK_SAY_HEAL,			(float)0		},
	{ TASK_PLAY_SEQUENCE_FACE_TARGET,		(float)ACT_ARM	},			// Whip out the needle
	{ TASK_HEAL,				(float)0	},	// Put it in the player
	{ TASK_PLAY_SEQUENCE_FACE_TARGET,		(float)ACT_DISARM	},			// Put away the needle
};

Schedule_t	slHeal[] =
{
	{
		tlHeal,
		ARRAYSIZE ( tlHeal ),
		0,	// Don't interrupt or he'll end up running around with a needle all the time
		0,
		"Heal"
	},
};
Down in the schedule. This is more like the base information about the task list. Now, tlHeal is the list, and ARRAYSIZE( tlHeal) says the size of the list. The next two variables are the interruption conditions, and the other one is the "sound" interruption conditions. "Heal" is the name of the schedule.
Now, to move on to making new tasks. First of all, define the task names in a similar way to new schedules:
enum
{
	TASK_GET_PATH_TO_BEST_ITEM = LAST_TALKMONSTER_TASK + 1,
	TASK_PICK_UP_ITEM,

	LAST_HEVSCIENTIST_TASK,			// MUST be last
};
void StartTask( Task_t *pTask );void CHEVScientist :: StartTask( Task_t *pTask )
{
switch ( pTask->iTask )
{
case TASK_RELOAD:
m_IdealActivity = ACT_RELOAD;
break;
default:
CTalkMonster::StartTask( pTask );
}
}
NOTE: This only is called when we START the task. Use a similar function - RunTask, for every moment that it's on.
Okay, you should now have the know-how to make even the best NPCs. I could go in to talking monsters, but that's easy, and the tutorial's getting rather long. So - mortals, I hope your eyes are still intact, and that you've learnt something.
25 Comments
You must log in to post a comment. You can login or register a new account.
Thanks to all the commenters!
I use this tutorial and is very good but i have only 3 "errors":
First, the pitdrone doesn´t fire.
Second, the melee attack left and right doesn´t make damage to the player.
and finally, when the pitdrones kill the player, using the attack "double", and i press a key to automatically restore the game i have this message error:
"ED_ALLOC = No edits yet."
**--**--**--**--**--**--**--**--**--**--**--**--**--**--**--**--**--**--**--
Ok, for the first, i dont need them for the moment, my new monster doesn´t fire, so i think if i need that in the future, i can use the bullchicken code, or whatever.
For the second, i dont see where is the error...if anyone can help me.
For the last one, ("the most important"), i read about the "edits", they are the "slots" for the monsters, all hl monsters have one...so, ¿you need to "define" a slot for the pitdrone? how do that? heeelp! i am so close to finish my mod...i can´t release them until i have coding at least three new npc´s....
So, thanks for all, I hope someone can help me.
default:
CBaseMonster::HandleAnimEvent( pEvent );
break;
}
} "
Right after what exactly??
Before I got to the reload part, everything compiled fine.
But, every time the I enter the pit drone's FOV, the game exits to the main menu, literally disconnecting me from the game.
The integers that represent the animation events were not the same as what was written in the .qc for the melee attacks and reload so you had to change it to this
#define PDRONE_FIRE_SPIKE ( 1 )
#define PDRONE_MELEE_LEFT ( 2 )
#define PDRONE_MELEE_RIGHT ( 4 )
#define PDRONE_MELEE_BOTH ( 6 )
#define PDRONE_RELOAD ( 7 )
the return NULL under GetScheduleOfType was causing crashes so i changed it to:
return CBaseMonster::GetScheduleOfType(Type);
i had to make a custom checkAmmo function and override checkRangeAttack1 and explicitly call them in getSchedule.
and thats about it. heres a video preview of the changes i made and the showcasing it working. I will share the gitHub Code below so you can reference it.
https://github.com/TylerMaster/ICE1/blob/BRANDON_SMITH_Ex1/wip_monster.cpp
https://github.com/TylerMaster/ICE1/blob/BRANDON_SMITH_Ex1/wip_monster.h