Tutorial: Custom Textures Last edited 3 months ago2024-09-03 17:43:29 UTC
There's a limit to what you can do with only the textures provided with Half-Life. Brand new maps quite often need brand new textures, but how do you do that?
What you Need
You could, of course, find the textures you need on the web, but it's always more exciting to make your own. If you do plan to download all your textures, they'll probably already be in WAD format, so you can skip the next couple of stages.First, you need to know what type of texture you're looking for. What style must it blend in with? Is it for indoors or out? Must it tile or be single? Tiling textures are the kind that are used for structures like walls, rock-faces, terrain, glass etc. while single are used for more specific objects like vehicles, vending machines and buttons. Both require a bit of work to get right.
You'll need a few tools as well, aside from WorldCraft. An image editor is first. Jasc's Paint Shop Pro will do, although you might have problems with fixing up tiling textures (see below), but your best bet is Adobe Photoshop, providing you can (and want to) afford it. Then you'll need a WAD-editing program. Wally is about the only one anybody's ever heard of, so get that ().
Making your Texture
As an example, I made my own (rather cheap) tiling wall texture out of a photo. Let's have a look at the process:- Find a nice wall and take a photo of it (this is quicker with a, ahem, digital camera). Level the camera carefully so that you get the wall as straight-on as possible.
- Scan or download the photos to your computer.
- Make your first selection to get rid of stuff you don't want, as I've done below:
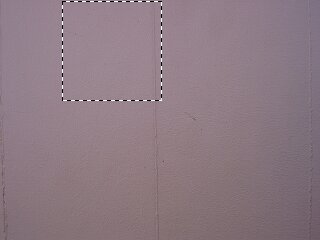 Stage 1: The Selection
- The final image must have dimensions that are both multiples of 16. So 192 x 64 is fine, while 28 x 268 is not. So at this point, get the texture into this kind of proportion, but keep it relatively large (something like 768 x 768 is fine).
- Now some fixing-up needs to happen. To get it to tile better, I copied the top-left quarter, rotated the little decorative line a bit to get it completely straight, then pasted it in the other corners, flipping it each time.
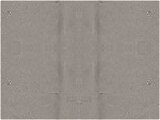 Stage 2: The Flip
- The zoomed-in shot above shows how you'll get a kaleidoscope image if you use this method - time to get out the 'clone' tool. Use this tool to randomly paste bits of image over the repetitive part. You'll be reducing the amount of unique picture that there is, but it's a pretty quick way to get a texture to tile. Or you could just skip the kaleidoscope bit and do the cloning alone - in PhotoShop it's easier because of the more advanced brush blending. Experiment!
- Use the 'Offset' filter in PhotoShop to fix any visible seams, and have a look at the texture in the Tiled view in Wally (see the next section) to find any noticable repetitive areas. The bigger the texture, the less lightly this is to be a problem, but it depends on where it's going to be used etc. etc. Eventually I ended up with something like the picture below (okay, so it's not very exciting, but it works):
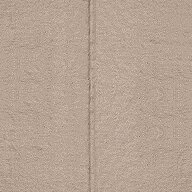 Stage 3: The Result
- Bear in mind that Half-Life's game engine is several years old, so it's not very good at handling large textures. 256 x 256 pixels is about as large as your texture should end up.
- Remember to give it a thorough in-game testing as well to make sure it fits in with the other textures you're using... read through the next couple of sections to find out how to get it working.
WADing it Up
So, having completed your texture, what do you do with it? Half-Life needs all its textures to be in WAD3 format. WADs are just... yes, wads... of textures, and the idea dates back to Doom. Quake uses WAD2, and Half-Life has a modified version of that, WAD3. WAD3 format allows each texture to have its own 8-bit palette. This just means that each image is stored in 256 colours, and those colours can be anything (as opposed to WAD2, where the palette is the same for all textures in the WAD, restricting the variety of texture colouring).Putting your textures into a WAD is where Wally comes in. Although Wally is capable of doing some basic image editing itself, you'll probably find the only useful extra feature is being able to see your texture tiled (you can do this in regular image editors, but perhaps less easily).
All you need to do is copy 'n' paste. Pasting into Wally will let you choose the file type. Select 'Half-Life Package', and it will create a new WAD and put the texture into it. To add subsequent textures to the WAD you are working in, press Ctrl+E. Double-click a texture to edit it, and press Ctrl+T in this view to see it tiled. + and - zoom in and out. When you're done, save the WAD anywhere you like (although it will need to be in your
Half-Life\valve folder if you plan to use Method 1, below).
Using your New WAD
Here's where it gets more exciting. Open WorldCraft, go to Tools -> Options, and click the Textures tab. Click Add WAD, and browse your newly-created WAD file. Close the Options window, and you will find that when you create a new map your custom texture(s) will be at your disposal.Working with WADs
Method 1
The simplest way to work with custom textures is to put the new WAD with all the default ones in yourHalf-Life\valve folder. In this case any maps using the custom WAD will simply call it like they would the default ones. The advantage is that BSP file sizes are kept to a minimum, but the disadvantage is that anyone could open the WAD and take the textures. So where would you use this method? Well, the Half-Life multiplayer maps all use it, because it's possible that clients may have to download a map on connecting to a server, and downloading a bunch of textures they already have is a waste of time. So as long as the client has the required WADs already, it all works great.
Method 2
This method is a little more complicated, but it's better for some situations. It involves embedding the used textures into the final BSP file, which increases the size of the BSP somewhat, but means you only have to distribute that one file. The single-player maps in Half-Life all have their textures embedded in this manner. You will need to use either of two command-line arguments to do it:Including the Textures
Method 1
This is the simplest way, which works with both the default WorldCraft compile tools (the ones you get with WorldCraft), as well as with Zoner's Compile Tools (what real mappers use - they're free anyway. Go get them!).
 When you're ready to test your map, press F9 or click the Run Map button (as usual), but then click the Expert button at the bottom (doesn't that make you feel cool?) and you should see a list of commands to the left. Find the one that is similar to
C:\program files\worldcraft\qcsg.exe (or hlcsg.exe if you are using Zoner's Tools), click it, and add -nowadtextures to the end. Your box should now look something like the one below:
 Compile options
Method 2
...-wadinclude, but this one does not work with Valve's compile tools, you need ZHLT, VHLT, or another custom compiler. Instead of putting all of the textures used in the map into the BSP, it only includes the ones from the WAD(s) you specify. In other words, you can tell it to include only the custom textures that you created. To use it put -wadinclude <wadname> as your CSG parameter, where <wadname> is the name of the file. You don't need the extension or path (these will be taken from WorldCraft). So your Parameters box should say something like this:
$path$file -wadinclude mytextures-wadinclude command
$path$file -wadinclude mytextures -wadinclude mytextures2Yes, you have to use the
-wadinclude prefix for every new wad that you want included.
That's about it. Using either of these parameters, you will get a single BSP file at the end that will work by itself. Hopefully you'll now be able to incorporate custom textures into your maps. Experiment with texture design, as it's obviously the most challenging bit of this to get right. And remember, there are plenty of free custom textures available on the web, if you aren't up for this art thing
The example map includes a custom WAD for you to look at. To see it in the map you'll need to add it to WorldCraft's list, explained above.
- Article Credits
-
 atom
–
Original author
atom
–
Original author
4 Comments
You must log in to post a comment. You can login or register a new account.
For me, this works to really embed textures into a bsp file:
-wadautodetect -wadinclude "..."
I'm not using "-nowadtextures".
This is using the "Vluzacn's ZHLT v3.4" tools.
Hope that helps!