Tutorial: Teleporters Last edited 3 months ago2024-09-15 13:11:03 UTC
"Beam me up Scotty!"
Teleportation, wouldn't that be cool. No more driving, just enter your destination and away you go. It is not available in real life, but it is in game development. Adding teleportation is an easy accomplishment in Half-Life, which has many uses. Things get more complex when adding triggers,multisources, and multi_managers for effects.This tutorial assumes you know the basics of Hammer or Worldcraft. Making brushes, assigning them to an entity, and creating entities. Other than that, I am attempting to be as detailed as possible, so new Mappers can follow along.
Its Simplest Form:
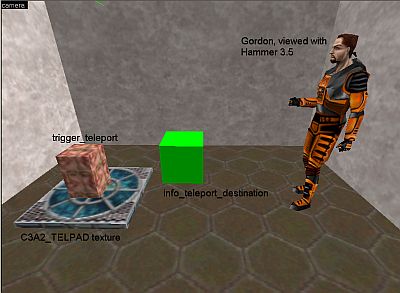
Teleporting requires a minimum of two entities,trigger_teleport and info_teleport_destination. The trigger_teleport entity is a brush-based entity, which is where the player is being teleported from; info_teleport_destination is the player's destination.As stated before,
trigger_teleport is a brush-based entity. So, make a brush where the teleporter is to be and tie it to the trigger_teleport entity. The only thing that must be set is the Target, which is the name you plan on giving info_teleport_destination; I used tele_dest1.Now, use the Entity Tool to place the
info_teleport_destination where you want the player to end up. Be careful not to place the entity too close to any brushes. It would be a shame to stick the player into a wall, desk, or other solid form. Set its name to match the Target you gave to trigger_teleport; again, I used tele_dest1. Now you have a working teleporter.Note: The player cannot see a
trigger_teleport, which is handy if you want him to be teleported without forewarning. But, if you want the player to know he is going to be teleported you will have to create a visible teleporter. Try adding a sprite, by checking out Tutorial: Using Sprites.
Switch Activated:
Now to add a little bit of complexity to teleportation, by controlling the teleporter through a switch. Here we will turn the "machine" on and give the player five seconds to use it before it deactivates.Create your entities as above and add a
multisource and func_button to your map. Set the values as follows:
trigger-teleportName: tele_trig1
Target: tele_dest2
Master: tele_master
info_teleport_destinationName: tele_dest2
func_buttonTarget: tele_master
Delay Before Reset: 5
Flags: Don't Move
multisourceName: tele_master
Target: tele_trig1
 Teleporter
Final Words:
Half-Life gives you the tools to come up with creative ways to initialize your teleporters. With some experimentation and imagination, how your machine is initialized and where your player goes has unlimited possibilities. Ambience, lasers, sparks, and other features can be added and manipulated with the use ofmultisources and multi_managers. Eventually, I will update the example map to demonstrate this, but till then combine other tutorials and play around.Happy Mapping!
- Article Credits
-
 Skeeve
–
Original author
Skeeve
–
Original author
3 Comments

ZPhugeFan
Commented 9 years ago2015-11-22 08:14:05 UTC
Comment #100576
Nice tutorial. I may not be new to mapping in general, but i'm still having trouble fully understanding multi managers and multisources.

jamie
Commented 2 years ago2022-04-09 21:55:17 UTC
Comment #104323
info_teleport_destination entity does not exist. How do i solve this?

gastenoise
Commented 2 years ago2022-05-09 19:23:18 UTC
Comment #104399
Hi jamie! If you use a newer hl1 .fgd the info_teleport_destination will appear in the entities list like normal. BUT you can just use an info_target entity for the destination, they work the same way.
You must log in to post a comment. You can login or register a new account.