Tutorial: The packing (and non-packing) of bodygroups and skin groups in GoldSource models Last edited 1 day ago2024-09-18 05:16:47 UTC
A short explainer on the why and how of packing and non-packing of
Packing for
Bodygroups are packed into the
That admittedly sounds like gibberish... Instead, let's clarify the concept by visualizing things in binary. First, a representation of all the binary places for 32 bits (the size of
Now let's say we want a combination of the following groups:
As another example, here's the 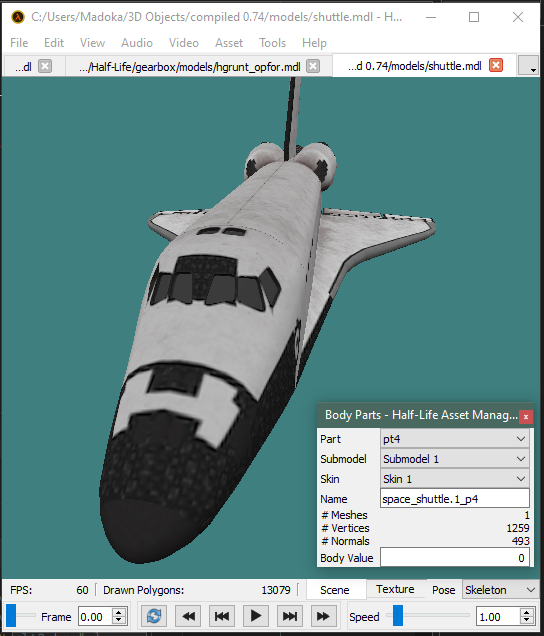
This works well for one dimension of skin changes e.g. changing the skin colour of NPCs or the paint colour of cars. If you want to add a second dimension e.g. clean vs blood-soaked vs torn clothing, or different decal patterns on cars, you just have a second
Nope.
Unfortunately, unlike meshes, GoldSource doesn't support multiple texture groups. Even studiomdl (the model compiler) will only compile the first one found in the QC file, and ignore all subsequent
Therefore, we need to pack all possible texture combinations into a single
 skin values 0 through 5
body and skin groups in GoldSource models.
Body and bodygroups
A GoldSrc model consists, in one part, of meshes. As a modeller, you can have one or several meshes included in the final model. You can also set up "body groups" in which only one mesh in the group is rendered at any one time.$body studio "<reference_smd>"$bodygroup <groupname>
{
studio "<part1_smd>"
studio "<part2_smd>"
blank // optional
}blank as one of the lines in the group you can choose to render nothing for the group.$bodygroup <groupname>
{
studio "<onlypart_smd>"
}Packing for body value
Bodygroups are packed into the body keyvalue first by fitting them into lists that are powers of 2 long e.g. 2,4,8,16... and then bit-shifting the subsequent groups the appropriate places to the left.That admittedly sounds like gibberish... Instead, let's clarify the concept by visualizing things in binary. First, a representation of all the binary places for 32 bits (the size of
body):
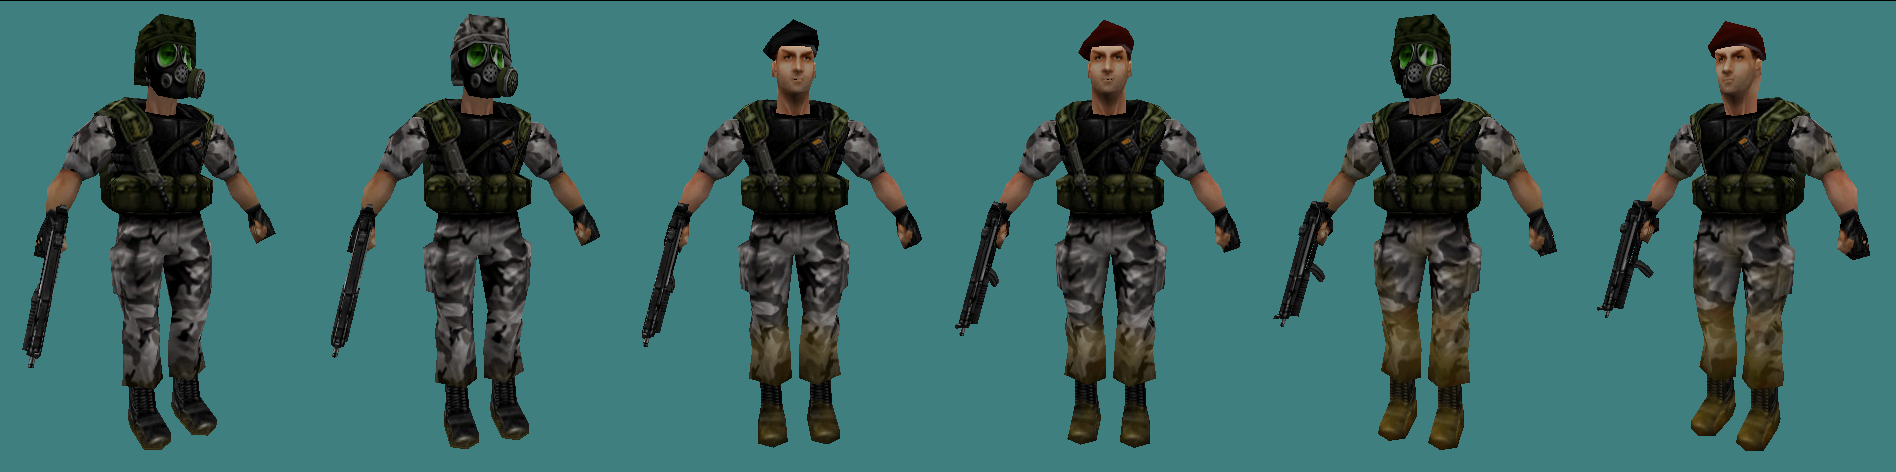
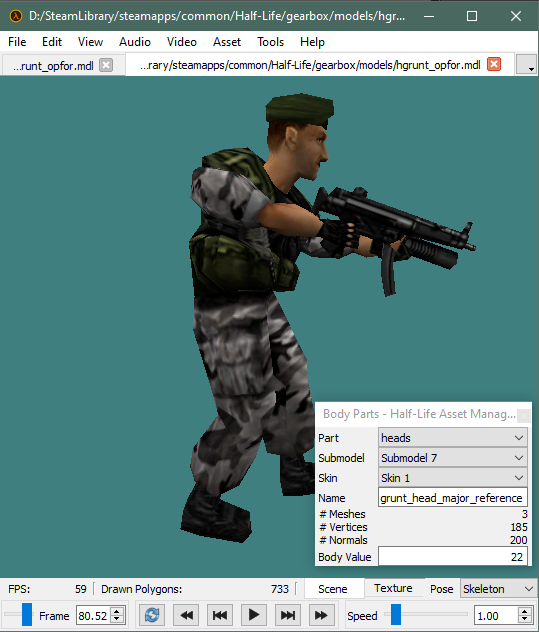
xxxx xxxx xxxx xxxx xxxx xxxx xxxx xxxx$body and $bodygroup of models/hgrunt_opfor.mdl (from Opposing Force). We will comment our enumeration of the values in decimal and binary.
$body studio "grunt_fatigues_reference"
$bodygroup heads
{                                               // DEC  BIN
    studio "grunt_head_mask_reference"          // 0    000
    studio "grunt_head_commander_reference"     // 1    001
    studio "grunt_head_shotgun_reference"       // 2    010
    studio "grunt_head_saw_wht_reference"       // 3    011
    studio "grunt_head_saw_blk_reference"       // 4    100
    studio "grunt_head_MP_reference"            // 5    101
    studio "grunt_head_major_reference"         // 6    110
    studio "grunt_head_commander_blk_reference" // 7    111
}
$bodygroup torso
{
    studio "grunt_reg_torso_reference"          // 0    000
    studio "grunt_saw_gunner_torso_reference"   // 1    001
    studio "grunt_noback_torso_reference"       // 2    010
    studio "grunt_shotgun_torso_reference"      // 3    011
}
$bodygroup weapons
{
    studio "MP5_reference"                      // 0    000
    studio "shotgun_reference"                  // 1    001
    studio "SAW_reference"                      // 2    010
    blank                                       // 3    011
}0000 0000 0000 0000 0000 0000 0CCB BAAANow let's say we want a combination of the following groups:
- head = the Major (6 or 0b110)
- torso = "no backpack" (2 or 0b10)
- weapons = MP5 (0 or 0b00)
//                             CCB BAAA
0000 0000 0000 0000 0000 0000 0001 0110body in entities like cycler or monster_generic.
You can double check with HLAM by selecting the same combo in its Body Parts widget, and checking the body value it it outputs at the bottom of the widget:
$body and $bodygroup part of a QC file for a complex model that had to have its meshes split into 4 smd files:
$body studio "space_shuttle.1_p1"
$bodygroup pt2 {
    studio "space_shuttle.1_p2"
}
$bodygroup pt3 {
    studio "space_shuttle.1_p3"
}
$bodygroup pt4 {
    studio "space_shuttle.1_p4"
}body value is always 0:
Texture groups
Texture groups provide a way to switch out any texture used by the meshes into one or more alternative sets.$texturegroup <groupname>
{
{ "tex1_base.bmp" "tex2_base.bmp" ⋯ "texN_base.bmp" }
{ "tex1_alt1.bmp" "tex2_alt1.bmp" ⋯ "texN_alt1.bmp" }
{ "tex1_alt2.bmp" "tex2_alt2.bmp" ⋯ "texN_alt2.bmp" }
⋮ ⋮ ⋱ ⋮
{ "tex1_altN.bmp" "tex2_altN.bmp" ⋯ "texN_altN.bmp" }
}This works well for one dimension of skin changes e.g. changing the skin colour of NPCs or the paint colour of cars. If you want to add a second dimension e.g. clean vs blood-soaked vs torn clothing, or different decal patterns on cars, you just have a second
$texturegroup, right? Nope.
Unfortunately, unlike meshes, GoldSource doesn't support multiple texture groups. Even studiomdl (the model compiler) will only compile the first one found in the QC file, and ignore all subsequent
$texturegroups.Therefore, we need to pack all possible texture combinations into a single
$texturegroup. Combining 2 sets is just a matter of creating unique pairs from the elements of the 2 sets. An example of set A of size 2 and set B of size 3 would be:
  A = ⎡X⎤
      ⎣Y⎦
  B = [ 1  2  3]
A×B = ⎡X1 X2 X3⎤
      ⎣Y1 Y2 Y3⎦
Hypothetical texture groups
// elements of A
$texturegroup headvars {
    { "helmet.BMP"  "beret_black.BMP" } // X
    { "helmet2.BMP" "beret_red.BMP"   } // Y
}

// elements of B
$texturegroup fatigues {
    { "fatigues.BMP"      "boots.BMP"      } // 1
    { "fatiguesDIRT1.BMP" "bootsDIRT1.BMP" } // 2
    { "fatiguesDIRT2.BMP" "bootsDIRT2.BMP" } // 3
}
Actual texture group used
// combination of A and B
$texturegroup variations
{
//  [--------ITEMS FROM A---------] [-----------ITEMS FROM B-----------]
  { "helmet.BMP"  "beret_black.BMP" "fatigues.BMP"      "boots.BMP"      } // X1
  { "helmet2.BMP" "beret_red.BMP"   "fatigues.BMP"      "boots.BMP"      } // Y1
  { "helmet.BMP"  "beret_black.BMP" "fatiguesDIRT1.BMP" "bootsDIRT1.BMP" } // X2
  { "helmet2.BMP" "beret_red.BMP"   "fatiguesDIRT1.BMP" "bootsDIRT1.BMP" } // Y2
  { "helmet.BMP"  "beret_black.BMP" "fatiguesDIRT2.BMP" "bootsDIRT2.BMP" } // X3
  { "helmet2.BMP" "beret_red.BMP"   "fatiguesDIRT2.BMP" "bootsDIRT2.BMP" } // Y3
}Conclusion
- Bodygroups are well supported by the game engine.
- Bodygroups are packed into lists of power-of-2 length into a single
bodykeyvalue. - Multiple texture groups aren't supported.
- Multiple texture groups need to be rolled into the first.
- Vanilla game code doesn't take multiple texture group dimensions into account when dealing with a model's
skin. - Mod authors need to roll their own system using offsets to use 2 texture variation dimensions.
- Categories
- Tutorials
- GoldSource Tutorials
- Modelling
- Article Credits
-
 kimilil
–
Original author
kimilil
–
Original author
- Microsoft – Space Shuttle model source
- pacman.09 on Discord – Custom hgrunt_opfor.mdl
1 Comment
You must log in to post a comment. You can login or register a new account.
bodyproperty packing. 🙂