VERC: Doors With Glass Last edited 5 years ago2019-04-14 10:35:28 UTC
You are viewing an older revision of this wiki page. The current revision may be more detailed and up-to-date.
Click here to see the current revision of this page.
Introduction
How do I make a moving door with transparent glass sections? This is a fairly common question. The short answer is, you make two doors (one for the frame and one for the glass) and trigger them to act together. If that's enough for you to go on, great! Otherwise, read on.Setup
A door with a glass section is obviously composed of two parts: the solid door frame, and one or more sections of transparent glass. These two parts must act together to appear as one object. This is done by making the two parts triggerable only, and then activating them both with one trigger. Further complicating the situation, you can have a rotating door with a glass section, or a normal sliding door with a glass section. Both of these use different concepts. We'll look at the rotating door first.Rotating Door with Glass
For this example, I've used theFIFTIES_DR8 door texture. I've cut out the window part (which is black in the texture) and replaced it with the GLASSGREEN texture. Below are three pictures showing the sequence of creation.
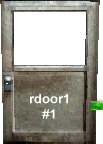
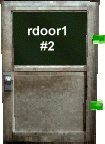
rdoor1. The rest can be left at the default settings (make sure you click on each one in the entity properties so the default is saved to the .map).Picture #2 shows the door with the glass section in place. Note its origin brush right beside the glass section. The properties of this should exactly mirror the properties for the normal door, above, with the following additions. The Render Mode (rendermode) should be set to
Texture (2), and the FX Amount (renderamt) should be set to 96. This will make the glass section transparent.Picture #3 in the sequence of three shows the door with its trigger (a trigger_multiple) in place. Walking into the trigger will cause the door to open. Its Target (target) is set to
door1, and its Delay before reset (wait) is set to 1.
Sliding Door with Glass
The other type of door would be a sliding door. For this example, i've used theOUT_W1DR1 door texture. As above, I've used the GLASSGREEN texture for the glass. Again, below is a sequence of three pictures showing the creation process.

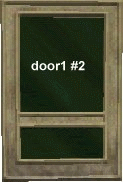

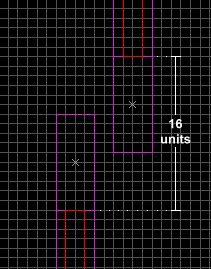
door1. Its Lip (lip) value is set to 4. This ensures that the door doesn't slide complete into the wall. (Don't forget to set the angle as well.)Picture #2 shows the glass section of the door in place. As with the rotating example, its setup exactly the same as its solid counterpart, except for the following additions and tweaks. First, setup the rendering modes as was outlined in the rotating door description, above. Next, you need to determine the Lip (lip) value. Since the glass section is not the same width as the frame section, you cannot use the same value for both. Below is a picture (a top view from Worldcraft) of the door in its closed and open state.
-16.Picture #3 in the sequence of three shows the trigger in place. As with the rotating door example, this is a trigger_multiple. Its Target (target) is set to
door1, and its Delay before reset (wait) is set to 1.
Notes
So, to go over the basic concept once more - Regardless of whether you're using a rotating door or a sliding door, its the same basic principle. You'll have a solid door frame and a glass section. Both of these will have the same name, and both of these will be opened by the player walking through a trigger_multiple that acts as the door's "open" field.- Categories
- Archived Articles
- VERC Archive
- VERC - Half-Life
- VERC - mapping
- Tutorials
- Mapping
- Images Required
1 Comment
You must log in to post a comment. You can login or register a new account.
BOUNDINGBOXbrush which eliminates the lip math. You make it the same width as the main door and tie it to the glass part. No messing with lip value for the glass door; use the same value as the main door.