VERC: Elevator No. 2 Last edited 5 years ago2019-04-14 10:50:42 UTC
You are viewing an older revision of this wiki page. The current revision may be more detailed and up-to-date.
Click here to see the current revision of this page.
Introduction
This tutorial describes the process of making an elevator that can move between more than two floors. It is a platform elevator, not a normal enclosed elevator. To keep things as simple as possible, I didn't make it with buttons that move with the elevator, although that could easily be incorporated as well.There are two parts to this tutorial -
- The elevator construction - this is the easy part.
- The button "state checking" - this is the more complicated part. This is where you give your elevator "rules".
Setup - Elevator Construction
The construction of the elevator is the easy part. Below is a cut-away view showing the first stage of the construction.
func_train (elev1)
This is the elevator. It should be built in a location that will give it even lighting, as it will automatically move to the first stop target when the level loads, but it will retain its lighting from where it was originally built. By starting the elevator on the second level, I was able to give it even lighting without having to build it at a separate location.- Name (targetname) - This elevator must be triggered each time it is moved, so you need to specify a name here. For the tutorial, I've used
elev1. - First stop target (target) - Set this to the path_corner you want the train to start on. For this tutorial, I've set it to path_corner
p2.
path_corner (p1, p2, and p3)
These are the path points the elevator will move to. The main difference between these and a normal set of path_corners is that these only have a Name, no "next stop target". This will be explained more below.- Name (targetname) - the path_corners need a Name so they can be referred to by other entities. In the tutorial, starting at the lowest path_corner and working upward, I've named them
p1,p2, andp3.
"Call" buttons
In the next step, we'll setup the "call" buttons. These will be used to call the elevator to your level if it isn't there. Useful, no? Below is the same cut-away view as above with the "call" buttons and their associated entities. (They would, of course, be set on a wall).
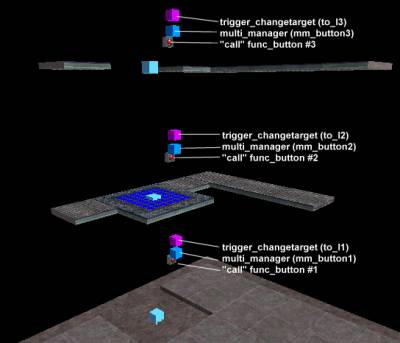
func_button ("call" buttons, #1, #2, and #3)
These are the buttons that you'll press to call the elevator. They're setup is pretty straightforward.- Targeted object (target) - Each "call" button targets a multi_manager. Starting from the lowest button and working upward, they target
mm_button1,mm_button2, andmm_button3.
multi_manager (mm_button1, mm_button2, and mm_button3)
These multi_managers coordinate the events that occur when the "call" button is pressed. The use of multi_managers is outlined in the multi_manager entity description.- Name (targetname) - this is the name the func_buttons use to refer to the multi_managers. From the lowest and working upward, the multi_managers should be named mm_button1, mm_button2, and mm_button3.
to_l1, 0orto_l2, 0orto_l3, 0- these are the Names of trigger_changetargets, and they are activated immediately when the multi_manager is activated. The lowest multi_manager will have theto_l1key, the middle theto_l2key, and the top theto_l3key.elev1, 0.1- this is the Name of the elevator, and it is activated 0.1 seconds after the multi_manager is activated (to give time for the trigger_changetargets to set the path of the elevator).
trigger_changetarget (to_l1, to_l2, and to_l3)
When activated, these set the target of the elevator to the level of the "call" button that was pressed. The use of the trigger_changetarget entity is outlined in the trigger_changetarget entity description.- Name (targetname) - This is the name that will be refered to by the preceeding multi_managers. Starting at the bottom and working upward, they are named
to_l1,to_l2, andto_l3. - Target (target) - The target of these will always be the elevator, so it should be set to
elev1. - New Target (m_iszNewTarget) - This is the Name of the new path_corner that the elevator will target. Starting from the lowest trigger_changetarget and working upward, this value should be set to
p1,p2, andp3.
Elevator Movement buttons
Now we'll add some buttons to move the elevator between the levels. Below is another picture of the same cut-away view. The buttons, multi_managers, and trigger_changetargets added in the previous step have been hidden to avoid a cluttered look.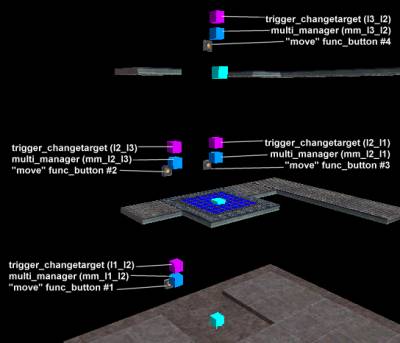
func_button ("move" button #1, #2, #3, and #4)
These buttons act exactly like the "call" buttons, except that they cause the elevator to move up or down a level (depending on which button is pressed) and the player is generally assumed to be on the elevator when a button is pushed. Note that, whereas everything previous to this step involved multiples of 3, this has 4 buttons because the middle level has a button for both up (#2) and down (#3).- Targeted object (target) - Each button targets a multi_manager.
- targets mm_l1_l2
- targets mm_l2_l3
- targets mm_l2_l1
- targets mm_l3_l2
multi_manager
These multi_managers coordinate the events that occur when the "move" button is pressed. The use of multi_managers is outlined in the multi_manager entity description.- Name (targetname) - this is the name the func_buttons use to refer to the multi_managers. From #1 to #4, the multi_managers should be named
mm_l1_l21,mm_l2_l3,mm_l2_l1, andmm_l3_l2 l1_l2, 0orl2_l3, 0orl2_l1, 0orl3_l2, 0- these are the Names of trigger_changetargets, and they are activated immediately when the multi_manager is activated. They are listed in order from #1 to #4.elev1, 0.1- this is the Name of the elevator, and it is activated 0.1 seconds after the multi_manager is activated (to give time for the trigger_changetargets to set the path of the elevator).
trigger_changetarget (l1_l2, l2_l3, l2_l1, and l3_l2)
When activated, these set the target of the elevator to the appropriate level depending on which "move" button was pressed. The use of the trigger_changetarget entity is outlined in the trigger_changetarget entity description.- Name (targetname) - This is the name that will be refered to by the preceeding multi_managers. From #1 to #4, they are named
l1_l2,l2_l3,l2_l1, andl3_l2. - Target (target) - The target of these will always be the elevator, so it should be set to elev1.
- New Target (m_iszNewTarget) - This is the Name of the new path_corner that the elevator will target. Going from #1 to #4, the value of this should be set to
p2,p3,p1, andp2.
Stretch!
Ok, that's that part. That was the easy part?! Well, not really. It's a little head spinning, no? That is the straightforward part though. You'll have something that looks similar to the picture below (again, this is a cut-away... you should have walls and stuff too.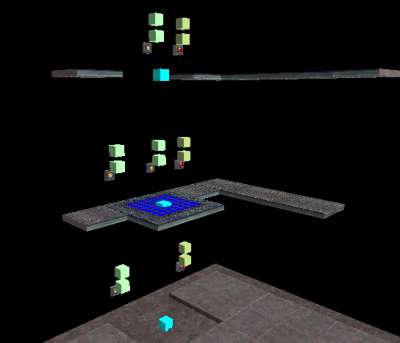
You can now run and test your level. The buttons should all work - if you press a "call" button, the elevator will move to the appropriate level. If you press a "move" button, the elevator will take you to the appropriate level. But wait, if you press a "move" button when the elevator is not at your level, the elevator will move as if it was. This just isn't right!
In the next section, we'll setup the state-checking entities that will prevent this.
Setup - Button State Checking
In this section, we're going to impose a few rules on the use of the buttons.- The elevator "call" button can only be activated if the elevator is on another level.
- The elevator movement buttons can only be activated if the elevator is on the current level.
- If the elevator is between levels, none of the buttons can be activated.
 Is your head spinning?
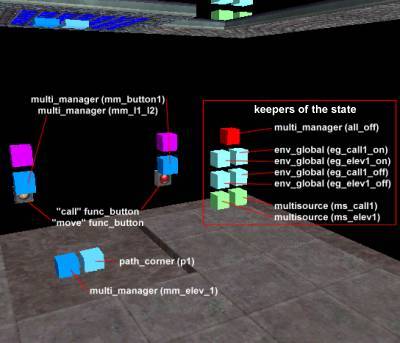
Keepers of the State
Ok, we'll start with the group of 7 entities that are responsible for tracking the state of the elevator and controlling what buttons are active when. Only 6 of the entities are used to keep track of the states. The sixth, theall_off multi_manager, is there for ease of use only. Activating it will turn all of the buttons off.
multi_manager (all_off)
This entity isn't entirely necessary, but it simplifies things greatly.As mentioned above, activating this turns off all of the "call" and "move" buttons.
- Name (targetname) - Set this to all_off.
eg_call1_off, 0- turns off the level 1 call button multisource (by way of an env_global)eg_call2_off, 0- turns off the level 2 call button multisourceeg_call3_off, 0- turns off the level 3 call button multisourceeg_elev1_off, 0- turns off the level 1 move button multisourceeg_elev2_off, 0- turns off the level 2 move buttons multisourceeg_elev3_off, 0- turns off the level 3 move button multisource
eg_call*_off, eg_elev*_off) have been defined yet. Patience, grasshopper.
multisource (ms_call1)
This is the multisource master for the level 1 "call" button. When it is "off", the button will be disabled.- Name (targetname) - set this to
ms_call1. - Global State Master (globalstate) - set this to
call1state. This is the global state that is defined by the env_global entities, below. The state ofcall1state(on or off) determines the state of the multisource.
ms_call1.
env_global (eg_call1_on)
Activating this entity will set thecall1state global state to "on", enabling the ms_call1 multisource.
- Name (targetname) - set this to
eg_call1_on. - Global State to Set (globalstate) - set this to
call1state. - Trigger Mode (triggermode) - set this to
On (1). - Initial State (initialstate) - set this to
On (1).
call1state global to "on". Each time this entity is triggered afterward, it will always set the state of call1state to on.
env_global (eg_call1_off)
Activating this entity will set thecall1state global state to "off", disabling the ms_call1 multisource.
- Name (targetname) - set this to
eg_call1_off. - Global State to Set (globalstate) - set this to
call1state. - Trigger Mode (triggermode) - set this to
Off (0). - Initial State (initialstate) - set this to
Off (0).
call1state to off.
multisource (ms_elev1)
This is the multisource master for the level 1 "move" button. When it is "off", the button will be disabled.- Name (targetname) - set this to
ms_elev1. - Global State Master (globalstate) - set this to
elev1state. This is the global state that is defined by the env_global entities, below. The state ofelev1state(on or off) determines the state of the multisource.
ms_elev1.
env_global (eg_elev1_on)
Activating this entity will set theelev1state global state to "on", enabling the ms_elev1 multisource and, in turn, the level 1 "move" button.
- Name (targetname) - set this to
eg_elev1_on. - Global State to Set (globalstate) - set this to
elev1state. - Trigger Mode (triggermode) - set this to
On (1). - Initial State (initialstate) - set this to
On (1).
env_global (eg_elev1_off)
Activating this entity will set theelev1state global state to "off", disabling the ms_elev1 multisource.
- Name (targetname) - set this to
eg_elev1_off. - Global State to Set (globalstate) - set this to
elev1state. - Trigger Mode (triggermode) - set this to
Off (0). - Initial State (initialstate) - set this to
Off (0).
elev1state to "off". Each time this entity is triggered afterward, it will always set the state of elev1state to off.
Final Thingies
Last, you've got to connect the state-checkers to the appropriate multi_managers so they're functional.- multi_manager (
mm_button1) - This is the multi_manager that is activated when the "call" button is pressed. The only thing you need to add to this multi_manager isall_off, 0. This turns all of the "call" and "move" buttons off. - multi_manager (
mm_l1_l2) - As above, all that needs to be added to this isall_off, 0. - multi_manager (
mm_elev_1) - (This must be created) This is the multi_manager that is activated when the elevator reaches thep1path_corner. The following values and parameters should be added to setup rules #1 and #2 -eg_elev1_on, 0- This turns on the "move" button on level 1.eg_call2_on, 0- This turns on the "call" button on level 2.eg_call3_on, 0- This turns on the "call" button on level 3.
p1 path_corner must have its Fire on Pass (message) set to mm_elev_1, so this multi_manager gets activated when the elevator reaches the p1 path corner.Whenever a "call" or "move" button is pressed, all of the buttons are disabled (satisfying rule #3). When the elevator reaches its target level, the path_corner activates its multi_manager which turns on the "move" buttons for that level (satisfying rule #2), and activates all of the "call" buttons except for the one on that level (satisfying rule #1).
Notes
Ok, each level has almost the identical setup, except for theall_off multi_manager which only needs to be created once but is referenced at each level, so I'm not going to list the other levels here. It would be a little redundant and my head would be in danger of exploding. If you want more detail, please check out the example map - the entities are set out pretty neatly and it should be easy to follow the logic of everything. The VisGroups are also setup to allow for easiest visibility of the inner-workings.Here's what the entity setup looks like in the finished example map.
 Crikey!
- To suitably understand this tutorial, a good understanding of the env_global and multisource entities is essential. You might want to play around with a smaller test map if you find that you can't get them working. The important thing to remember with the env_global entity is to check the Set Initial State flag when needed, otherwise you might be checking a state that doesn't exist yet.
- Until it is possible to group entities together (for example, putting a func_door and a func_button on a func_train), it will never be convenient to make a normal "real-life" elevator. That is why this tutorial uses a simple platform elevator. It is certainly possible to add a set of doors and the illusion of a button that travels with the elevator (as demonstrated by other tutorials) but you may find yourself thinking, is the effort really worth it?
- When working on a project like this, the most important thing to do is figure out what the rules are and make sure none of them conflict with each other. Once I had the set of three simple rules set out, it was easy to figure out how things should be done.
- When doing something that requires state checking using env_global entities, testing your map is way easier when you use the
impulse 104"cheat" to list the current global states. You'll know immediately if you're setting up and manipulating the states correctly, rather than having to watch the behavior of the affected entities.
- Categories
- Archived Articles
- VERC Archive
- VERC - Half-Life
- VERC - mapping
- Tutorials
- Mapping
- Images Required
Comments
You must log in to post a comment. You can login or register a new account.