VERC: Real-Time "TRON 2.0" Glow For Low-Spec Hardware Last edited 2 years ago2022-09-29 07:55:24 UTC
I won't take long to introduce the effect this article demonstrates, mainly because I introduced it before in the previous article. It received a good response, but the main complaint was that the method used (vertex and pixel shaders) made it unsuitable for anything but fairly high-end hardware.
This article aims to rectify that. Using the same basic algorithm as before, I will describe how you can implement this glow effect without the use of any vertex or pixel shaders. All the hardware requires is the GL_NV_texture_rectangle OpenGL extension (or better), which is supported on even fairly low-end cards. As before, this article will walk you through the steps necessary to implement this in your modification.
Here's an image of a scene with no effect applied and this article's effect: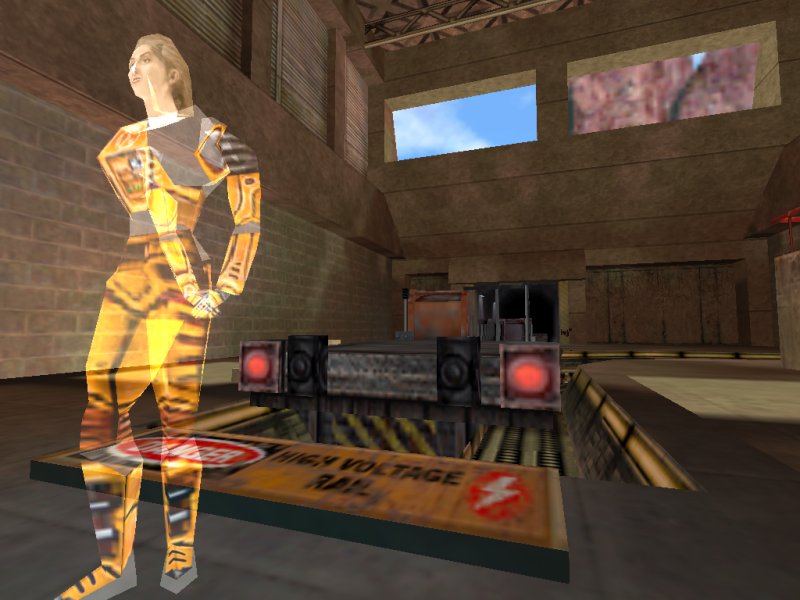 No effect applied
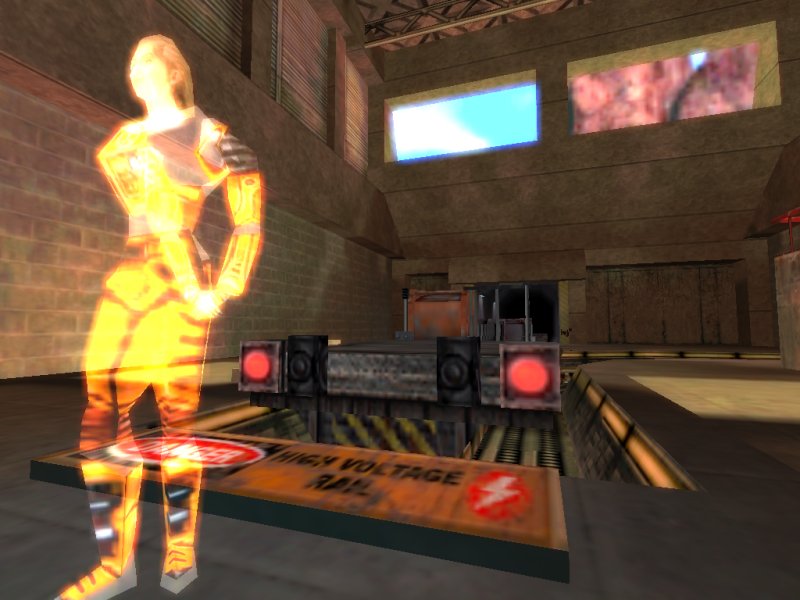 This article's effect
More examples of how the effect looks can be found in the previous article.
This article's effect
More examples of how the effect looks can be found in the previous article.
Attached to this article is a of the effect, bundled into a mini-mod. Extract it into your Half-Life directory, then load up one of the HL maps to see the effect in action.
As before, this effect only works under OpenGL, which is no great loss as the majority of people use OpenGL in preference to Direct3D with Half-Life.
Let's get moving. First things first, go to your project's settings (Project->Settings in MSVC++) and add 'opengl32.lib' as a library to link with. This enables us to use OpenGL commands as required.
Next, open up tri.cpp. At the top, add these two include directives:
After the definitions, add this:
Next is a small utility function to make the code easier to read:
The last function we need to create is the one that does all the work, and which will be called every frame to do the actual blurring:
All that's left now is to add in the code to make it actually apply the blur. Open up cdll_int.cpp and before the second
This article aims to rectify that. Using the same basic algorithm as before, I will describe how you can implement this glow effect without the use of any vertex or pixel shaders. All the hardware requires is the GL_NV_texture_rectangle OpenGL extension (or better), which is supported on even fairly low-end cards. As before, this article will walk you through the steps necessary to implement this in your modification.
Here's an image of a scene with no effect applied and this article's effect:
No effect appliedThis article's effectAttached to this article is a of the effect, bundled into a mini-mod. Extract it into your Half-Life directory, then load up one of the HL maps to see the effect in action.
As before, this effect only works under OpenGL, which is no great loss as the majority of people use OpenGL in preference to Direct3D with Half-Life.
Let's get moving. First things first, go to your project's settings (Project->Settings in MSVC++) and add 'opengl32.lib' as a library to link with. This enables us to use OpenGL commands as required.
Next, open up tri.cpp. At the top, add these two include directives:
#include <windows.h>
#include <gl/gl.h>#define DLLEXPORT, add this:
#define GL_TEXTURE_RECTANGLE_NV 0x84F5extern "C" block, add this block of code:
#include "r_studioint.h"

extern engine_studio_api_t IEngineStudio;IEngineStudio to retrieve which renderer is being used - software, OpenGL or Direct3D. After this, add in this block of definitions:
// TEXTURES
unsigned int g_uiScreenTex = 0;
unsigned int g_uiGlowTex = 0;

// FUNCTIONS
bool InitScreenGlow(void);
void RenderScreenGlow(void);
void DrawQuad(int width, int height, int ofsX = 0, int ofsY = 0);After the definitions, add this:
bool InitScreenGlow(void)
{
     // register the CVARs
     gEngfuncs.pfnRegisterVariable("glow_blur_steps", "4", 0);
     gEngfuncs.pfnRegisterVariable("glow_darken_steps", "3", 0);
gEngfuncs.pfnRegisterVariable("glow_strength", "2", 0);// create a load of blank pixels to create textures with
unsigned char* pBlankTex = new unsigned char[ScreenWidth*ScreenHeight*3];
memset(pBlankTex, 0, ScreenWidth*ScreenHeight*3);// Create the SCREEN-HOLDING TEXTURE
glGenTextures(1, &g;_uiScreenTex);
glBindTexture(GL_TEXTURE_RECTANGLE_NV, g_uiScreenTex);
glTexParameteri(GL_TEXTURE_RECTANGLE_NV, GL_TEXTURE_MIN_FILTER, GL_LINEAR);
glTexParameteri(GL_TEXTURE_RECTANGLE_NV, GL_TEXTURE_MAG_FILTER, GL_LINEAR);
glTexImage2D(GL_TEXTURE_RECTANGLE_NV, 0, GL_RGB8, ScreenWidth, ScreenHeight, 0, GL_RGB8, GL_UNSIGNED_BYTE, pBlankTex);// Create the BLURRED TEXTURE
glGenTextures(1, &g;_uiGlowTex);
glBindTexture(GL_TEXTURE_RECTANGLE_NV, g_uiGlowTex);
glTexParameteri(GL_TEXTURE_RECTANGLE_NV, GL_TEXTURE_MIN_FILTER, GL_LINEAR);
glTexParameteri(GL_TEXTURE_RECTANGLE_NV, GL_TEXTURE_MAG_FILTER, GL_LINEAR);
glTexImage2D(GL_TEXTURE_RECTANGLE_NV, 0, GL_RGB8, ScreenWidth/2, ScreenHeight/2, 0, GL_RGB8, GL_UNSIGNED_BYTE, pBlankTex); // free the memory
delete[] pBlankTex;
return true;
}Next is a small utility function to make the code easier to read:
void DrawQuad(int width, int height, int ofsX, int ofsY)
{
     glTexCoord2f(ofsX,ofsY);
     glVertex3f(0, 1, -1);
     glTexCoord2f(ofsX,height+ofsY);
     glVertex3f(0, 0, -1);
     glTexCoord2f(width+ofsX,height+ofsY);
     glVertex3f(1, 0, -1);
     glTexCoord2f(width+ofsX,ofsY);
     glVertex3f(1, 1, -1);
}The last function we need to create is the one that does all the work, and which will be called every frame to do the actual blurring:
void RenderScreenGlow(void)
{
     // check to see if (a) we can render it, and (b) we're meant to render it

     if (IEngineStudio.IsHardware() != 1)
          return;

     if ((int)gEngfuncs.pfnGetCvarFloat("glow_blur_steps") == 0 || (int)gEngfuncs.pfnGetCvarFloat("glow_strength") == 0)
          return;

     // enable some OpenGL stuff
     glEnable(GL_TEXTURE_RECTANGLE_NV);
     glColor3f(1,1,1);
glDisable(GL_DEPTH_TEST);// STEP 1: Grab the screen and put it into a texture
glBindTexture(GL_TEXTURE_RECTANGLE_NV, g_uiScreenTex);
glCopyTexImage2D(GL_TEXTURE_RECTANGLE_NV, 0, GL_RGB, 0, 0, ScreenWidth, ScreenHeight, 0);// STEP 2: Set up an orthogonal projection
glMatrixMode(GL_MODELVIEW);
glPushMatrix();
glLoadIdentity();
glMatrixMode(GL_PROJECTION);
glPushMatrix();
glLoadIdentity();
glOrtho(0, 1, 1, 0, 0.1, 100);DrawQuad function draws across the whole screen.
// STEP 3: Render the current scene to a new, lower-res texture, darkening non-bright areas of the scene
// by multiplying it with itself a few times.

glViewport(0, 0, ScreenWidth/2, ScreenHeight/2);

glBindTexture(GL_TEXTURE_RECTANGLE_NV, g_uiScreenTex);

glBlendFunc(GL_DST_COLOR, GL_ZERO);

glDisable(GL_BLEND);

glBegin(GL_QUADS);
DrawQuad(ScreenWidth, ScreenHeight);
glEnd();

glEnable(GL_BLEND);

glBegin(GL_QUADS);
for (int i = 0; i < (int)gEngfuncs.pfnGetCvarFloat("glow_darken_steps"); i++)
     DrawQuad(ScreenWidth, ScreenHeight);
glEnd();

glBindTexture(GL_TEXTURE_RECTANGLE_NV, g_uiGlowTex);
glCopyTexImage2D(GL_TEXTURE_RECTANGLE_NV, 0, GL_RGB, 0, 0, ScreenWidth/2, ScreenHeight/2, 0);glow_darken_steps CVAR) to make darker colours get even darker, leaving brighter colours still relatively bright (0.2*0.2 = 0.04, which is a 0.16 difference, but 0.9*0.9 = 0.89, which is a 0.01 difference). The result is then stored in the glow texture.
// STEP 4: Blur the now darkened scene in the horizontal direction.

float blurAlpha = 1 / (gEngfuncs.pfnGetCvarFloat("glow_blur_steps")*2 + 1);

glColor4f(1,1,1,blurAlpha);

glBlendFunc(GL_SRC_ALPHA, GL_ZERO);

glBegin(GL_QUADS);
DrawQuad(ScreenWidth/2, ScreenHeight/2);
glEnd();

glBlendFunc(GL_SRC_ALPHA, GL_ONE);

glBegin(GL_QUADS);
for (i = 1; i <= (int)gEngfuncs.pfnGetCvarFloat("glow_blur_steps"); i++) {
     DrawQuad(ScreenWidth/2, ScreenHeight/2, -i, 0);
     DrawQuad(ScreenWidth/2, ScreenHeight/2, i, 0);
}
glEnd();

glCopyTexImage2D(GL_TEXTURE_RECTANGLE_NV, 0, GL_RGB, 0, 0, ScreenWidth/2, ScreenHeight/2, 0);glow_blur_steps CVAR.
// STEP 5: Blur the horizontally blurred image in the vertical direction.

glBlendFunc(GL_SRC_ALPHA, GL_ZERO);

glBegin(GL_QUADS);
DrawQuad(ScreenWidth/2, ScreenHeight/2);
glEnd();

glBlendFunc(GL_SRC_ALPHA, GL_ONE);

glBegin(GL_QUADS);
for (i = 1; i <= (int)gEngfuncs.pfnGetCvarFloat("glow_blur_steps"); i++) {
     DrawQuad(ScreenWidth/2, ScreenHeight/2, 0, -i);
     DrawQuad(ScreenWidth/2, ScreenHeight/2, 0, i);
}
glEnd();

glCopyTexImage2D(GL_TEXTURE_RECTANGLE_NV, 0, GL_RGB, 0, 0, ScreenWidth/2, ScreenHeight/2, 0);glow_blur_steps.
// STEP 6: Combine the blur with the original image.

glViewport(0, 0, ScreenWidth, ScreenHeight);

glDisable(GL_BLEND);

glBegin(GL_QUADS);
DrawQuad(ScreenWidth/2, ScreenHeight/2);
glEnd();

glEnable(GL_BLEND);
glBlendFunc(GL_ONE, GL_ONE);

glBegin(GL_QUADS);
for (i = 1; i < (int)gEngfuncs.pfnGetCvarFloat("glow_strength"); i++) {
     DrawQuad(ScreenWidth/2, ScreenHeight/2);
}
glEnd();

glBindTexture(GL_TEXTURE_RECTANGLE_NV, g_uiScreenTex);

glBegin(GL_QUADS);
DrawQuad(ScreenWidth, ScreenHeight);
glEnd();glow_strength CVAR controls the number of times that the blurred version is added to the original (try setting it to 50 to get some weird psychadelic effects!).
     // STEP 7: Restore the original projection and modelview matrices and disable rectangular textures.

     glMatrixMode(GL_PROJECTION);
     glPopMatrix();

     glMatrixMode(GL_MODELVIEW);
     glPopMatrix();

     glDisable(GL_TEXTURE_RECTANGLE_NV);
     glEnable(GL_DEPTH_TEST);
     glDisable(GL_BLEND);
}All that's left now is to add in the code to make it actually apply the blur. Open up cdll_int.cpp and before the second
extern "C" block, add this:
// SCREEN GLOW
extern bool InitScreenGlow();
extern void RenderScreenGlow();HUD_VidInit (around line 170) and after VGui_Startup() is called, add this:
// SCREEN GLOW
if (!InitScreenGlow())
gEngfuncs.Con_Printf("ERROR: Could not initialise screen glow!");HUD_Redraw (around line 210) and add this before gHUD.Redraw() is called:
RenderScreenGlow(); // SCREEN GLOW- Article Credits
- Francis 'DeathWish' Woodhouse – Author
This article was originally published on Valve Editing Resource Collective (VERC).
The original URL of the article was http://collective.valve-erc.com/index.php?doc=1087646312-07733400.
The archived page is available here.
TWHL only publishes archived articles from defunct websites, or with permission.
For more information on TWHL's archiving efforts, please visit the
TWHL Archiving Project page.
Comments
You must log in to post a comment. You can login or register a new account.