VERC: Texture Alignment on Curves Last edited 5 years ago2019-04-21 12:42:28 UTC
You are viewing an older revision of this wiki page. The current revision may be more detailed and up-to-date.
Click here to see the current revision of this page.
Texture alignment across 'curved' faces poses a number of problems, and much of it can turn into an evil guessing game of offsets, scales, and angles. Often overlooked are the Vertex Manipulation and Align to View tools within the editor. This tutorial introduces some practical uses of these tools, but an intermediate familiarity with vertex manipulation and texture alignment will be required for best use. Some notes about each:
Vertex Manipulation, while risky for inexperienced users, is one of the most powerful tools available in Hammer. One of its most powerful uses is, surprisingly, in texture alignment. Any face moved, split, or created in vertex manipulation retains the properties (alignment, offset, etc.) of the original face unless the operation draws the plane past the point where a perpendicular to axis error would occur. Clipping often (but not always) loses much of this information, causing you to spend extra time and effort re-aligning the textures. In many cases, face splitting and vertex/edge dragging will give you the results quicker and with no texture misalignment.
Align to View is a quirky but powerful texture alignment tool. While often more apt to screw things up, careful camera placement can allow some very nice alignment to be done much easier than it would be otherwise. An align to view accident caused me to stumble upon the style I used for the 'liquid' background in the teleportation tunnels Wormhole and Odin's Guard.
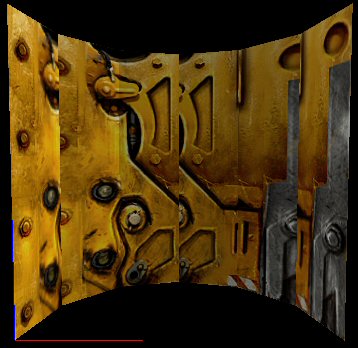
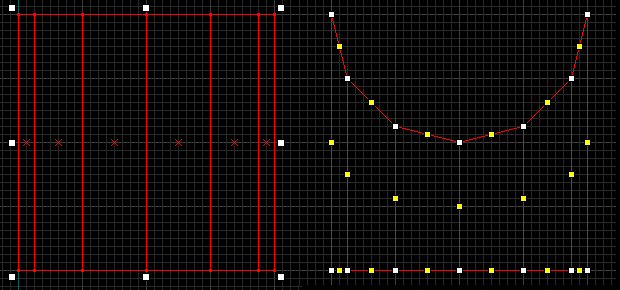
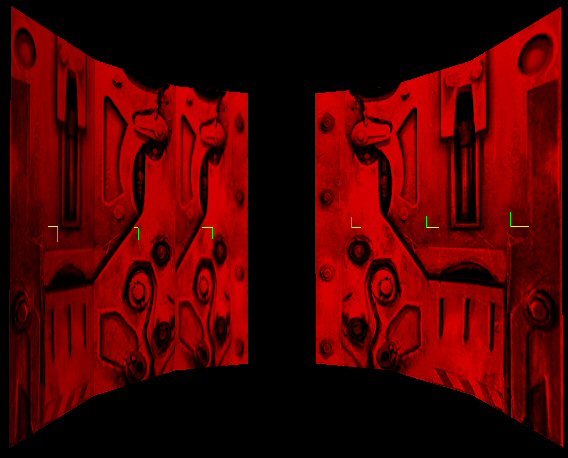
Here's just one way to use both of these tools, but hopefully this just helps you open the door to more possibilities:As you can see, default texture alignment across curves in Half-Life can cause problems. Even with the use of the Arch and Cylinder tools, alignment issues like this often pop up (note: I have only used this texture for demonstration purposes). In this case, I manually clipped the faces, but almost any means of creation will give a similar result. However, it is possible to do this:...in less time and with less effort. In this example, rather than clipping, I used vertex manipulation to pull the faces back as necessary, retaining the original texture alignment and causing the texture to line up just perfectly. Done on a 256x256 solid block with 12 faces and a grid size of 8, it should look something like this:The ability for vertex manipulation to retain original surface properties in motions such as this makes it incredibly valuable in creating and modifying more complex architecture, especially when you start getting this many faces involved (or more). However, you can see it's still not quite perfect - the outside faces, far steeper than the inside faces, have a much more stretched appearance.
Those of you who have tried align-to-world and align-to-face operations on these sorts of faces know how frustrating proper alignment can sometimes be. It'd be nice to just be able to pop the "world" alignment box and call it good, but that's just not the case. However, the Align to View operation in Texture Application can greatly help.
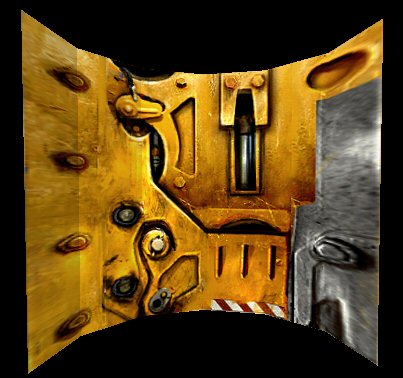
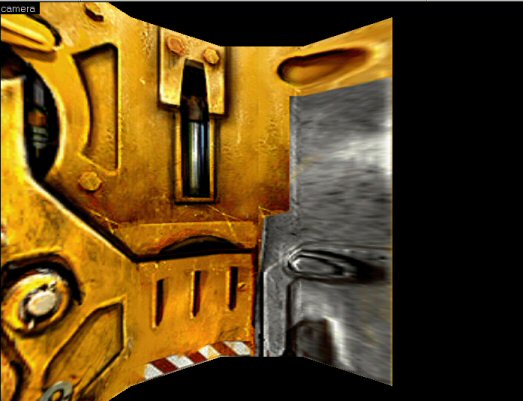
To properly use Align to View, you have to have your camera set up just right. You'll need to actually set a camera point first, so those of you like me who just like to get into a map and start flying around with the space bar, don't forget this step In this example, we have a 6 sided surface. The middle face of each side of 3 is at a 45 degree angle. Set your camera at a 90 degree angle facing that face, targetting the midpoint (the camera does snap to grid on a very fine level, so placement is not as tricky as it may seem). In this case, where the brushes form a vertical curve, I also set the camera to the vertical midpoint height of the brushes. In the end, your view should look something like this:Once you have aligned your view this way, be careful to not move anything! Then, go to texture application and select "Align to View" from the bottom. Click on the three faces making up this half of the curve. Then, select "Lift and Select" and mark all 3 faces. Tick the "Treat as one" box on and then click "Fit." You'll notice the texture will now fit perfectly across all 3 faces... but it always goes upside-down. Set the vertical scale to -x, where x = whatever scale it fit to (or you set it to) and make note of the x scale, though we won't do anything with it yet. Repeat the same process for the other half.This is a comparison between fitting the texture across all faces with world alignment set (on the left) and with our align to view work done (on the right). Once you have both sides taken care of, you'll need to manually join them together. To do so, take the right half, select all 3 faces, and change the x scale to twice the number it currently is (in this case, I went from .71 to 1.42). Keeping "Treat as one" marked, align these textures to the right. Repeat the same process on the left, aligning them to the left. You now have this:The reason for performing the Align to View operation on each side individually is that it had already occured naturally when we performed the first vertex operation, hence the stretching. Applying the proper texture axis to the faces will allow the two sides of the curve to blend much better than they would otherwise - our new version no longer has any notable stretching on the outside (steepest) faces
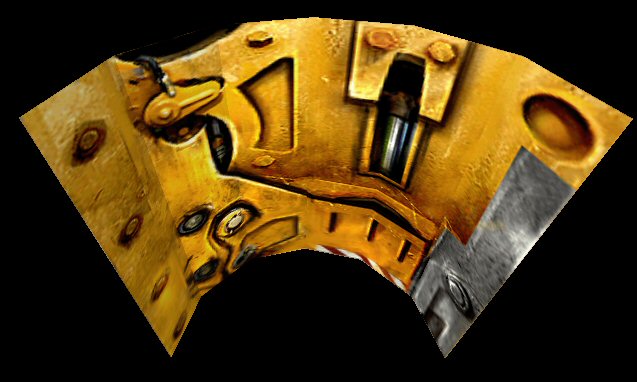
Of course, this same technique applies to convex faces as well, and also works on conic sections. See a similar example I whipped up while testing out ns2.wad long long ago...Vertex Manipulation and Align to View are tricky tools to use properly, but with the right knowledge can make many things much easier to handle. While this demonstration is very limited in scale and complexity, this is just the beginning of a huge range of possibilities allowed by these tools. Enjoy.
Vertex Manipulation, while risky for inexperienced users, is one of the most powerful tools available in Hammer. One of its most powerful uses is, surprisingly, in texture alignment. Any face moved, split, or created in vertex manipulation retains the properties (alignment, offset, etc.) of the original face unless the operation draws the plane past the point where a perpendicular to axis error would occur. Clipping often (but not always) loses much of this information, causing you to spend extra time and effort re-aligning the textures. In many cases, face splitting and vertex/edge dragging will give you the results quicker and with no texture misalignment.
Align to View is a quirky but powerful texture alignment tool. While often more apt to screw things up, careful camera placement can allow some very nice alignment to be done much easier than it would be otherwise. An align to view accident caused me to stumble upon the style I used for the 'liquid' background in the teleportation tunnels Wormhole and Odin's Guard.
Here's just one way to use both of these tools, but hopefully this just helps you open the door to more possibilities:As you can see, default texture alignment across curves in Half-Life can cause problems. Even with the use of the Arch and Cylinder tools, alignment issues like this often pop up (note: I have only used this texture for demonstration purposes). In this case, I manually clipped the faces, but almost any means of creation will give a similar result. However, it is possible to do this:...in less time and with less effort. In this example, rather than clipping, I used vertex manipulation to pull the faces back as necessary, retaining the original texture alignment and causing the texture to line up just perfectly. Done on a 256x256 solid block with 12 faces and a grid size of 8, it should look something like this:The ability for vertex manipulation to retain original surface properties in motions such as this makes it incredibly valuable in creating and modifying more complex architecture, especially when you start getting this many faces involved (or more). However, you can see it's still not quite perfect - the outside faces, far steeper than the inside faces, have a much more stretched appearance.
Those of you who have tried align-to-world and align-to-face operations on these sorts of faces know how frustrating proper alignment can sometimes be. It'd be nice to just be able to pop the "world" alignment box and call it good, but that's just not the case. However, the Align to View operation in Texture Application can greatly help.
To properly use Align to View, you have to have your camera set up just right. You'll need to actually set a camera point first, so those of you like me who just like to get into a map and start flying around with the space bar, don't forget this step
 In this example, we have a 6 sided surface. The middle face of each side of 3 is at a 45 degree angle. Set your camera at a 90 degree angle facing that face, targetting the midpoint (the camera does snap to grid on a very fine level, so placement is not as tricky as it may seem). In this case, where the brushes form a vertical curve, I also set the camera to the vertical midpoint height of the brushes. In the end, your view should look something like this:Once you have aligned your view this way, be careful to not move anything! Then, go to texture application and select "Align to View" from the bottom. Click on the three faces making up this half of the curve. Then, select "Lift and Select" and mark all 3 faces. Tick the "Treat as one" box on and then click "Fit." You'll notice the texture will now fit perfectly across all 3 faces... but it always goes upside-down. Set the vertical scale to -x, where x = whatever scale it fit to (or you set it to) and make note of the x scale, though we won't do anything with it yet. Repeat the same process for the other half.This is a comparison between fitting the texture across all faces with world alignment set (on the left) and with our align to view work done (on the right). Once you have both sides taken care of, you'll need to manually join them together. To do so, take the right half, select all 3 faces, and change the x scale to twice the number it currently is (in this case, I went from .71 to 1.42). Keeping "Treat as one" marked, align these textures to the right. Repeat the same process on the left, aligning them to the left. You now have this:The reason for performing the Align to View operation on each side individually is that it had already occured naturally when we performed the first vertex operation, hence the stretching. Applying the proper texture axis to the faces will allow the two sides of the curve to blend much better than they would otherwise - our new version no longer has any notable stretching on the outside (steepest) faces
Of course, this same technique applies to convex faces as well, and also works on conic sections. See a similar example I whipped up while testing out ns2.wad long long ago...Vertex Manipulation and Align to View are tricky tools to use properly, but with the right knowledge can make many things much easier to handle. While this demonstration is very limited in scale and complexity, this is just the beginning of a huge range of possibilities allowed by these tools. Enjoy.
Comments
You must log in to post a comment. You can login or register a new account.

