This article was recovered from an archive and needs to be reviewed
The formatting may be incorrect as it was automatically converted to WikiCode from HTML, it needs to be revised and reformatted.Okay, a little introduction first. This tutorial is meant for people who have reasonable mapping experience. If you're completely new to mapping, this tutorial probably is not suited for you. You better take a look at the GenSurf program (widely available). But you don't have to be a professional in order to be able to use the technique described here. Just pay attention and experiment a lot! You will be using Worldcraft's
Vertex tool a lot for the rocks-making technique described here. So be careful with what you do with that, since you easily create invalid solid brushes when you misuse the tool.
We are going to make realistic looking rocks and desert-ground using triangles. Using triangles has a few great advantages:
- The Quake engine Half-Life uses is based on triangles, so if you align your triangles alongside their edges, the engine won't need to split up its faces, thus improving the speed of your map
- You can move the vertexes of triangles around quite a lot without getting invalid brushes
Two important things before we start! Always:
- For every rock/sand brush you make, set the scale of the textures to 2.0 instead of 1.0. This decreases the amount of faces
- Switch off the texture lock (Tools | Texture Lock or Shift-L). Sporadic terrain should have sporadic texture alignment
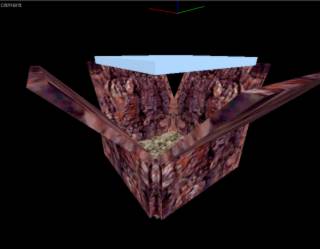
This may sound a little strange, but I will explain the technique by starting with a simple boxed room! Normally you could make a room out of 6 brushes, but now we'll split up these 6 brushes into trangles. The more triangles you split it up, the more detailed you can make your rocks/ground, but the more the r_speeds of your map will rise! I personally prefer triangles of 128x128 pixels. Ofcourse the wall has to have some sort of rock texture and the ground some sort of sand texture. When you plan to make a cave, you should also split up the ceiling brush. When you want to make an outdoor mountain scene, you can simply keep the upper brush and put the SKY texture on it. I've chosen the latter for this tutorial. You should have something like this now (I selected some brushes to show how you should have built your triangles)
We're now going to bend the upper row of triangles to the outside, to give the rocks a more natural look. Select the upper row of triangles from one side. When you've done this, click your selection twice to be able to bend it. Now bend it backwards with a shear of about 80 (might be negative). Do this for all 4 sides. You can vary the shear with which you bend each side to give the rocks a more random look. Your map might look something like this now:
Now comes a tricky part. As you can see on the above screenshot, we have created 4 empty spaces in each of the 4 upper corners. As you can see these have a triangular shape. You now have two options:
- Add 4 triangles (1 to each corner) and make them align EXACTLY with the triangles you already made
- Move the upper vertexes of the triangles in the corners, so they fit exactly and form a rectangle again
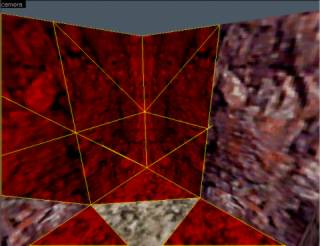
I've used the latter option. See the following screenshot for the details. Ofcourse you'll have to do this for all of the 4 corners.
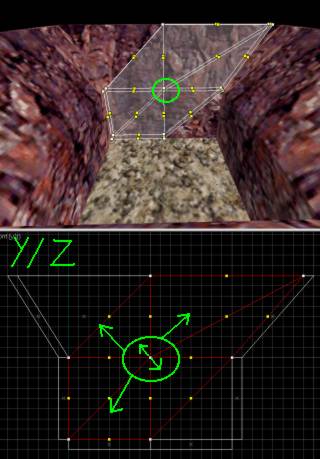
We still don't have a map here which looks like an natural looking mountain/rock scene. But what we do have is a perfect situation from which we easily can create such a natural looking mountain/rock scene. The only thing you now have to do is select a couple of brushes which all share the same set of vertices. First take a look at the following screenshot.
The set of vertices selected in the screenshot can be moved to all possible directions without (!!) causing invalid brushes (ofcourse as long as you don't 'invert' the brush which is always an invalid brush). You also can move it on the x-axis, which gives it a more natural look. But as long as you select all of the brushes around a certain vertex, you can always move it as much as you like. Now experiment with it! Don't exaggerate your vertex displacements, since that won't improve the 'natural' look you want for your map.
Now it's time for you to play around with this technique. But before I quit I want to tell you the following:
- if you want to make an outdoor scene in your map, you should design how your mountain scene will look before you make any brushes! With a predefined plan, you can make the walls for it (split up in triangles as explained above). When you've done so, you can start moving the vertexes around for the natural look (see the screenshot below, it's the start scene I used for the tutorial map)
- Whenever possible, try to align your triangles which make up the ground and walls to the edges of any building you might put into your map. This again will keep your r_speeds low!
- I've used a special way to 'close' the tutorial map (i.e. it won't leak). I didn't place a huge skybox around it (which is a tragic mistake) but did it in a way that keeps the r_speeds nice!
Now download the tutorial map, have a look and enjoy! Please note that it took me no more than half an hour to build the tutorial map! The technique is very simple and very fast. I hope you soon will be able too to build good looking rocks and desertgrounds which will not cause the excessivly high r_speeds! When you have problems with this technique, you can reach me at
woprog@hotmail.com.
This article was originally published on
69th Vlatitude.
TWHL only archives articles from defunct websites. For more information on TWHL's archiving efforts, please visit the
TWHL Archiving Project page.