Tutorial: Dark Outdoor Maps Last edited 5 months ago2024-09-10 21:10:00 UTC
Dark/Night Outdoor Maps
Not all of the maps in the original HL were daylight bright, but most of the outdoor maps were. Counter-Strike has enabled the player to use "Nightvision goggles" for the first time, and there is no point in running around with them on, in full daylight. Here we will try to cover the easiest method of adding darkness to your level.Here we will try to cover the easiest method of adding darkness to your map. With your outdoor area open in Hammer go to the tool bar and select Map and then Map properties... you should be presented with the Worldspawn Object Properties box below.
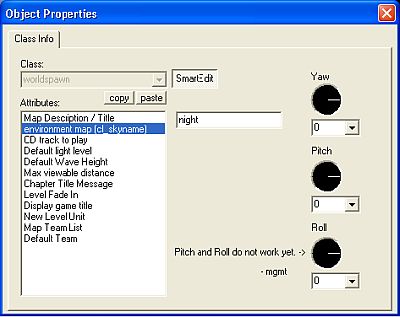 WorldSpawn Properties
- night
- space
- black
- dusk
Changing the Default Light Level in the Worldspawn does not seem to do anything regardless of the figure entered.
light_environment
Add a light_environment or a light_spot with FLAG Is Sky checked to your map. If you compile your map now, you will get something that looks like this: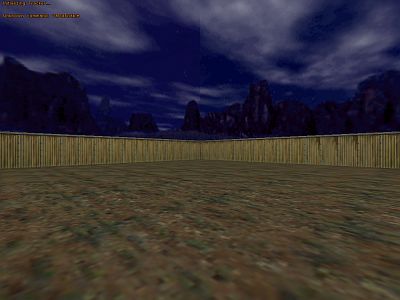 Doesn't look like night time
 Set it lower...
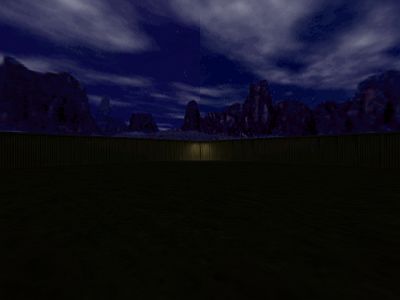 ....and you can see nothing!
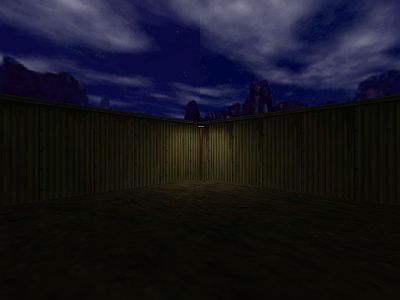 Now you can see an exciting corner!
-noskyfix line for your RAD compile to make use of multiple light_environments. You have the option of adding -ambient to your hlrad compile. Figures like: -ambient 0.0040 0.0040 0.0040 will add a small amount of ambient light to your shadows. The figures are very sensitive, so tweak them until they are suitable for your needs. There is a lot more you can do with the light_environment and skies, but this is just a really basic starter tutorial. For more information on environments check out Atom's tutorial, Environment.
- Article Credits
-
 Andy
–
Original author
Andy
–
Original author
-
 Penguinboy
–
Revised and added additional information
Penguinboy
–
Revised and added additional information
2 Comments
JohnLocke
Commented 13 years ago2011-06-23 16:13:20 UTC
Comment #100567
This is a very simple and good tutorial.

Stojke
Commented 11 years ago2013-03-30 01:17:58 UTC
Comment #100568
Good stuff, good stuff.
You must log in to post a comment. You can login or register a new account.