Tutorial: Random entity triggering Last edited 1 month ago2024-11-06 13:51:58 UTC
Random events are something that may be tricky to create in Goldsource. Of course, you can use timed events to make things seem random, but it's time consuming, and ultimately isn't the same as a real random event. Fortunately there's a trick that allows you to do proper random triggers without any custom code required! This tutorial will explain how to do it, and suggest some uses for the technique.
The Entity Setup
The basic components you need are as follows:- An env_beam entity
- A number of info_target entities
- A func_button to go along with each info_target
Knowing this, the set up is fairly simple. All that needs to be done is to place the func_buttons in the path between the two info_targets that make up the start and end of the env_beam's path.
Take the following steps:
- Place the func_buttons between the info_target pairs that the env_beam is using
- Set the health of the func_button entities to 1 (so they are triggered by damage)
- Set the damage dealt by the env_beam to 999999
- Enable the "Random strike" flag on the env_beam
Screenshots
This is the entity set up: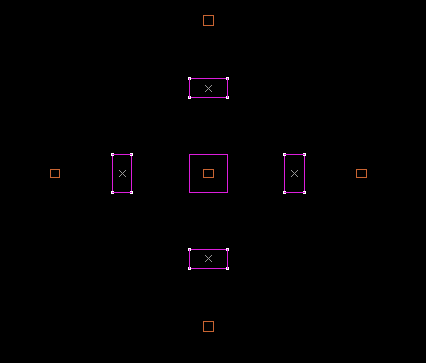 2D view top
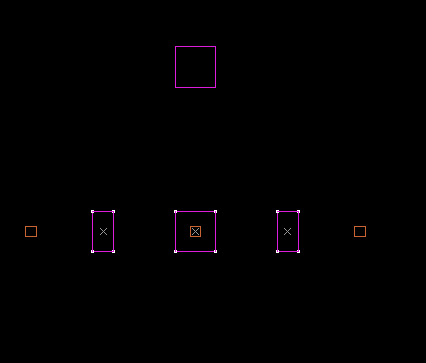 2D view side
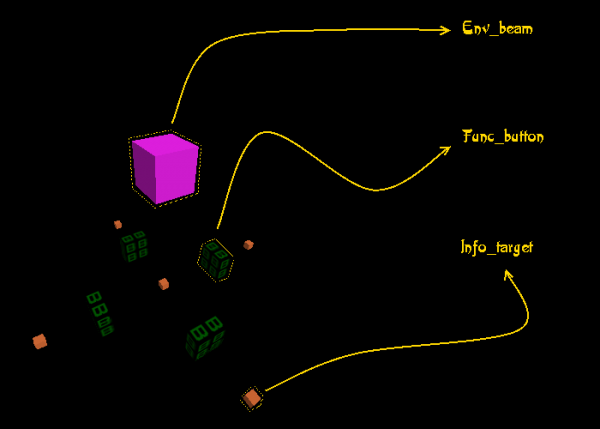 3D view illustrated
For example, say there were 4 ending targets for the beam, each target would be decided randomly each time the beam strikes. Of course, you can have as many ending targets as you want!
Take a look at the properties on the env_beam:
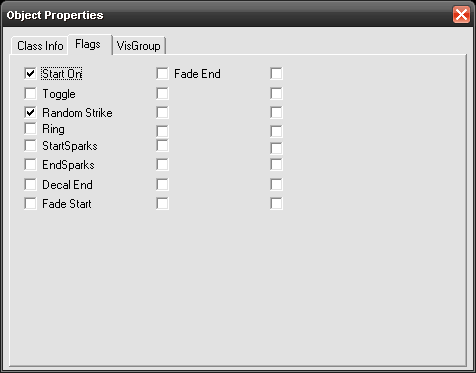 env_beam flag properties
Also, in this case, env_beam is set to be ON at all times, but you can toggle it however you want as you normally would.
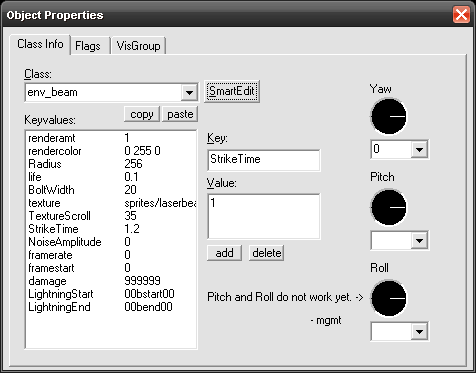 env_beam class properties
The "Strike again time" value is the time between each strike of the beam, and the "Life" value is how long each strike lasts (no more than 0.1 seconds is needed for this method).
If you wanted your events to trigger very quickly, you could reduce the time for the "Strike again time" value. Along the same lines, increasing the "Strike again time" value will make your events trigger more slowly.
The "Random strike" flag randomizes the strike again time for each interval, between 0 and the given value.
You can also take advantage of the "Reset time" property on the func_buttons - meaning that you can make sure that the random beam doesn't trigger your button too quickly.
Summary
The env_beam entity uses the "Random strike" flag chooses its targets at random if they're all given the same name, to achieve random activation of buttons, which then go on to trigger another entity. You can control the speed of the events with the "Strike again time" on the beam, as well as the "Reset time" on the buttons.This technique can be used to trigger anything that a button can trigger. One example is randomly swapping teleport locations in a map, like in this example map.
If you're still confused, the example map contains everything you need to know to find out how to use this setup!
- Big thanks to The Mighty Atom who introduced me to this method!
- Article Credits
-
 Stojke
–
Original author
Stojke
–
Original author
-
 Captain P
–
Corrections about "Random Strike"
Captain P
–
Corrections about "Random Strike"
-
 kimilil
–
Additional information
kimilil
–
Additional information
10 Comments
You must log in to post a comment. You can login or register a new account.


The central info target has one name (starting entity)
The outer info targets need to have the same name (ending entity)
So, you have 2 entity names, start and end, where all ends are named the same. Thats how the program choses randomly.
Note that the 'Random strike' flag is not required for random targeting - it randomizes the time between strikes.