

Did you apply Scales? Seems like on export theres a skeleton mismatch in size. You can also verify by importing the SMD back into a new blender file and see if the skeleton is scaled differently. Your weight links seem fine as it wouldnt export if not, basically 1 bone per vertex
As for MDL viewer, HLAM is the new thing to replace Jed's:
https://github.com/SamVanheer/HalfLifeAssetManager/releases/tag/HLAM-V3.0.0
Forum posts
Posted 7 months ago2024-06-21 04:58:27 UTC
in Could Someone Give me Advice for Enhancing Custom Textures in Goldsource Engine? Post #348906
in Could Someone Give me Advice for Enhancing Custom Textures in Goldsource Engine? Post #348906
With texture tiling seamless I found the fast easy reversible way is the "cross technique". Theres some videos on youtube but the basic jist is just duplicate your texture into another layer, then use the offset filter, then place a image mask on that layer then paint white reveal around the cross edges. If you screw up you can reverse the mask by painting back black.
More advanced tilable usually involves either clone stamp or copy pasting some select details overtop. Patch select and heal brush can work as well.
If you have the issue of one side darker than the other then its a matter of light equalization which this tutorial covers:
https://tolas.wordpress.com/2009/05/26/tutorial-how-to-equalize-textures-in-photoshop/
another trick you can try with some stuff that this doesnt work is duplicating the layer, invert, turn the duplicate to "luminosity", create a black layer below it, merge down, then set that merged layer to "overlay"
As for brushes, look up grunge brushes or grunge brush packs. When adding dirt/darker details blend them with a multiply layer. When needing something with highlights or lightening use either "screen" or soft light. If you got a black and white noise or grunge texture you can use "overlay" which uses both black and white to darken and lighten. Another big thing is layering different grunge layers with low layer opacity.
A very under used feature is the layer style advanced blending with the "Blend If" sliders (double clicking the layer, then holding ALT and drag the blending arrow open: example image)
I have a lot more examples to draw from but I do have a list of links here:
https://the303.org/tutorials/gold_mdl_tex_links.htm
Lasty as for "optimization", thats kinda hard to really answer as if you mean texture sizes it could just be stick to the sizes of say original Halflife, or later CS games. also if you havent seen it check out my texture authoring guide:
https://the303.org/tutorials/gold_texture.htm
As for books the old PHOTOSHOP WOW books are great. 3D Game Textures by Luke Ahearn is also good for old-era stuff that would fit in with goldsrc look.
While I don't have a proper full page on my site just yet, due to the big 25th update I thought id post some info on the process as we are likely to get this question asked a lot:
2. Replace the studiomdl.exe in this folder C:\Program Files (x86)\Steam\steamapps\common\Half-Life SDK\Model Tools with this one http://www.the303.org/backups/sven_studiomdl_2019.rar
(The current HLSDK studiomdl.exe is 2002 era old and is missing support for $texrendermode and other things. This is a modernized compiler that is compatable. To see new features see here: https://the303.org/tutorials/gold_qc.htm#AS
3. Navigate to C:\Program Files (x86)\Steam\steamapps\common\Half-Life SDK\Player Models\DMatch and make a copy of one of these, for example copy "gordon.qc" and rename it. Then navigate into "Highcount" and make a copy of the gordon folder and rename it to your modelname, and do the same for "lowcount"
NOTE: cl_himodels 1/0 is an old command that seems to be kinda hidden now. Basically it uses bodygroup to change from a high poly to a low poly model. by default iirc its set to 0 which uses the lowpoly variant. Its up to you if you want to use this feature but most people don't bother with it. If not then you just remove the "low" line in the bodygroup QC
4. In the QC file open it and fix up the look paths as they were set to valves names and also change the mesh names to what model you are using. This is an example:
For texturing methods and matching half-life style see here: https://the303.org/tutorials/gold_mdl_tex_links.htm
If you want color changing textures, see this guide: https://the303.org/tutorials/gold_remap.htm
If you want mic-activated jaw flap animation, see this guide: https://the303.org/tutorials/gold_flappyjaws.htm
6. When you are done you export the SMD into the high folder. Optionally you can make a lowerpoly version but not many people use this old LOD feature so you could just put the high being the only line in the bodygroup.
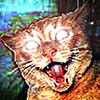
7. Its recommended to use crowbar.exe ( https://steamcommunity.com/groups/CrowbarTool ) as it has several features for the compiling process. Go to "Set up games" tab, and in the "Half-Life" tab, go to the "model viewer" and change its path to HLAM. Switch to the compile tab, choose your QC, make sure the Game configuration says "half-life". Press the compile button by default it makes a subfolder in the current dir. I use this until im happy with the model then I use the "game models" folder option. You will probably have some first time compile errors but heres a comprehensive list: https://the303.org/tutorials/gold_mdl_fix.htm
NOTE: If you are making custom animations for your model you must make a copy of the "player_shared.qc" rename it to something like "yourmodel", update the name of it in your main QC to point to it, then edit the player_shared_yourmodel.qc lines to have the new anims and make the names of those new anim SMD files unique so you don't overwrite the original SMD ones. Example like say idle_custom.smd. Also don't accidentally rename the sequence name to custom. It should look like this for example:
$sequence "idle" "idle_custom" fps 14 loop ACT_IDLE 1
8. To verify the model if It did succeed in compiling, click the button at the bottom to "use in view" and click "open viewer" or just use the "goto" button in the previous window to navigate to the model in its folder and open from there if you have associated mdl files with hlam.
9. Make any changes/recompile after verifying the model for any issues. Check all angles, check animations. If you think its good compile to models folder and launch the game. Useful testing commands to see your model:
start new server, password protect set at least 2 players
sv_cheats 1
thirdperson
cam_idealdist 128
cam_idealyaw 180
cam_idealpitch -30
voice_loopback 1 (if testing jaw-flap animation)
10. When you are sure its ready, then make your playermodel portrait: 164x200 BMP in 8bit indexed mode (but limit to 160 colors if not using color changing) . If doing the advanced color changing you will need to refer to this guide to get a working portrait to match: https://the303.org/tutorials/gold_remap.htm
INTRO:
- Before you start, Playermodels have limits compared to NPC models:
- You cannot add new animations to the existing set or change the order of the sequences
- You cannot change the FPS of animations, they are locked
- You cannot have sequences with more frames than the originals or else they will play too fast and will cut-off
- You cannot change the hitbox set (nice try)
- You cannot have skin changes (swappable body meshes are only for use in the cl_highmodels command)
- You can customize existing animations however you must make them fit within the same frames as the original and be keyed to match the same FPS as the originals
- You can add bones to the model as long as its parented off of existing and not inbetween existing bones (breaks hierarchy)
- You can have procedural mouth animations
- You can have color remapping
The method
1. Download the HalfLife SDK (Steam tools > Half-Life SDK) & HLAM ( https://github.com/SamVanheer/HalfLifeAssetManager )2. Replace the studiomdl.exe in this folder C:\Program Files (x86)\Steam\steamapps\common\Half-Life SDK\Model Tools with this one http://www.the303.org/backups/sven_studiomdl_2019.rar
(The current HLSDK studiomdl.exe is 2002 era old and is missing support for $texrendermode and other things. This is a modernized compiler that is compatable. To see new features see here: https://the303.org/tutorials/gold_qc.htm#AS
3. Navigate to C:\Program Files (x86)\Steam\steamapps\common\Half-Life SDK\Player Models\DMatch and make a copy of one of these, for example copy "gordon.qc" and rename it. Then navigate into "Highcount" and make a copy of the gordon folder and rename it to your modelname, and do the same for "lowcount"
NOTE: cl_himodels 1/0 is an old command that seems to be kinda hidden now. Basically it uses bodygroup to change from a high poly to a low poly model. by default iirc its set to 0 which uses the lowpoly variant. Its up to you if you want to use this feature but most people don't bother with it. If not then you just remove the "low" line in the bodygroup QC
4. In the QC file open it and fix up the look paths as they were set to valves names and also change the mesh names to what model you are using. This is an example:
$modelname "/player/skelepuncher/skelepuncher.mdl"
$cd "../player/"
$cdtexture "../dmatch/highcount/skelepuncher" //texture look in folder
$cliptotextures

$scale 1.0
$origin 0 0 36

// whole body
$bodygroup body
{
studio "../dmatch/lowcount/skelepuncher/skelepuncher-low" //remove this whole line if not using this feature
studio "../dmatch/highcount/skelepuncher/skelepuncher-high"
}

$include "../player/player_shared.qc"For texturing methods and matching half-life style see here: https://the303.org/tutorials/gold_mdl_tex_links.htm
If you want color changing textures, see this guide: https://the303.org/tutorials/gold_remap.htm
If you want mic-activated jaw flap animation, see this guide: https://the303.org/tutorials/gold_flappyjaws.htm
6. When you are done you export the SMD into the high folder. Optionally you can make a lowerpoly version but not many people use this old LOD feature so you could just put the high being the only line in the bodygroup.
7. Its recommended to use crowbar.exe ( https://steamcommunity.com/groups/CrowbarTool ) as it has several features for the compiling process. Go to "Set up games" tab, and in the "Half-Life" tab, go to the "model viewer" and change its path to HLAM. Switch to the compile tab, choose your QC, make sure the Game configuration says "half-life". Press the compile button by default it makes a subfolder in the current dir. I use this until im happy with the model then I use the "game models" folder option. You will probably have some first time compile errors but heres a comprehensive list: https://the303.org/tutorials/gold_mdl_fix.htm
NOTE: If you are making custom animations for your model you must make a copy of the "player_shared.qc" rename it to something like "yourmodel", update the name of it in your main QC to point to it, then edit the player_shared_yourmodel.qc lines to have the new anims and make the names of those new anim SMD files unique so you don't overwrite the original SMD ones. Example like say idle_custom.smd. Also don't accidentally rename the sequence name to custom. It should look like this for example:
$sequence "idle" "idle_custom" fps 14 loop ACT_IDLE 1
8. To verify the model if It did succeed in compiling, click the button at the bottom to "use in view" and click "open viewer" or just use the "goto" button in the previous window to navigate to the model in its folder and open from there if you have associated mdl files with hlam.
9. Make any changes/recompile after verifying the model for any issues. Check all angles, check animations. If you think its good compile to models folder and launch the game. Useful testing commands to see your model:
start new server, password protect set at least 2 players
sv_cheats 1
thirdperson
cam_idealdist 128
cam_idealyaw 180
cam_idealpitch -30
voice_loopback 1 (if testing jaw-flap animation)
10. When you are sure its ready, then make your playermodel portrait: 164x200 BMP in 8bit indexed mode (but limit to 160 colors if not using color changing) . If doing the advanced color changing you will need to refer to this guide to get a working portrait to match: https://the303.org/tutorials/gold_remap.htm
Thanks to the new 25th anniversary update, the glorious counter-strike brush entity known as FUNC_VEHICLE is now available in Half-Life.
I have seedees tutorial on my site here for it: https://the303.org/tutorials/gold_func_vehicle.htm
If anyone has made an HLDM map with func_vehicle let me know, id want to play sometime
Current issues so far ive noticed:
-acceleration sounds seem to not play properly
-idle sounds seem to be very delayed
Posted 2 years ago2022-10-20 23:27:45 UTC
in walking animation won't stay in place after compiling model with LX/LY command Post #346988
in walking animation won't stay in place after compiling model with LX/LY command Post #346988
First thing is to check to see if your root bone is different. For example, if you animated your model to move forward using a pelvis bone, but the pelvis bone is parented to another, that will break it. Blender BST by default has this annoying "implicit motionless bone" option in the export window that can do this. A quick way to verify is open the SMD in notepad++ and look at the bone list
Posted 4 years ago2021-01-25 08:10:28 UTC
in Making textures with the Half-Life aesthetic? Post #345277
in Making textures with the Half-Life aesthetic? Post #345277
Many of the World textures from Half-Life began as photographs of various places, then contrast boosted and given a paint over. A lot of early photobashing and some filters and the likes. Related this just dropped so you see what I mean:
https://twhl.info/thread/view/20064?page=last
As for the rest like special textures and monsters a lot of it used direct painting on uv maps in either photoshop or Corel Painter in the case of CS1.6. While I don't have a guide, I do have a big collection of links here:
http://www.the303.org/tutorials/gold_mdl_tex_links.htm
Some specific ones from the list that may be closest to old HL style to you:
https://hulub.ch/images/Portfolio/IvanTextureProgress_L.jpg
http://www.horribledeath.com/orc_wip.htm
https://www.youtube.com/watch?v=1QKXpaRiTYs
Character painting method by Ben Mathis
https://www.youtube.com/watch?v=fEeb8Qhe-fw&list=PL5254wVvvPeaCjulsrovknRgHlV-I4UYh
Did you do anything to the walk animation itself? like a custom anim or something? also did you change any of the bones or root bone? What 3d model program did you use to modify? Im suspecting either root bone became a secondary bone or the walk anim lost its forward motion. In goldsrc walk anims use motion extraction from the root bone and if that root bone is changed in the hierarchy or the anim walks in place without forward motion the NPC cannot move.
On the other hand, you could use cycler with the model dead_barney.mdl and sequences 7, 8, 9, or 10.Problem with cycler entity is that when you shoot it will bleed monochrome blood and wont be gibbable like using monster_generic. This issue is also present when using cyclers for props, so in that case for example in CS, people switch it to cycler_sprite instead since it wont bleed like that (since cycler_sprite has no collision just make a clip brush to define it). However if the mod supports it like say CZ:DS or SvenCoop use item_generic instead.
Also not well known thing is both cycler/sprite and monster_generic entities support "skin" keyvalue as well as "body" to change skins and bodygroups but is not found in most FGD's so you will have to add manually. I have more details added here.
Posted 5 years ago2019-09-07 06:44:25 UTC
in Weird bug in my map... like dust or something Post #343109
in Weird bug in my map... like dust or something Post #343109
That looks like an orphaned Ground Node
https://knockout.chat/thread/806/1
A set of simple SMD plugins for many modern versions of 3dsMax. Has useful options like BMP material/texture get name option and automatic recognize explicit and face render normals correctly.
(Archived old thread info): https://web.archive.org/web/20190612005828/https://forum.facepunch.com/dev/qxgb/3DS-Max-SMD-Plugins/1/
My GoldSrc MDL tutorial also covers usage of this plugin in the 3DS choice : http://www.the303.org/tutorials/gold_mdl.htm
Did by any chance you had multiple armatures for the doughnuts or separate mesh objects that could have had the same name possibly? Ideally if making a static mesh you should have it all joined together in case of possible export confusion. Also if you havent seen it I have a guide on blender specific exports:
http://www.the303.org/tutorials/gold_mdl_blend.htm
Lastly Jeds' HLMV has some crash on close and hiding locked up processes . For a better and more featured HLMV, use standalone:
https://github.com/SamVanheer/HL_Tools/wiki/Half-Life-Model-Viewer
http://www.the303.org/tutorials/gold_mdl_blend.htm
Lastly Jeds' HLMV has some crash on close and hiding locked up processes . For a better and more featured HLMV, use standalone:
https://github.com/SamVanheer/HL_Tools/wiki/Half-Life-Model-Viewer
Come to think of it, I don't know what determines the appearance of the modelt.mdl file...Thats $externaltextures command. And yeah as said before with modern stuff its best to remove that and the $sequencegroupsize commands altogether.
For OP, you will have to decompile&recompile it with those commands removed. Use the latest version (0.58) to decompile and for recompiling use a modern studiomdl like svens (so you dont get texture shifting) .
Some tips for full goldsrc:
Oxcjae's in-console command machinima tutorials. This is most useful for already compiled maps and does everything on the fly
https://steamcommunity.com/sharedfiles/filedetails/?id=1172439308
If using custom maps this is how you do camera control and entity setup:
https://sites.google.com/site/svenmanor/tutorials/cutscenes
As for using source engine to do goldsrc stuff it is possible, but in the end I always found it more work in the end and more frustating dealing with source stuff. i did it here with some enhancements like face flexes;
https://www.youtube.com/watch?v=8AIzM5kMt5A
But in the end it was too much work and i nearly gave up.
Years ago when i made GORDON IS LATE:
https://www.youtube.com/watch?v=FtRHZwylI3M
I was just recompiling models with swapped out idle animations exported from a 3d program and did a bunch of inconsole stuff. However Oxcjae's guide did waaaay more cool stuff than i knew at the time. In hindsight I wish i used FOV changes "default_fov 30" but i did do some other neat stuff like recording at a higher resolution and panning in the video editing program.
Also these if you want to read very old tumblr posts on my then experiences (REMinder this is before I knew about all that cool console stuff and some of the things i did were a bit wierd and hacky -so for real read Oxcjae's stuff before attempting anything here)
https://the303.tumblr.com/post/15705663584/it-all-began-at-the-very-beginning-of-2010-when-i
https://the303.tumblr.com/post/15975523477/on-the-heels-of-creating-let-me-in-barney-i
https://the303.tumblr.com/post/16323630746/with-the-end-of-my-animation-testing-i-wanted-to
What subforums have the good information?Id say every subforum under Mapping is the biggest amount of stuff and tutorial content. Modelling has some stuff too but the bulk of newer info I already have mirrored on my site since Ive written newer, more up to date workflows.
But as said in the original thread it will be archived in some form
Posted 6 years ago2018-11-16 03:07:15 UTC
in Having issues making a skin for a model im working on Post #341250
in Having issues making a skin for a model im working on Post #341250
Okay, I figured it out:
Turns out even though you had the skin formatting correct, there needs to be a space between the bracket and " for the BMP filename lines. I fixed it so it looks like this:
$texturegroup "skinfamilies"
{
Another issue that came up was that when you have skins of differing dimensions you will have UV conflicts, therefore this is why you should choose to probably resize the main original skins to match 256X256 instead of its current 512X512.
I also did another decompile and merged the QC and whatnot and cleaned it up a bit. So to compile, drop the contents of this rar into your "everythingforcompiling" folder, select "barneyx.qc and compile. There is already a compiled model in "Compiled 0.56" you can look at which i did (albiet with the wierd dimension issue).
http://the303.org/stuff/2ndattempt.rar
Lastly, is there any particular reason why you are using a 2012 XASH compiler? I'm currently using the latest 2018 svenSDK compiler.
Turns out even though you had the skin formatting correct, there needs to be a space between the bracket and " for the BMP filename lines. I fixed it so it looks like this:
$texturegroup "skinfamilies"
{
{ "Base_M_D.bmp" }
{ "head.bmp" }
{ "head_bar.bmp" }
{ "head_sci.bmp" }
{ "head_sci2.bmp" }
{ "Base_M_D2.bmp" }
{ "Base_M_05_D.bmp" }
{ "Base_M_07_D.bmp" }
{ "Base_M_16_D.bmp" }Another issue that came up was that when you have skins of differing dimensions you will have UV conflicts, therefore this is why you should choose to probably resize the main original skins to match 256X256 instead of its current 512X512.
I also did another decompile and merged the QC and whatnot and cleaned it up a bit. So to compile, drop the contents of this rar into your "everythingforcompiling" folder, select "barneyx.qc and compile. There is already a compiled model in "Compiled 0.56" you can look at which i did (albiet with the wierd dimension issue).
http://the303.org/stuff/2ndattempt.rar
Lastly, is there any particular reason why you are using a 2012 XASH compiler? I'm currently using the latest 2018 svenSDK compiler.
Posted 6 years ago2018-11-11 06:27:42 UTC
in Having issues making a skin for a model im working on Post #341229
in Having issues making a skin for a model im working on Post #341229
Can you Rar the whole thing? mediafire wont let me folder download, only individual files. Also for clarity what QC are you using? There is multiples
Posted 6 years ago2018-11-06 20:50:41 UTC
in Having issues making a skin for a model im working on Post #341210
in Having issues making a skin for a model im working on Post #341210
if needed I can just send you the files, since right now it looks like I'm having trouble communicating the problem I haveI think that would be best imo. Also if you have the original model you decompiled just in case. Usually whenever people have issues with decompiles from older versions of crowbar/mdldec its sometimes better to do another decompile with the latest crowbar and go off the fresh QC since it sounds like you are continually working to fix the old one.
Oh and instead of using Jed's 1.36 HLMV use Solos Standalone ver:
https://github.com/SamVanheer/HL_Tools/releases/
Last edit: Are you using any mods or anything? That dying/changing skin is a weird issue ive not seen.
Posted 6 years ago2018-11-06 03:31:19 UTC
in Having issues making a skin for a model im working on Post #341203
in Having issues making a skin for a model im working on Post #341203
What does your current QC look like? One other thing is that if your first texture skin is not the starting one on your model it can fail to change as well. So for example your SMD starts with "shirt_a.bmp" but the skin line goes like this:
$texturegroup skins
{
It can fail to work. Furthermore the placement can be an issue sometimes. If you want to go with a safe bet try moving the whole texturegroup block before your sequence lines.
$texturegroup skins
{
{ "shirt_b.bmp"  }
{ "shirt_a.bmp" }It can fail to work. Furthermore the placement can be an issue sometimes. If you want to go with a safe bet try moving the whole texturegroup block before your sequence lines.
Posted 6 years ago2018-10-27 06:08:18 UTC
in Having issues making a skin for a model im working on Post #341084
in Having issues making a skin for a model im working on Post #341084
Seems like you need the textures inline for example here is what HGRUNT looks like:
Also unrelated and curious, why is all your sequences rotated 270? If you are still using mdldec.exe or MS3Ds decompiler, you shoudn't use those since they are outdated and can cause issues. Use the latest version of Crowbar.exe in this configuration: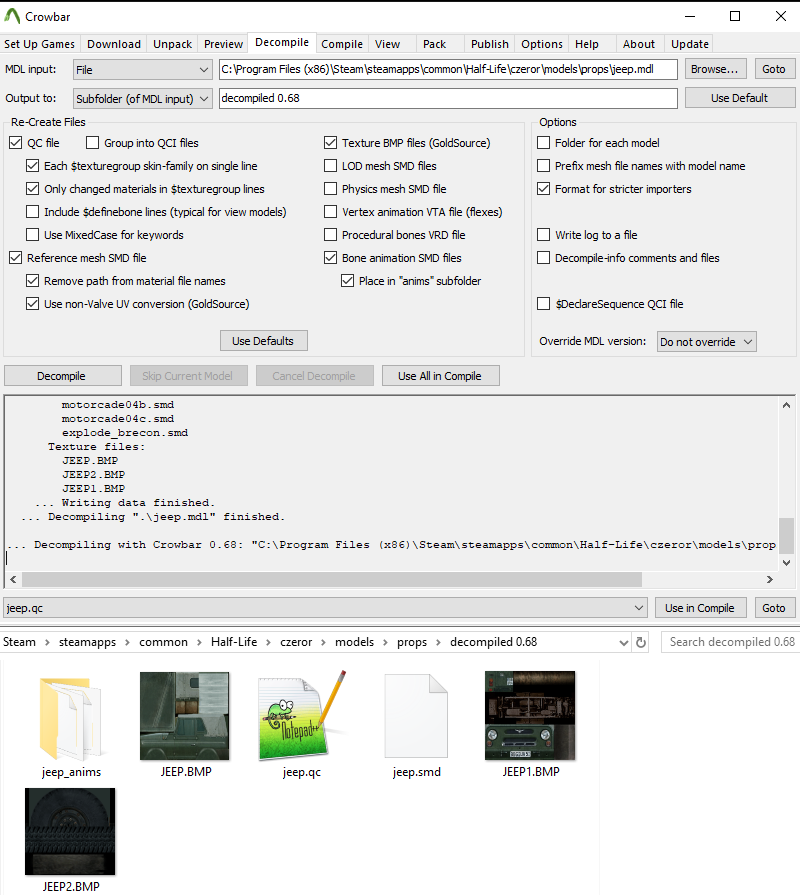 GoldSrc Config
$texturegroup "skinfamilies"1st line is original textures, and second is replacement. You seem to have your in different lines.
{
{ "newarm.bmp" "Handback.bmp" "helmet.bmp" }
{ "newarm(dark).bmp" "handback(dark).bmp" "helmet(dark).bmp" }
}
Also unrelated and curious, why is all your sequences rotated 270? If you are still using mdldec.exe or MS3Ds decompiler, you shoudn't use those since they are outdated and can cause issues. Use the latest version of Crowbar.exe in this configuration:
GoldSrc Config
Posted 6 years ago2018-10-04 06:54:15 UTC
in A Barney Model that im fixing isnt walking Post #340981
in A Barney Model that im fixing isnt walking Post #340981
0.34 is a very old version and is probably the cause of your issues. That version is pre-full goldsrc support and I remember the walk extract bugging out on older versions. 0.56 is the latest:
https://steamcommunity.com/groups/CrowbarTool
https://steamcommunity.com/groups/CrowbarTool
A while back thewall.de german mapping community closed but I was linked this archive copy:
https://thewall.hehoe.de/content/half-life:tutorials:
Has a lot of Halflife tutorials, glossary and others. While I don't speak german, through google translate ive found some quite useful stuff on thewall in the past.
https://thewall.hehoe.de/content/half-life:tutorials:
Has a lot of Halflife tutorials, glossary and others. While I don't speak german, through google translate ive found some quite useful stuff on thewall in the past.
Yes, it will have to be done via animation creation. A quick breakdown:
Here is an imported scientist model walk and what it looks like in blender: Im using an example from the gordon scientist model in bshift who's walking sequence moves Bip01 forward about 48 units (-48Y as it says in the blender inspector) which means he will move 48 hammer units per animation cycle (how ever many frames at how ever fps, this gif does not represent final fps).
Now basically in order to make an NPC "move" you make a walking animation and have the root bone (Often called "Bip01" as per standard HL skeletons) keyframed to move forward a set distance (depending how fast your custom NPC is moving) and with linear keyframes for just that root bone. See my above example of that scientist walk
The way I test to see if extraction is working is open the compiled model in HLMV and go to the "walk" animation. If it is walking in place then the extraction worked.
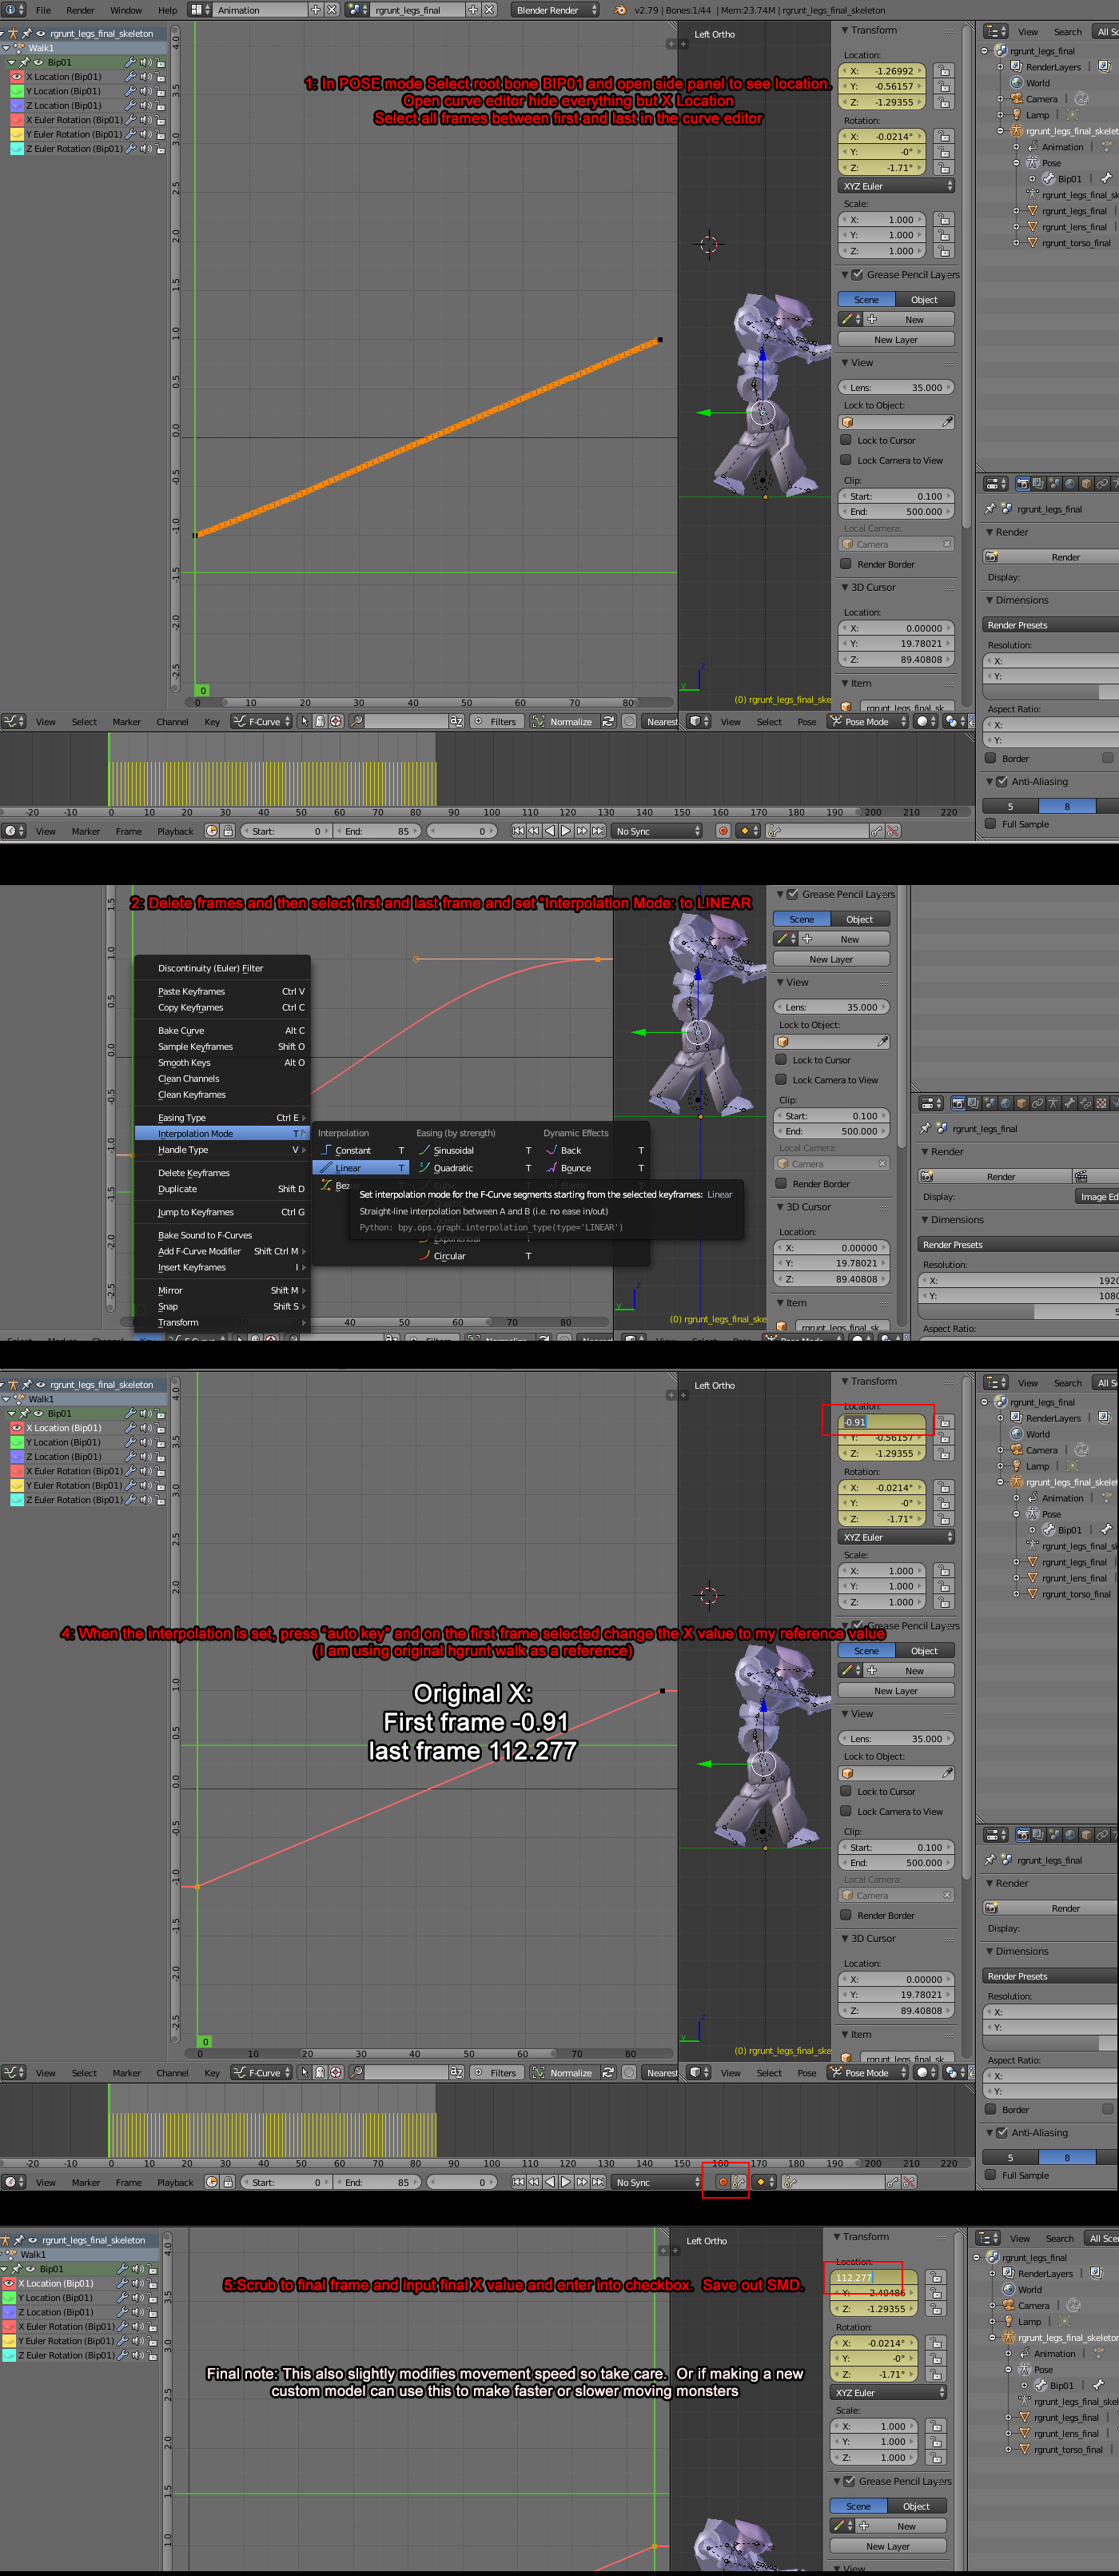
A while back I made 2 methods of "fixing" walk animations that drag but this exact method can be used to change existing NPC movement speeds, so use a higher number for more distance per loop cycle and a lower number for slower distance per loop cycle
Blender method
3dsmax method
Here is an imported scientist model walk and what it looks like in blender:
Now basically in order to make an NPC "move" you make a walking animation and have the root bone (Often called "Bip01" as per standard HL skeletons) keyframed to move forward a set distance (depending how fast your custom NPC is moving) and with linear keyframes for just that root bone. See my above example of that scientist walk
The way I test to see if extraction is working is open the compiled model in HLMV and go to the "walk" animation. If it is walking in place then the extraction worked.
A while back I made 2 methods of "fixing" walk animations that drag but this exact method can be used to change existing NPC movement speeds, so use a higher number for more distance per loop cycle and a lower number for slower distance per loop cycle
Blender method
3dsmax method
Posted 6 years ago2018-09-14 01:09:18 UTC
in Can someone explaind these sequence attributes. Post #340871
in Can someone explaind these sequence attributes. Post #340871
Blends are two animations that are blended together based on movement. XR , YR, ZR is X, Y, and Z rotations. CS has a more powerful blend feature known as "9 way blend" which is why you see so many animations within the blend bracket which is why when you move around your playermodel adjusts their pose and gun with more dynamic than just standard 2.
ZR "mouth" 0 30 is mouth animation that moves the mouth in say 30 which is 30 degrees rotation maximum and 0 minimum (starting point). Other ways is body rotation which begins at a midpoint say -90 90 is a 180 degree range.
LX is linear movement extraction. Meaning the game will move the NPC based on how much distance was covered in the walk SMD; so for example if in 30frames of walking the root bone of the NPC moves forward say 100 Generic units (3dsmax) ingame the NPC will move 100 Hammer units. The loop is added so the animation knows when to loop back to the beginning.
{ event 2001 21 } events are animation events that happen on a specific frame. "2001" is "drop light body" which is a sound and its being played at the 21st frame of the sequence.
Cbox you almost never use so you can ignore it and , AX AY AZR, are deprecated commands that you can also ignore.
Lastly, I have carefully documented pretty much everything GoldSrc QC related here:
http://the303.org/tutorials/gold_qc.htm
http://www.the303.org/tutorials/gold_mdl.htm
ZR "mouth" 0 30 is mouth animation that moves the mouth in say 30 which is 30 degrees rotation maximum and 0 minimum (starting point). Other ways is body rotation which begins at a midpoint say -90 90 is a 180 degree range.
LX is linear movement extraction. Meaning the game will move the NPC based on how much distance was covered in the walk SMD; so for example if in 30frames of walking the root bone of the NPC moves forward say 100 Generic units (3dsmax) ingame the NPC will move 100 Hammer units. The loop is added so the animation knows when to loop back to the beginning.
{ event 2001 21 } events are animation events that happen on a specific frame. "2001" is "drop light body" which is a sound and its being played at the 21st frame of the sequence.
Cbox you almost never use so you can ignore it and , AX AY AZR, are deprecated commands that you can also ignore.
Lastly, I have carefully documented pretty much everything GoldSrc QC related here:
http://the303.org/tutorials/gold_qc.htm
Which tutorials are needed to master on goldsource mdl compiling?Have I got the thing for you:
http://www.the303.org/tutorials/gold_mdl.htm
If you are using the MS3D decompiler, thats likely breaking it as the MS3D tools are horribly outdated and buggy. For decompiling use Crowbar in this configuration:Also you should update some tools such as getting a the HLMV standalone as Jeds 1.36 is old and hides in memory a lot. These tools and A bunch more stuff can be found in my guide here:
http://www.the303.org/tutorials/gold_mdl.htm
http://www.the303.org/tutorials/gold_mdl.htm
Posted 6 years ago2018-08-26 20:20:44 UTC
in Map Optimization resources ( r_speeds , hint/skip brushes, func_detail ) Post #340687
in Map Optimization resources ( r_speeds , hint/skip brushes, func_detail ) Post #340687
Thanks.
Also, another resource: StarBlarty's func_detail document:
https://docs.google.com/document/d/1XYpW70E8bgSi-uSwUqBSH6RQIplrBV_gtkW9TL6Uk9c/edit?usp=sharing
Also, another resource: StarBlarty's func_detail document:
https://docs.google.com/document/d/1XYpW70E8bgSi-uSwUqBSH6RQIplrBV_gtkW9TL6Uk9c/edit?usp=sharing
Posted 6 years ago2018-08-10 01:05:19 UTC
in Map Optimization resources ( r_speeds , hint/skip brushes, func_detail ) Post #340465
in Map Optimization resources ( r_speeds , hint/skip brushes, func_detail ) Post #340465
A recent VHLT specific tutorial with lots of pictures:
https://forums.svencoop.com/showthread.php/45301-Tutorial-Total-Map-Optimisation
(A few things are sven specific like the upcoming "wireframe color" command)
Few odd tips:
-If you have a detailed bush-model set it to func_illusionary with a clip brush for collision
-some details are best done with masked transparency images or for an always facing sprite use an Parallel Upright for signs or some trees
Legacy stuff:
http://www.slackiller.com/tommy14/rspeeds.htm
http://www.countermap2.com/Tutorials/tutorial0b30.html?id=2
https://twhl.info/wiki/page/Tutorial%3A_R_Speeds
https://web.archive.org/web/20000609203718/http://www.halflife.gamedesign.net:80/resources/fpschart.shtml
Yep, you guessed it. Import to 3dsmax or whatever else supports it. Its a very useful feature to have.
Also for already compiled BSP's you can use Crafty's "export>OBJ", and use that for your animation sync. The difference is that the .DXF import is whole brushes blocks geometry (OBJ will be faces).
Also for already compiled BSP's you can use Crafty's "export>OBJ", and use that for your animation sync. The difference is that the .DXF import is whole brushes blocks geometry (OBJ will be faces).
Yeah I briefly took a look at Reactor in an old version of max and it was pretty cool. It may at times be even easier than massFX with some things but its no longer around. I did this whole guide because from what ive seen there has literally been no remaining guides/tutorials on those old methods and this seemed kinda like a "lost art" similar to the HL1 extended color remap pallete name format (I had to get help from a friend and a barley remaining 2005 forum post just to write this one since pretty much all references were gone).
I still wish there was an easier way to do blender baked physics as that was an enormous pain to come up with and having to come up with a hacky workaround but at least it works.
I still wish there was an easier way to do blender baked physics as that was an enormous pain to come up with and having to come up with a hacky workaround but at least it works.
The GoldSrc Baked Physics Guide is now complete:
http://www.the303.org/tutorials/gold_mdl_phys.htmThis is for 3dsmax and blender.
 Break Through
 So TIRED
Ive been researching and wanting to put together a guide on many of the old methods of texturing that was common from the late 90s to early 2000s before special shaders and maps. I will list links and resources as well as my commentary on various methods. Ill begin with the old style:
Tripwire thread on various recovered mini-tutorials:
https://forums.tripwireinteractive.com/forum/killing-floor/killing-floor-modifications/3d-and-animation-aa/55519-texturing-tutorial-thread
(also includes Millenia's video texture playlist at bottom of post)
"Enin" site for mini-tutorials (most is dead but here is the working archives):
Metal & Spring: https://web.archive.org/web/20080216055541/http://st.burst.cc:80/tut_enin1.htm
Wood Stock: https://web.archive.org/web/20080215110220/http://st.burst.cc:80/tut_enin3.htm
Basic metal: https://web.archive.org/web/20071221022901/http://st.burst.cc:80/tut_wanna.htm
Plastic https://web.archive.org/web/20080216055552/http://st.burst.cc:80/tut_exess2.htm
Metals: https://web.archive.org/web/20071221022821/http://st.burst.cc:80/tut_exess1.htm
Photoshop Brush set: https://web.archive.org/web/20040607040331/http://st.gaming-interactive.com:80/brushes/photoshopbrushes1.rar
Tutorial Shack Gun Texturing PDF site dump backup:
https://web.archive.org/web/20050909192652/http://st.burst.cc:80/Tutshack.pdf
Fox-Mike Gun Texturing PDF site dump backup:
https://web.archive.org/web/20040407000001/http://st.gaming-interactive.com:80/MikesSkinningTuts.pdf
Stylized Texture painting of a character step-by-step. Uses "Overlay" method of painting light style (Archive Link)
https://web.archive.org/web/20110210182754/http://michaeldashow.com/tips_texturepainting.html
Face texture painting method video by Ben Mathis:
https://www.youtube.com/watch?v=1QKXpaRiTYs
Character painting method by Ben Mathis (iirc this was originally from 2004ish):
Part1: https://www.youtube.com/watch?v=IvLzk8JrEFs
Part2: https://www.youtube.com/watch?v=lwshiFsq9ec
Rust & Metal painting workflow:
https://www.3dtotal.com/tutorial/658-texturing-metal-part-1-making-the-general-surface-photoshop-by-johny-texture-rust-screw
Painting a tank with welds & mud tutorial:
http://forgottenhope.warumdarum.de/tutorials/skinningdingo.php
Photo-texture/painting hybrid method; this style was used a lot in HL2beta (skip to page 66):
https://orig09.deviantart.net/5ef4/f/2007/122/0/4/3d_tutorial___lowpoly_characte_by_athey.pdf
Texturing a Glock VIDEO series (2007 complete tutorial)
http://www.moddb.com/tutorials/creating-a-weapon-for-source-part-2
I highly recommend this one since it is probably the most complete on the "old style" methods. New(er) Methods:
A newer method of painting is done in a hybrid method of painting on the texture as well as within the active 3d viewport, also known as "Viewport Canvas" or some other variation:
Viewport canvas painting method of a stylized gun:
https://www.youtube.com/watch?v=vMg9S5j5bHY
Viewport canvas painting method of a stylized character:
Part1: https://www.youtube.com/watch?v=6VNMLauOUpU
Part2: https://www.youtube.com/watch?v=LLNw4onM_YE
Part3: https://www.youtube.com/watch?v=kM82kaPHAK4
Viewport canvas painting method of a monster character:
https://www.youtube.com/watch?v=2Yr-Pgw3pMw
DOTA2 "Light Bake" texture method:
https://support.steampowered.com/kb/8700-SJKN-4322/dota-2-character-texture-guide
You can use modern highpoly to lowpoly workflow methods to bake out a "Complete Map" which is a render to texture of your model so all the light and bump/specular/gloss/normalmap is "baked in" to the diffuse. To do this you set up all your materials, create an array of scene lights above your model then use "Render-To-Texture" to bake out the complete map or do it in separate passes for more control.
I have made a quick and dirty guide about doing fine tuning and control with baked maps:

My "SkelePuncher" model was a highpoly-to lowpoly render bake using these methods
( https://forums.svencoop.com/showthread.php/44599-SC-5-x-Skelepuncher?p=526924 ) An important thing to note when making Cartoony ,Stylized or Anime models is that you may want to consider using either the reduced shadows flag (QC code $flags 256 ) or even use the Sven-only special texture mode $flatshade which discards shadows and lights the whole texture uniformly. This is best for Anime or painted shadows textures that would normally suffer under vertex shadows. An example of lighting differences here: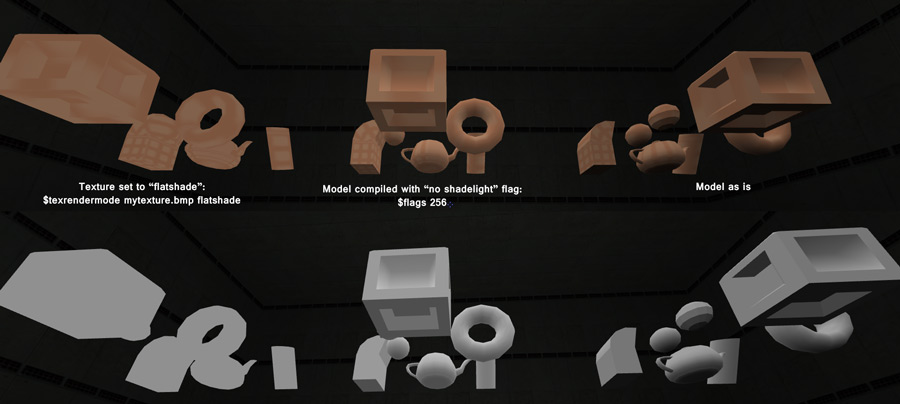 Also, don't forget Color Remapping as well:
http://www.the303.org/tutorials/gold_remap.htm
Lastly my MDL export guide is almost complete (still no full playermodels but working on it)
http://www.the303.org/tutorials/gold_mdl.htm
Tripwire thread on various recovered mini-tutorials:
https://forums.tripwireinteractive.com/forum/killing-floor/killing-floor-modifications/3d-and-animation-aa/55519-texturing-tutorial-thread
(also includes Millenia's video texture playlist at bottom of post)
"Enin" site for mini-tutorials (most is dead but here is the working archives):
Metal & Spring: https://web.archive.org/web/20080216055541/http://st.burst.cc:80/tut_enin1.htm
Wood Stock: https://web.archive.org/web/20080215110220/http://st.burst.cc:80/tut_enin3.htm
Basic metal: https://web.archive.org/web/20071221022901/http://st.burst.cc:80/tut_wanna.htm
Plastic https://web.archive.org/web/20080216055552/http://st.burst.cc:80/tut_exess2.htm
Metals: https://web.archive.org/web/20071221022821/http://st.burst.cc:80/tut_exess1.htm
Photoshop Brush set: https://web.archive.org/web/20040607040331/http://st.gaming-interactive.com:80/brushes/photoshopbrushes1.rar
Tutorial Shack Gun Texturing PDF site dump backup:
https://web.archive.org/web/20050909192652/http://st.burst.cc:80/Tutshack.pdf
Fox-Mike Gun Texturing PDF site dump backup:
https://web.archive.org/web/20040407000001/http://st.gaming-interactive.com:80/MikesSkinningTuts.pdf
Stylized Texture painting of a character step-by-step. Uses "Overlay" method of painting light style (Archive Link)
https://web.archive.org/web/20110210182754/http://michaeldashow.com/tips_texturepainting.html
Face texture painting method video by Ben Mathis:
https://www.youtube.com/watch?v=1QKXpaRiTYs
Character painting method by Ben Mathis (iirc this was originally from 2004ish):
Part1: https://www.youtube.com/watch?v=IvLzk8JrEFs
Part2: https://www.youtube.com/watch?v=lwshiFsq9ec
Rust & Metal painting workflow:
https://www.3dtotal.com/tutorial/658-texturing-metal-part-1-making-the-general-surface-photoshop-by-johny-texture-rust-screw
Painting a tank with welds & mud tutorial:
http://forgottenhope.warumdarum.de/tutorials/skinningdingo.php
Photo-texture/painting hybrid method; this style was used a lot in HL2beta (skip to page 66):
https://orig09.deviantart.net/5ef4/f/2007/122/0/4/3d_tutorial___lowpoly_characte_by_athey.pdf
Texturing a Glock VIDEO series (2007 complete tutorial)
http://www.moddb.com/tutorials/creating-a-weapon-for-source-part-2
I highly recommend this one since it is probably the most complete on the "old style" methods. New(er) Methods:
A newer method of painting is done in a hybrid method of painting on the texture as well as within the active 3d viewport, also known as "Viewport Canvas" or some other variation:
Viewport canvas painting method of a stylized gun:
https://www.youtube.com/watch?v=vMg9S5j5bHY
Viewport canvas painting method of a stylized character:
Part1: https://www.youtube.com/watch?v=6VNMLauOUpU
Part2: https://www.youtube.com/watch?v=LLNw4onM_YE
Part3: https://www.youtube.com/watch?v=kM82kaPHAK4
Viewport canvas painting method of a monster character:
https://www.youtube.com/watch?v=2Yr-Pgw3pMw
DOTA2 "Light Bake" texture method:
https://support.steampowered.com/kb/8700-SJKN-4322/dota-2-character-texture-guide
You can use modern highpoly to lowpoly workflow methods to bake out a "Complete Map" which is a render to texture of your model so all the light and bump/specular/gloss/normalmap is "baked in" to the diffuse. To do this you set up all your materials, create an array of scene lights above your model then use "Render-To-Texture" to bake out the complete map or do it in separate passes for more control.
I have made a quick and dirty guide about doing fine tuning and control with baked maps:

My "SkelePuncher" model was a highpoly-to lowpoly render bake using these methods
( https://forums.svencoop.com/showthread.php/44599-SC-5-x-Skelepuncher?p=526924 ) An important thing to note when making Cartoony ,Stylized or Anime models is that you may want to consider using either the reduced shadows flag (QC code $flags 256 ) or even use the Sven-only special texture mode $flatshade which discards shadows and lights the whole texture uniformly. This is best for Anime or painted shadows textures that would normally suffer under vertex shadows. An example of lighting differences here:
http://www.the303.org/tutorials/gold_remap.htm
Lastly my MDL export guide is almost complete (still no full playermodels but working on it)
http://www.the303.org/tutorials/gold_mdl.htm
Oh yes, this is real good. Legacy SMD exporters I take it would be good to have on here too?
have you seen these as well? https://sites.google.com/site/gshltools/system/app/pages/sitemap/hierarchy
have you seen these as well? https://sites.google.com/site/gshltools/system/app/pages/sitemap/hierarchy
I have a massive guide on texture creation for GoldSrc, mainly uses PS but also has alternatives and whatnot:
http://www.the303.org/tutorials/gold_texture.htm
There is a lot of generic youtube tutorials as well such as hand-painted style or realistic style/photomanipulation and other stuff.
http://www.the303.org/tutorials/gold_texture.htm
There is a lot of generic youtube tutorials as well such as hand-painted style or realistic style/photomanipulation and other stuff.
Cool that you are continuing this; I found this a long time back. One question, i can get texture list info out of a .bsp by using -x and -d but it didn't dump any textures like it did with sprites and models i tested. Is there a command im missing?
Hl Texture tools is cool stuff and fairly modern compared to a lot of the existing HL editing programs.
One problem I have with GIMP is that it will at times alter 8bit palettes with unpredictable results (for example changing "pure blue" [RGB 0 0 255] to something silly like [RGB 10 21 255] ). Personally id say if you use GIMP to edit images, save it as regular unindexed 24bit color and use IRFANVIEW or wally or HLtools to do the 8bit conversion.
Also tschumann, if you havent seen it before I made a very extensive map texture tutorial with a lot of BMP/WAD info:
http://www.the303.org/tutorials/gold_texture.htm
A huge thing that I found was using func_detail (have you loaded the fgd & wad for the tool extra textures for your newer compilers?) on any detail or complex brush prop. A reduction in clipnodes is to change your func_details to "passable" "yes" then place a simple clipnode brush(es) as your collision.
So I got something for you all to test since we are on the topic of "random picking in vanilla GS". I found out that indeed using the ACT_IDLE for a monster generic will pick an animation at random, so i placed an "event 1003" to fire a map trigger. Seems to work so far and the way I have it set up, you can even bias the weight of the random by changing the ACT_ numbers from 1 to say 3. So how does this work? I have 6 animations: And each animation sequence is 30 frames @ 30fps = 1 animation fires every second. If you are wondering why there are 2 types animations, it was just part of my testing to make sure that the model was functioning.
This is what it looks like in action: Now im fairly confident that this is random but it may be glitchy. The reason why I put the trigger at frame 14 was because on my first test I think i had it at 1 and it may have double or triple triggered due to the loop/beginning/end (but thats just me speculating).
Anyways if you guys can test this out especially in an MP environment or other situations let me know. Here is my files and included is the MDL sources so you can change up that QC (say going with a slower fps = more delay than 1 second, adding additional sequences ect). www.the303.org/stuff/pick6_test.rar
Hopefully this may be a good alternative to the classic laser method.
This is what it looks like in action:
Anyways if you guys can test this out especially in an MP environment or other situations let me know. Here is my files and included is the MDL sources so you can change up that QC (say going with a slower fps = more delay than 1 second, adding additional sequences ect). www.the303.org/stuff/pick6_test.rar
Hopefully this may be a good alternative to the classic laser method.
I found the problem:
You had your head rigged but you had a vertex weight group "Bip01 Head1" with the whole head weighted to it. It is my assumption that during export it saw this bone first and committed it while discarding all the other weights. Im not much of a blender user but I find the way weight painting is setup and how easy it is to weight multiple vertexes to multiple groups which break everything a massive pain compared to other 3D programs.
Unweight the "Bip01 Head1" vertex group and also do a bit of cleanup on your existing weights like how you have a part of the cheek weighted to the mouth and the neck is not weighted. Then weight the remaning stuff to "Bip01 Head" but be sure not to accidently weight things that are already weighted like your eyes mouth ect (i think there is some kind of lock or normalize thing to prevent that?) Also if you have an issue where the eyes are floating off that means your physical mesh positioning is not in alignment with the eyes bones. If I were you id use the existing gina head mesh as an overlap guide to match the positioning.
Something is going wrong with the export since the 2nd head is all skinned wrong at the SMD level so, only way to find out is to look at your Blender file
Something that is really confusing is how both Masked and Decals use the same wildcard "{", even though they use different modes of transparency.
For example, the standard hard-transparency which is usually blue is "Masked" which is more commonly known in 3D as "AlphaTest" transparency (hard threshold either fully transparent or not). Goldsrc handles this by using the 255 index for the transparent color.
The second which is used for decals is a bit of a wierd one which is internally known as "IndexAlpha" that is also used with certain sprites. "IndexAlpha" is a black and white gradient of all of the pallete which functions like a typical mask or alpha channel for smooth gradients (due to 255 shades available) except the last color being the "fill color". To better visualize it think of a standard photoshop or gimp alpha channel but the final index color is the solid color that is being masked off. This is used for decals and how they can have smooth transitions of transparency. Its also used in projectile sprites and others.
Now to be even more confusing both sprite IndexAlpha and Decal IndexAlpha use inverted pallete order for the greyscale. So this is why decals are white background and black fill and why sprites in indexalpha are black background with white fill (however the final fill color remains at index 255).
A sprite example is here: If you want to read my writeup on sprite/indexalpha go here:
http://www.the303.org/tutorials/gold_sprite_p3.htm
Oh and lastly, if you want to make your own decals you cannot use any other wad for decals other than your decals.wad. So if you have a mod of your own then you have to use decals.wad. This cannot be done with custom maps because you would have to replace this important wad for that and there would be lots of conflicts; instead use the sprite technique I explain in the linked above.
For example, the standard hard-transparency which is usually blue is "Masked" which is more commonly known in 3D as "AlphaTest" transparency (hard threshold either fully transparent or not). Goldsrc handles this by using the 255 index for the transparent color.
The second which is used for decals is a bit of a wierd one which is internally known as "IndexAlpha" that is also used with certain sprites. "IndexAlpha" is a black and white gradient of all of the pallete which functions like a typical mask or alpha channel for smooth gradients (due to 255 shades available) except the last color being the "fill color". To better visualize it think of a standard photoshop or gimp alpha channel but the final index color is the solid color that is being masked off. This is used for decals and how they can have smooth transitions of transparency. Its also used in projectile sprites and others.
Now to be even more confusing both sprite IndexAlpha and Decal IndexAlpha use inverted pallete order for the greyscale. So this is why decals are white background and black fill and why sprites in indexalpha are black background with white fill (however the final fill color remains at index 255).
A sprite example is here:
http://www.the303.org/tutorials/gold_sprite_p3.htm
Oh and lastly, if you want to make your own decals you cannot use any other wad for decals other than your decals.wad. So if you have a mod of your own then you have to use decals.wad. This cannot be done with custom maps because you would have to replace this important wad for that and there would be lots of conflicts; instead use the sprite technique I explain in the linked above.
Also a few months back Blender Source tools included GS support (switch export mode) so you wont have to use the converter program (unless you get some wierd vertex error, then swich back to Source export and use converter).
Just make sure your vertex weights are 1 or 0. Use Quantize and Limit Total on all groups to "1" in paint mode to be sure. I put in a bug fix request to the devs a while back so next version should have an export thresholder to catch these issues.
Just make sure your vertex weights are 1 or 0. Use Quantize and Limit Total on all groups to "1" in paint mode to be sure. I put in a bug fix request to the devs a while back so next version should have an export thresholder to catch these issues.
The line in the face is caused by compiler UV shifting, a common studiomdl.exe issue, but there is an improved version here which fixes the shift:
https://forums.svencoop.com/showthread.php/45003-StudioMDL-with-Texture-Shifting-fix?p=528588#post528588
Also when compiling use argument -b 512 to pad out your bitmaps.
The latest version of Crowbar (0.49) has full GS support now and I recommend it since it can do decompiles and can compile as a GUI wrapper with extended directory options (also can put the arguments in)
https://steamcommunity.com/groups/CrowbarTool
Remove the line $externaltextures from your QC as its an old optimization command that breaks the file into two.
The reason why the second head isnt working is because its not skinned properly to the skeleton. You will have to rerig this in a 3D editor. My assumption is that you grabbed this model from some playermodel which has a different skeleton.
Great guide on machinima making and very helpful for beginners:
https://steamcommunity.com/sharedfiles/filedetails/?id=1172439308
https://steamcommunity.com/sharedfiles/filedetails/?id=1172439308
I have an in-depth guide here that explains:
http://www.the303.org/tutorials/gold_texture_p2.htm
I also put in a mention of using wally or irfanview to do the 8bit conversion step since gimp tends to mess up your "pure blue" on conversion (save as full color 24bit then feed into wally just similar to what 789 just posted).
http://www.the303.org/tutorials/gold_texture_p2.htm
I also put in a mention of using wally or irfanview to do the 8bit conversion step since gimp tends to mess up your "pure blue" on conversion (save as full color 24bit then feed into wally just similar to what 789 just posted).
Crowbar tool has been a source modding MDL tool for a long time but recently has gotten GoldSrc MDL support and in its latest update (.49) has gained many improvements.
Decompiles have nicely formatted QC code as well as recognizing things like multiple $texrendermodes on textures. It has multiple GoldSrc games & mods configs ready to set up and is able to compile directly into the steam dir & models folder of your desired game.
https://steamcommunity.com/groups/CrowbarTool
Ive been learning a bit of Maya and noticed that it does not seem to have a native GoldSrc export method but Ive come up with one with the help of Lossy. First install MESA Source Engine tools:
https://puppet-master.net/plugins/mesa-2-0/
(For later versions of MAYA modify the .bat install files to recognize the version year)
Then get Lossy's modified version of PeteTheGoats converter:
https://github.com/LossyDragon/smdConverter/releases/tag/v1.0 Go to SMD options and go through this checklist
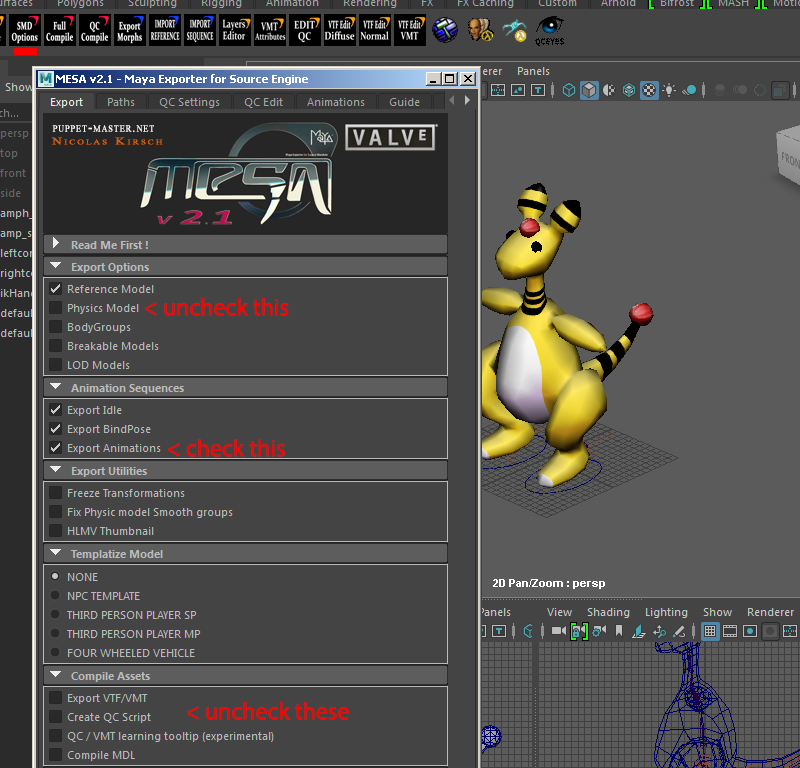 Generate paths. Be sure you have saved your maya file to the projects or else this wont set up properly!
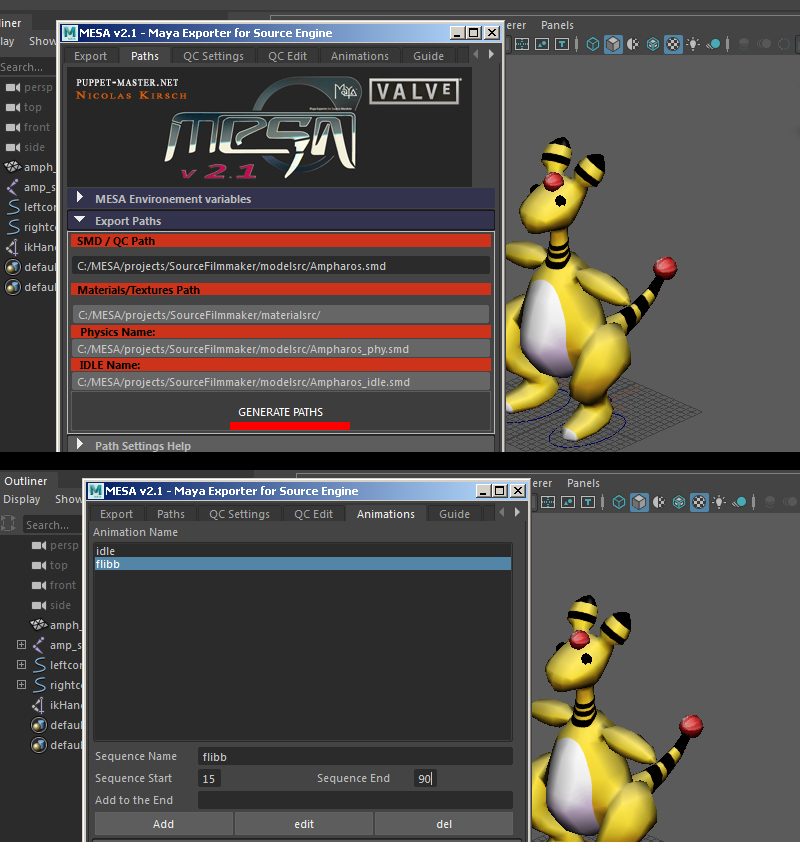 Layers setup
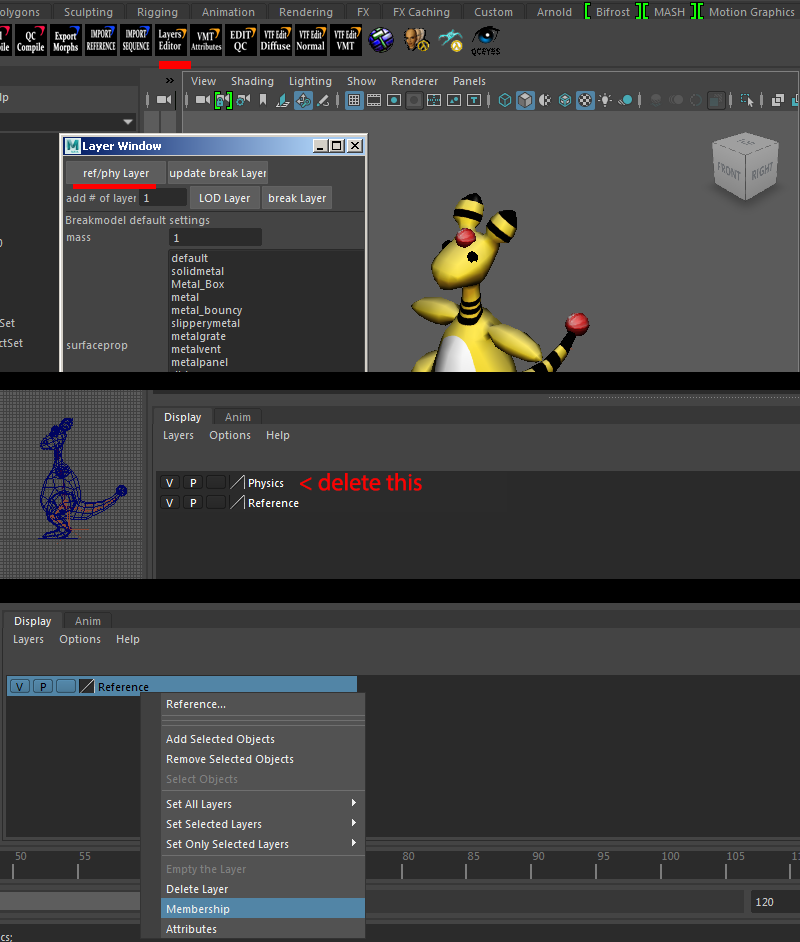 Set up layers ready for export. Be sure to have your mesh shape expanded like so.
Then hit the "FULL COMPILE" button After hitting the "Full Compile" button the files will wind up here in "modelsrc". Remember you don't need to convert animation SMD's unless your are changing underscore node names.
For 8bit indexed conversion you can actually follow my GoldSrc texture tutorial, its same thing only without WAD's:
http://www.the303.org/tutorials/gold_texture.htm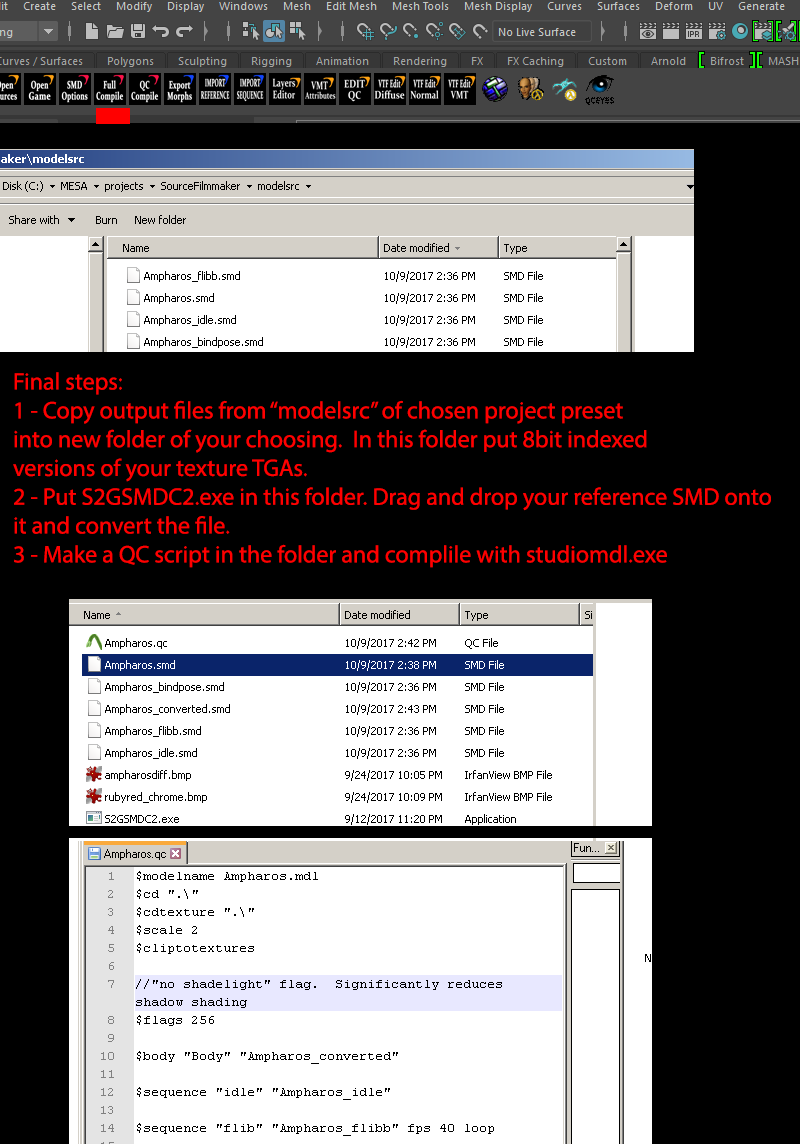 Finished result:
https://puppet-master.net/plugins/mesa-2-0/
(For later versions of MAYA modify the .bat install files to recognize the version year)
Then get Lossy's modified version of PeteTheGoats converter:
https://github.com/LossyDragon/smdConverter/releases/tag/v1.0
Then hit the "FULL COMPILE" button
For 8bit indexed conversion you can actually follow my GoldSrc texture tutorial, its same thing only without WAD's:
http://www.the303.org/tutorials/gold_texture.htm
Masked & additive? yeah those and the additional Sven-Coop ones like fullbright, flatshade, ect.
That was actually incredibly clever, I expected a model-based intro but it was just gigantic brushwork so you got them lightmap scale. Well done.
Also got that Executive plunger
Also got that Executive plunger
A new studiomdl.exe has been made available by BrianOblivion (AKA DoomMusic on Sven Co-op Forums) which not only has fixed the infamous UV shift issue that plagued pretty much studiomdl.exe variants, but also properly fixes non-power of 2 textures by padding out space (be sure to use the -b <number of padding pixels say 64 or more> command ). Furthermore has a brand new command called $protected which will prevent bones from being stripped out on compile if they are not weighted to a mesh. It also supports extra texrendermodes used by Sven-Coop and other mods like fullbright.
https://forums.svencoop.com/showthread.php/45003-StudioMDL-with-Texture-Shifting-fix?p=528588
I HIGHLY recommend everyone who is a modeller to use this as it has fixed so many things and has made my workflow so much better.
https://forums.svencoop.com/showthread.php/45003-StudioMDL-with-Texture-Shifting-fix?p=528588
I HIGHLY recommend everyone who is a modeller to use this as it has fixed so many things and has made my workflow so much better.
Ive yet to test it but it also could theoretically be possible to create a custom model with map outputs (event 1003) using animations on loop. Furthermore you could randomize the output using the ACT_ frequency in the QC file as well. I should do some testing.
You saved the TGA's as 8bit; skybox TGA's are supposed to be 24bit full color. Also im pretty sure you don't use RLE compression.
As a test i resaved the TGA's to 24bit but the order you have the sides in are wrong. I have a guide with 5 different methods of Custom skybox creation. You can substitute GIMP out for the photoshop bits and i use irfanview which is free
http://www.the303.org/tutorials/gold_texture_p8.htm
As a test i resaved the TGA's to 24bit but the order you have the sides in are wrong.
http://www.the303.org/tutorials/gold_texture_p8.htm