RUST: Simple Doors Last edited 2 years ago2022-09-29 07:53:57 UTC
This is a guide to simple doors in Half-Life, and how to get them working using WorldCraft or Hammer 3.4
file contains a small .rmf file and a .map file. The layout we are using has 9 doors, each with a different function.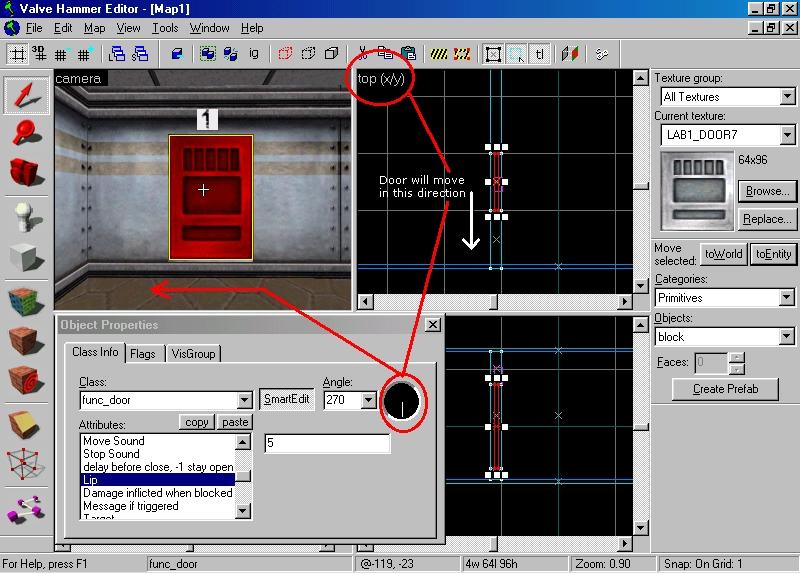 To make the door, build a brush 64 x 96 units and about 8 units wide. (The reason I use this size is that most of the generic door textures in Half-Life are 64 x 96.)
Choose the door texture you want to use by browsing through the texture window, and then right click on your brush and choose 'Create Object'. You should now have a textured door. Left click the Texture Application tool and then Left click the front of the door. Click FIT and the texture will align with the brush.
(Do not do this with the whole door selected as it will shrink the texture on the edges of the door and could cause errors later on. You should only fit the texture to the front and rear faces of the door.)
The first thing we want to do is get the door to open. In the first example I have chosen a sliding door. Looking at the Object Properties box in the picture above, the thing we need to concentrate on is the direction that we want the door to move in. Hammer gives us two methods to achieve this, the Angle Compass and the Pitch Yaw Roll (Y Z X) attribute.
For this door I have aligned the compass to point in the direction I want the door to go, when looking at the door in the Top(x/y) view. The Angle setting next to the compass will then display 270. If I wanted to use the Pitch Yaw Roll attribute, I could manually type in 0 270 0. This means the door will move in the 'Z' axis at 270 degrees.
Note: Top (x/y) is the 'Z' axis, Front (y/z) is the 'X' axis and Side (x/z) is the 'Y' axis.
The only other attribute I have set for the first door is a Lip value of 5. The Lip value tells the door how far to retract along it's width. When triggered the door will move in the chosen direction the same distance as it's width. Lip value subtracts the number used from the width making the door travel more or less depending on the value set. If I enter a Lip value of '5' then the door will protrude out of the door frame by 5 units. If I wanted it to disappear altogether, then I would use a negative number. Using a 'Lip' value is important, because 'In Game' the door edge texture will look bad if it ends flush with the door frame.
Ok, so that is door one. The next two door in the sequence are not much different.
The Second door will rise vertically because the Angle drop down box next to the Compass has been set to Up. Manually, I could have set this in the Pitch Yaw Roll attribute by entering -90 0 0 where this instructs the door to move -90 degrees in the 'Y' plane. I have also increased the lip value to '10' so that when the door is open, a larger amount is visible at the top.
The Third door is just a reverse of the first to give you a better idea of how it all works, however I have set the Delay before Close to -1 so that the door stays open.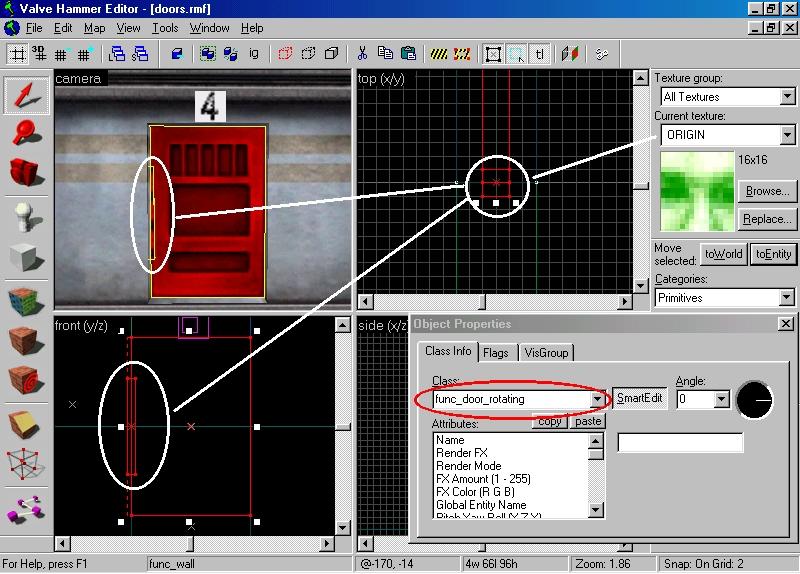 In the Second set of doors, 4 to 6, I have made use of the func_door_rotating entity and the Origin texture. Here is a step by step guide to making a rotating door:
That is all you need to do to make a swinging door. The position of the Origin brush is important, but the size is not. It acts like a hinge and let's the game engine know which way the door should go. The biggest mistake people make is that they don't tie both the origin and the door to the func_door_rotating entity.
Door 5 is slightly different in that I have placed the origin at the top of the door. This will make it move up and away from the player. To get this to work, you need to decide what plane you want the door to move in. In the example map, I wanted the door to move in the 'Y' plane or side view. To make the door move in the 'Y' plane you need to change the Flag Property of the door. One of the options is 'Y axis", check this and the door will move in the 'Y" axis.
Door 6 operates in the 'X' axis. I have added a small Origin brush in the top corner of the door and selected the Flag "X axis". The door will hinge on the Origin and move up and away. Understanding how Origin's work is vital when using func_door_rotating.
Door 8 is a simple locked door. To achieve this all you need to do is 'Name' the door and assign a 'Locked Sound' to it.
Door 9 is slightly more complicated. It is locked from the outside and when touched by the player makes the 'Latch Locked' sound, but it swings open when approached from the other side. Setting this up is simple when you start with the basic swinging door:
Add a multisource and a trigger_multiple near the door and set the multisource up like this:
file contains a small .rmf file and a .map file. The layout we are using has 9 doors, each with a different function.
Building the door:
The first thing we need to look at are the entities involved in creating a door. Have a look in the entity guide at func_door as our first set of doors use the func_door entity.Choose the door texture you want to use by browsing through the texture window, and then right click on your brush and choose 'Create Object'. You should now have a textured door. Left click the Texture Application tool and then Left click the front of the door. Click FIT and the texture will align with the brush.
(Do not do this with the whole door selected as it will shrink the texture on the edges of the door and could cause errors later on. You should only fit the texture to the front and rear faces of the door.)
Getting the door to work:
Select the brush and clickTo Entity or Ctrl+T. Scroll through the available entities in the Object Properties box until you come to Func_door. Click on Func_door to select it and now you can modify the properties of your door.The first thing we want to do is get the door to open. In the first example I have chosen a sliding door. Looking at the Object Properties box in the picture above, the thing we need to concentrate on is the direction that we want the door to move in. Hammer gives us two methods to achieve this, the Angle Compass and the Pitch Yaw Roll (Y Z X) attribute.
For this door I have aligned the compass to point in the direction I want the door to go, when looking at the door in the Top(x/y) view. The Angle setting next to the compass will then display 270. If I wanted to use the Pitch Yaw Roll attribute, I could manually type in 0 270 0. This means the door will move in the 'Z' axis at 270 degrees.
Note: Top (x/y) is the 'Z' axis, Front (y/z) is the 'X' axis and Side (x/z) is the 'Y' axis.
The only other attribute I have set for the first door is a Lip value of 5. The Lip value tells the door how far to retract along it's width. When triggered the door will move in the chosen direction the same distance as it's width. Lip value subtracts the number used from the width making the door travel more or less depending on the value set. If I enter a Lip value of '5' then the door will protrude out of the door frame by 5 units. If I wanted it to disappear altogether, then I would use a negative number. Using a 'Lip' value is important, because 'In Game' the door edge texture will look bad if it ends flush with the door frame.
Ok, so that is door one. The next two door in the sequence are not much different.
The Second door will rise vertically because the Angle drop down box next to the Compass has been set to Up. Manually, I could have set this in the Pitch Yaw Roll attribute by entering -90 0 0 where this instructs the door to move -90 degrees in the 'Y' plane. I have also increased the lip value to '10' so that when the door is open, a larger amount is visible at the top.
The Third door is just a reverse of the first to give you a better idea of how it all works, however I have set the Delay before Close to -1 so that the door stays open.
Rotating Doors:
For rotating doors have a look in the Entity Guide at func_door_rotating. Nearly all doors that move other than in a straight plane are made using the func_door_rotating entity.- Build your basic 64 x 96 brush and texture it.
- Build a small square brush about 8 x 8 x 50
- Texture the small brush with the Origin Texture
- Align the small brush so that it overlaps the door brush as though you were adding a hinge
- Select the Door Brush, and hold Ctrl and select the Origin Brush
- With both the brushes highlighted, click To Entity or Ctrl+T.
- Select func_door_rotating from the Object properties box
That is all you need to do to make a swinging door. The position of the Origin brush is important, but the size is not. It acts like a hinge and let's the game engine know which way the door should go. The biggest mistake people make is that they don't tie both the origin and the door to the func_door_rotating entity.
Door 5 is slightly different in that I have placed the origin at the top of the door. This will make it move up and away from the player. To get this to work, you need to decide what plane you want the door to move in. In the example map, I wanted the door to move in the 'Y' plane or side view. To make the door move in the 'Y' plane you need to change the Flag Property of the door. One of the options is 'Y axis", check this and the door will move in the 'Y" axis.
Door 6 operates in the 'X' axis. I have added a small Origin brush in the top corner of the door and selected the Flag "X axis". The door will hinge on the Origin and move up and away. Understanding how Origin's work is vital when using func_door_rotating.
Doors and triggers:
Door 7 is a simple sliding door very similar to door 1. The difference here is that we are going to use a button to open the door. To achieve this we need a func_button.- Build a small brush next to the door and assign that to the func_button entity. (Ctrl+T)
- In the Properties of your func_button, add a 'Target' of door_7.
- In the 'Flag properties' check Don't Move.
- Select your door and add a 'Name" of door_7.
- Under 'Locked sound' choose 'Latch locked'.
Door 8 is a simple locked door. To achieve this all you need to do is 'Name' the door and assign a 'Locked Sound' to it.
Door 9 is slightly more complicated. It is locked from the outside and when touched by the player makes the 'Latch Locked' sound, but it swings open when approached from the other side. Setting this up is simple when you start with the basic swinging door:
- In the Object Properties of the Door assign a 'Name' of door_9.
- Assign a 'Master' of door_9_master.
- Assign a 'Locked Sound' of Latch Locked.
Add a multisource and a trigger_multiple near the door and set the multisource up like this:
- Name: door_9_master
- Target: door_9
- Target: door_9_master
- Categories
- Archived Articles
- RUST Archive
- Tutorials
- Mapping
- Article Credits
- Andy – Author
This article was originally published on Gamedesign.net RUST.
The original URL of the article was http://www.gamedesign.net/node/669.
The archived page is available here.
TWHL only publishes archived articles from defunct websites, or with permission.
For more information on TWHL's archiving efforts, please visit the
TWHL Archiving Project page.
Comments
You must log in to post a comment. You can login or register a new account.