Tutorial: Detailed Textures in Half-Life Last edited 3 months ago2024-09-20 11:10:49 UTC
Thanks to an update from Valve, version 1.1.2.0 for the GoldSource engine now includes detail texture support. Some people may be familiar with these very powerful visual effects but this tutorial not only demonstrates how to implement them into your map but also some very good looking tweaks for advanced users.
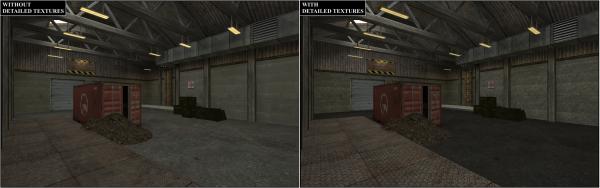 A before and after shot of using detailed textures
Creating a Detailed Texture
First up, what is a detail texture? A detail texture is a high resolution external image (TGA image file) that is placed over the top of a map texture. This gives the impression of a small details when you get up close to a texture instead of the usual blurred image you get when the texture fills the screen.Now you will need to create a detail texture to use in your map. I use Corel Photopaint 10 but any other graphics programs that can create TGA images are suitable. The ideal size for a detail texture is 128x128 pixels. The recommended maximum size is 256x256 pixels because although they can be larger, results can become unpredictable. Detail textures are best made with the grayscale pallet, in other words, don't use colour. When creating your image remember that the colour 128 128 128 on the RGB (red, green, blue) scale will be completely transparent. Brighter shades create highlights and darker shades create shadows. To avoid blotchy and ugly looking detail textures, always try to remain close to the middle gray colour when making shadows and highlights, as very white and very black shades will cover the map texture and look more like paint on your map texture. Once you create your image, save it as a 24-bit colour, uncompressed TGA image in the directory: Half-Life/(modname)/gfx/detail/mytexture.tga. You can create a subdirectory within the detail folder but for now this will do.
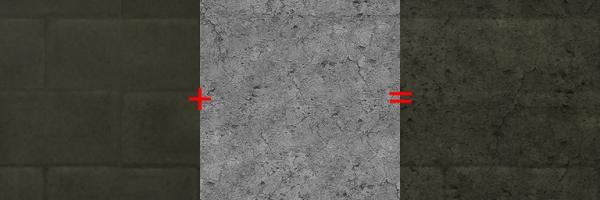 The original texture + The detail texture = More in-game detailing and atmosphere
Implementing Detailed Textures
Now that we have a detail texture, we can use it in our map. Go to your half-life/(modname)/maps folder and create a new TXT file the EXACT same name as your map name but add the prefix _detail.txt to the end. Eg, bigbox.bsp, bigbox_detail.txt. Open up the TXT file and add the following line:texname detail/mytexture 2.0 2.0
The first value is the name of the map texture to apply the detail texture to, you need to rename this to the name of the texture you used in your map, eg, if you used the texture C1A0_LABW2 in your map you need to replace texname with C1A0_LABW2, it is not case sensitive.
The next value is the directory and file name of your detail texture you just created. The engine will only look in the GFX folder and the file extension is not required as it is looking for a TGA file. The advantage of this is that you can have a subdirectoy to use for your own map, eg detail/bigbox/mytexture.tga, and you won't overwrite other map's files if they have the same name.
Next two values are the scale. This is the number of times your detail texture will tile compared to the size of the texture. The first is the horizontal scale and the second is the vertical scale. So if the texture in your map is 256x256 and you set the scale to 1.0 and 1.0 then it will tile once in that 256x256 sized texture. This means, however, if your detail texture is 128x128 then it will stretch to fit, decreasing its resolution. If the map texture 256x128, then again, it will be stretched horizontally to fit, making it look bad. The larger the scale you set, the smaller your detail texture gets and the resolution is increased, but it can lead to an unappealing 'repeating' look if you tile, say, 10 times. Just to further clarify, if you used a 64x64 detail texture on a 128x128 map texture, you would probably want a scale of 2.0 and 2.0 so that it is not stretched to fit, instead repeating 4 times in that 128x128 map texture. Remember that these numbers do not mean to scale up making it twice the size, they mean how many times a detail texture will tile in a single map texture. These scales also take into account the scale of the map texture set in Hammer (or Worldcraft) so that they always match. If you stretch your map texture, the detail texture does the same.
You need to repeat the process with every texture in your map that you want it to apply to. This can mean a long tedious process but the rewards are well worth it. You can also use different detail textures on different map textures. Want a tile effect on your floor tiles? What about a rough rock look on your rock faces? Just change what detail texture to use on each surface. Eg,
rock detail/myrocktexture 2.0 2.0
floortiles detail/mytiletexture 2.0 2.0
There is no known limit to how many detail textures you can use at once and you can have as many entries as in the _detail.txt file as you want. Now save the file and load your map in Half-Life. Make sure the cvar r_detailtextures is set to 1 and you should see the detail texture on every texture that is defined _detail.txt file. The good thing about detail textures is that you do not need to recompile a map if the detail texture loooks wrong, it is done in real-time. Make changes to the _detail.txt that you want and reload the map. Half-Life re-loads the detail textures used every time a map loads.
Keep in mind
Using detailed textures also has a massive impact on the quality of your map's lighting if used correctly. Because of the difference between light and dark shades and how they create highlights and shadows, you can use this to simulate, more appropriately, the material surface. For example, metal reflects much more light than concrete and therefore, looks brighter than concrete, even if the two materials are right next to each other in the same lighting conditions. Normally, Half-Life cannot discern between different materials like the Source Engine can but clever use of detailed textures can help simulate these conditions. By making metal detail textures brighter than normal, you 'lighten' the the map texture, because brightness values are also overlayed by detailed textures. Again, apply a darker detailed texture to a dark concrete surface. Now, when the map is lit, the metal looks brighter than the concrete, which is much more realistic.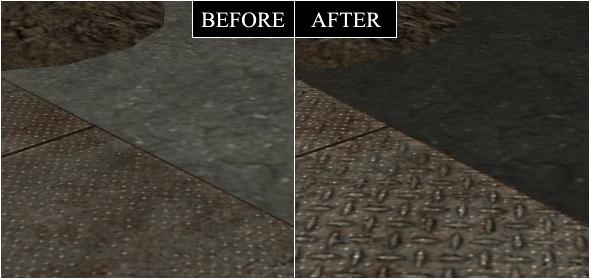 Metal is lighter than the concrete because of detailed textures
Advanced Features
Now, after a bit of experimenting, you can manipulate the power of detail textures for greater purposes. One use is for a cool sand effect. Want to have a nice glowing effect for your sand and improve its appearance? Create a full colour sand texture and use it as a detail texture over your sand map texture. This goes for all detail textures, they do not have to be grayscale images, colour detail textures will also overlay their colour properties to the textures and because detail textures are not heavily reliant on lighting for their appearance, unlike normal map textures, they can create a glowing effect. This is not applicable for all uses, however, use at your own discretion.Using a rough looking map texture? Extract the texture from the wad and convert it to a grayscale detail texture and use a scale of 1.0 and 1.0 in your _detail.txt file. This will greatly improve the look of the map texture by adding a small amount of depth and highlight to your map texture.
Detail textures can be applied to solid colour transparent textures, ie, map textures with the { prefix. The engine will automatically render the detail on the visible parts of the texture and not over the transparent colour. This does not, however, apply to normal transpartent textures like glass or any other texture that has the rendermode set to 'texture'. The engine can't overlay a transparent texture over a transparent texture so it does not work.
Remember! The Steam version of Half-Life is required! This will not work on older WON versions!
I would like to thank the following sources for support and detail textures to experiment with:
VERC
Ragnarok Arena (for packing a whole bunch of borrowed detail textures)
TWHL
- Article Credits
-
 hlife_hotdog
–
Original author
hlife_hotdog
–
Original author
7 Comments
You must log in to post a comment. You can login or register a new account.
Some comments:
- divide the article into various paragraphs, as currently it's a big wall of text
- add a few example images to spice it up, text only is rather dry
- use bold or italic when emphasizing something, all-caps is regarded as shouting and makes the article look less professional (not that we're striving for a very formal style, but hey)
- I think it'd be cool if you did provide a working example map

Also, the following sentence seems self-contradicting:Exact same name... but not case-sensitive? I'd say it is case-sensitive. Commas? '' are single quotation marks.i quite enjoy the flood textures.
not that i dont have access to steam hl, i just dont use it much.
1) They can cause increased lag. watch the "ms" reading under rspeeds, and you'll see it go up 2-3ms when they are enabled. Your mileage may vary, though, and the number of them used might effect it as well.
2) These don't replace using properly sized regular textures- most of the default HL textures are blurry because their dimensions are not strictly 16, 32, 64, 128, 256 and they get sampled down. It just seemed funny to see you applying detail textures to textures that look twice as blurry as they should to begin with.
3) The two numbers after the dt name in the detail textures file are its scale. This is inverse, though- the larger the number, the more times it repeats and the smaller it is compared to the regular texture. For the purpose of adding fine detail, I scale these up to 8 or ever 14 sometimes. Putting it on at a 1 to 1 ratio seems sort of pointless... why not just merge the two textures in photoshop and use that? The scale of the plating dt looks way off, btw, it's huge.
4) Don't bother going nuts with this. Adding them to the primary wall and floor textures makes sense, but beyond that nobody will probably notice.
5) For an actual example of how these look in-game, check out my Temple map. And you are free to use the detail textures included with it or Art Museum in your own maps, just credit me.
Hope that added something. I have some further info & textures to use here:
http://www.ministryofaction.net/MoAForum/viewtopic.php?t=1296&highlight=detail
The current tool set [or utter lack thereof] makes it very very cumbersome to get the correct factors to account for the different dimensions of every texture in every map of your mod, which I think discourages more widespread application of detail textures to maps.
There is also an issue of textures containing a mixture of material types which basically need their own detail textures tailor made.
I'm thinking of developing a program to address these issues but I want it to be able to render the result in 3D. It's a very steep thing to pick up though. (I could fork off of bspguy but I don't want to take over someone else's cooking 😅)