VERC: Half-Life Editing Tips Last edited 2 years ago2022-11-15 17:23:10 UTC
Tips 1-10
Tip #1Build brushes individually. This may sound obvious, but there are still people out there who construct their maps by hollowing out brushes, and carving hallways in between 'rooms'. Don't. It may be quick, but in the long run, your levels will be much easier to maintain and will help you express your ideas easier if each brush is placed individually.
Tip #2
Vital to get texturing perfect: examine the base. Run around the original levels of Half-Life until you find a style that you like, be it the 'lab' look of the levels just before the experiment, or the army brickwork of boot_camp. Then, take screenshots (use F5 or bind a key to screenshot ). Take them of the floor, the walls, ceilings, roofs, outside, inside... everywhere. Then, load up Paint Shop Pro (or some other image browser), and browse through the shots you have taken (should be in your half-life dir). These will be your reference shots - use these to decide what textures to use and where in your map. I use this always , until I understand the motif 95%. Tip #3
Allow yourself to be influenced. No, don't copy, but if you're really stuck for ideas, look around levels you admire and err... be influenced by the design. In time, you will build up a library of different ideas for your maps, and you will twist these ideas into your own creations.
Tip #4
Use newsgroups and discussion boards. Just read the FAQs first. I personally recommend the Half-Life editing discussion on rust. If you have a problem, ask. If someone else has a problem, help them if possible. Keep the community alive. Tip #5
"USE ALL THE TEXTURES YOU CAN!!!"
Oi, Mr. Absolute Beginner, out. You are 100% wrong. Don't. Keep within your limits. Even if your limits are sky-high. Just... just don't abuse your privileges. Half-Life doesn't need it. If you must use all the textures you can, don't release your map. Please.
Tip #6
Break it down. Everything. If you're having a right problem trying to get a series of entities to do what you want, get a bit of paper, make a flow chart. This will help you visualize the order of events, and see where the error lies.
Tip #7
Take your time. This is something I'm always terrible at... I run straight into a map, expecting myself to create base ideas spontaneously. It's something I can't do. However if you can, great. You'll probably get great maps out in a number of minutes. The rest of us though will have to find our ways round it and take just a little bit more time.
Tip #8
Fix on the go. If you're testing your map, and you find just one error, fix it as soon as possible, no matter how minor. As the defects build up, you will forget about the old less obvious ones. Keeping errors and defects to their absolute minimum is essential for a map that looks professional. Fix 'em on the way, and you only need think about what you'll be working on next.
Tip #9
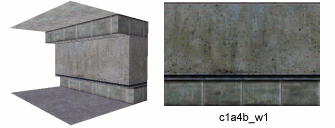
Use textures appropriately. Especially on wall corners... don't have one side of a visible wall one texture, then a connecting side a texture that just doesn't match:

Tip #10
Keep an eye on your
r_speeds. Go to the console, type in r_speeds 1 and a little indicator will appear a the top of your screen while playing. Go around normal Valve maps, and see what the numbers are like in those. Compare to your own, and if the numbers are way too high in yours, make the scene in which you get a high reading simpler. Lower values are best, as they run faster. Just remember, the reported r_speeds aren't 100% correct until you've done a full vis. Use r_speeds 0 to turn the display off again. If you'd much rather have a less reliable audio signal to see how fast the scene is, get an RPG, fire it until its ammo is depleted, then continue to hold down fire. You should hear clicks. Make sure the clicks stay fast.
Tips 11-20
Tip #11Use textures to your advantage. Many textures in all games are designed to be used across 2 or more brushes. Check this out:
Tip #12
Silhouettes are great. What you do, is you need to try and get a monster in the dark, but with a lighter textured wall further behind them that is a contrast to their blackness. This just makes 'em look more menacing, I think... it was also a tip I picked up from an old .plan update from some id employee... John Romero I think, who, as we all know, co-founded Ion Storm. Could have been American McGee too, though...
Tip #13
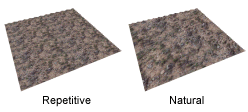
Trying to create an outdoor scene that boasts grass? Okay, make it look more natural. If you've ever had a look at a patch of grass or rock in HL from a distance, you'll have noticed how apparent it is that the textures repeat quite noticeable... this is unnatural.
Tip #14
Don't overuse the halos on lights etc... levels full of little glowing sprites just aren't as attractive to those that use them sparingly. This is not to say don't use them, just don't think that every little light needs its own.
Tip #15
Use pillars to mask ugly corners of hallways. Bear in mind that this doesn't mean ALL corners, just places where you feel a corner is looking particularly boring...
Use clip brushes on the sky... In HL, sky brushes aren't naturally solid (this is to get some sun and lighting effects to work without affecting the player) so you can walk straight through them, and fall out the level. In fact, you can even drown in them. To fix this, you just need to put clip brushes where each sky brush is, or just put a clip brush overhead to separate the players area from any sky.
Tip #17
Compile your maps properly!!! There's nothing worse than downloading and playing a map just to find it runs at a max speed of 3fps on your system because it hasn't been properly compiled. So, remember, always compile properly, and do a full vis.
Tip #18
Don't rely on prefabs for your whole level... yes, they may be quick, and you are meant to use them, but really... it seems that every released map has at least 1 vending machine in it somewhere... and the very worst have about 5 of the same in a row. Use all prefabs carefully, and the least you can.
Tip #19
Not everyone is a God, that is, not everyone may have as much skill at playing HL as you do. So, make sure your map is a challenge for the stronger players on harder skills, but still possible for the beginner who has only completed Half-Life once. We'd rather not need to cheat, thanks.
Tip #20
Playtest the map as much as you can - play it through yourself over and over again, until you're sick. Only then will you know where it needs to be improved and/or optimized. Note down details on paper as you find errors... then get friends and colleagues to test it too, with as many varied in skill as possible. Then, listen to them, and try to get some points for improvement off all of them. Then, give it to a review site maintainer to playtest. Make your map completely infallible.
Tips 21-30
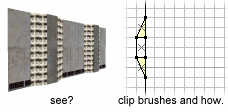
Tip #21Please, please, please use clip brushes. Especially in DM maps where pursuit is often occuring. We'd rather not be chasing around a corner just to get stuck on some brush that leaves us with one less frag than we deserve, or feed one to someone else. Look at this:
Tip #22
If you're making a DM map, make sure the player starts are quite near to either a weapon or armour. There's nothing worse than being killed time after time in DM because you couldn't get a weapon or reasonable protection without a 3 mile hike. I'm not saying put a weapon and armour by every start, just make sure that within about 5 seconds, a player can get a weapon after spawning. 8 is a better value for armour. This tip was mentioned in a recent Dario Casali (of Valve) interview plus another old one with some id employee...
Tip #23
Decals are great for adding atmosphere. Textures are such that they repeat along brushes... so use decals across them do just make them slightly more interesting, the {water ones are used extensively in boot_camp to keep it from becoming to uniform. Do the same.
Tip #24
If you want atmosphere in your maps, add some dark spots. This is something I continually fail on - I think it's subconscious that I believe every part of a map should be well lit. It shouldn't.. that's what the flashlight is for. So, make dark spots in maps, and hide headcrabs in 'em... hehe...
Tip #25
Okay, you want to make a great SP map, but a great map doesn't mean it needs every single monster in it! Even the largest of maps may only have a variety of three different monsters (excluding scientists and Barneys), as this makes it look so much more believable.
Tip #26
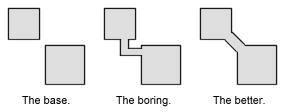
Stretch.
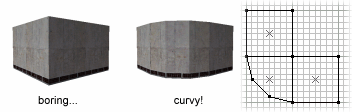
Tip #27
Some corners just don't look good, with or without a pillar. So, try something employed a lot in some of Half-Life's earlier levels, and make curves instead!
Entity lighting ain't dead yet... since Quake II invented the wonderful idea of texture-lighting, where textures give off a light in accordance with their texture, the use the simple
light entity has gone downhill. However, even in Quake II they were used extensively, just not as much as in maps made my amateur mappers for it. In HL however, light entities are rare (decompile a map from Valve and you'll see it's true), but that doesn't mean they aren't needed - otherwise you wouldn't see a light entity in the listing. What they are needed for is things like pulsing light, as well as switchable lights etc. However, if ArghLight is ever released for HL, then you will be able to make texture-lights that switch on and off...
Tip #29Spotlights are great inventions, especially if you're building a map where eye-candy is a requirement. I suggest you go download some of the best DM maps by headshot and ztn, looking at how much of an effect spotlights can have on the look of a map. Then, learn how to use the light_spot entity...
Tip #30
Repetition Sucks. Not just textures endlessly abused, but sounds and placement of entities too. For example, if you are trying to make a basic series of sounds to make it sound like battle is commencing, allow for variation. Don't just get the same .wav to play over, and over, and over again. That is not what battles sound like, is it? In another case, maybe there is a long corridor with ceiling lights. It's probably pretty repetitive by itself, with all that uniform lighting and such.
Tips 31-40
Tip #31Are you going to have a barney or a scientist in your map? Will they be crucial to finishing the map, or progressing through it? Then for goodness sake, make sure that if the player kills 'em, the screen fades and loads the last saved game like it does in the game. All you need is the player_loadsaved point-entity - give it a name like 'barneydeath'. Then, on a Barney (or scientist) just fill in the Trigger Target field with the name of the loadsaved entity, in this case 'barneydeath'. Then, in the Trigger Conditions field, choose 'Death'. Thus, if the barney or scientist dies, it will trigger the player_loadsaved entity, which will load the last saved game. You can also make it fade by setting various properties of the player_loadsaved entity...
If you don't want it to trigger the player_loadsaved after the character has performed something (ie, the player can continue even if the character dies), just get a trigger to killtarget the name of the player_loadsaved once the action has been completed.
Tip #32
Check for updates to your software. That means keep an eye on rust for new releases of Worldcraft (if you use it, like most of you) or QuArK, BSP, QeRadiant... whatever one you use. Then, download the new version, and update. This should not only stop you from losing a lot of work from some bug in an old version, but will often also provide you with new tools or an updated version of game files so you can do more with the game. The same goes with entity files ( .fgd 's for Worldcraft) which are often updated, and are available in normal HL flavours, as well as some which include TFC entities.
And also, do make sure you have the latest version of Half-Life, as it is easier for someone to upgrade to the required version of Half-Life for your map than downgrade. The theory is, 1.0.1.0 should be able to load any map made previously without problems, but a map designed for 1.0.1.0 may not run on 1.0.0.6 as it may use the custom game option or a new entity.
Tip #33
I always forget which way round these go. You know the FX Amount that most entities (point and solid-based) use? And you know how it can be a value from 0 to 255 to control opacity (specifically if Render Mode is on 'texture')? Just remember 0 renders the object invisible, 255 is solid. I can never remember that one... 96 is ideal for windows, BTW.
Tip #34
Be Square! Try to keep everything nicely optimized to multiples of 4s, 8s and 16s. You may have a natural urge to have walls exactly 50 units wide, or 100 units long, but this is not the way 3D engines work since the development of Wolfenstein 3D. So, walls of rooms should as a general rule be 32 or 64 pixels wide, not only for simplicity, but because it is easier for the engine to handle, as it can be halved right down to 1. Apparently, thicker walls also makes BSP and CSG compile faster...
Tip #35
Linear maps are boring. That is, if you all the player can do is walk down a set of hallways, with no way to avoid them or head to another route, it is boring. Try to make te levels interesting, with places to explore, even if they are dead ends. Look at the second and third maps after getting off the subway train at the beginning of Half-Life... you'll find there are several corridors that aren't 100% necessary (not at that part of the game - but remember you did have to go back to the airlock after the experiment and go through), but you can walk along anyway... the same goes for rooms. You didn't need to visit all the rooms in the game, but you could if you liked. This made everything more interesting.
Tip #36
Are you looking for some steam in your map? Try this: Insert a env_sprite point-entity somewhere in your map, where you want the steam. Not that the steam will rise up, and will not have it's base at the entity - rather, the entity will be the centre of the sprite, so raise the sprite about 32 units about where you want the steam to come from. Then, set the Sprite Name to sprites/xsmoke3.spr , Render Mode to 'additive' and FX Amount to about 128. Also, check Start On in the spawnflags. Setting the Scale factor to 2 would also be a good idea...
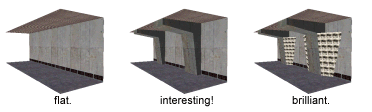
Tip #37
Some walls just look flat and boring. If decals don't make it look any better, you could always try this - put in some extra detail:
Tip #38
Environmental sounds rock. The
env_sound is a great point-entity for atmosphere. For those of you that don't know, this is the entity that changes how sounds are handled in the game. For example, should the player walk near to such an entity with say, Room Type set to 'Tunnel Large', then sounds would begin to sound as if they were being affected by a large tunnel, therefore making the player think they are in a large tunnel. This effect stays with the player no matter where they go, at least, until they encounter another env_sound that changes the Room Type to something different...Tip #39
There is no fog! Let me just reiterate one thing - Half-Life does not do fog. Yes, it may simulate 'fogging' under water, but water is the only place this will happen. BTW
func_illusionary entities act like water, and therefore can simulate fog, but because they do act as water they will drown you... if you want to make maps with fog, either head for Unreal, or wait for the mighty Quake III: Arena and the ultimate Team Fortress II.
Tip #40Lay it out. Many of the professional mappers you find at places like Valve, id, Epic, Ritual, Raven and many others draw their maps out before building them. I personally don't do this, but for some people it may help get some basic ideas down, as well as structure and flow for levels... of course, if you can do this you could then move on to developing whole levels like the pros. That's not to say all of them do it, I know for a fact that there are a few at each of the teams mentioned that lay down brushes as they go. Neither method is proved to be 'better' than the other, just some people are better suited to one of them, while the rest prefer the other. (Then of course, you obviously get the crowd who program their own utility to randomly generate their maps... D'oh!)
Tips 41-50
Tip #41If you want to be hired as a level designer for some big company like Valve or id, then be prepared for a lot of work. First and foremost, it requires a lot of experience in level design for previous games as this is what the companies look for when hiring you (make sure the levels are excellent, though ;). Not only that, but if you can demonstrate that you can work well as a team with other people, that helps too. Also, basing this upon Ikka Keranen's pre-Ion Storm days, the ability to draw and use your own textures for your own levels, as well as programming small utilites to help you (and sometimes, programming an add-on to an existing game) is another big plus. Finally, you'll need a lot of determination, luck, and once again, experience. Good luck.
Tip #42
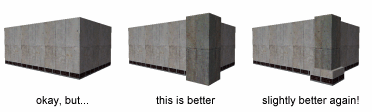
Rocks are not flat, so don't make them! If you're creating an outdoor scene with rock sides, don't just use one huge brush for the rock, hoping the texture will work for you... take my advice and use many many brushes to make the rock look natural . Even some of the least-experienced mappers will tell you to do this. It just makes everything look better. Of course, if the rock is to appear somewhere relatively unnoticed it can stay flat(ie, part of the ceiling in a room, like the basement in TFCs 2fort . Yet, even that isn't flat!) Rust has a good tutorial on outdoor scenes... and GenSurf may be useful too.
Tip #43
Let them see. If you're going to add a button or switch some place in your map that is vital to progressing through the map, at least make it slightly visible. There are too many maps out there with buttons hidden in the black-darkness of rooms, which are obviously a pain. If it must be in the dark, at least make it clear that you'll need the torch to find it. Alternatively, either set the _minlight of the button or switch entity to about 0.2 so it is brighter, add a texture light nearby, or just place a light point-entity in front of it with a low value.
Tip #44
Argh!
r_speeds still way too high? Here's one trick I've never heard anyone suggest before, so I'll say it was a home-grown idea.. Anyway, due to various things about how 3D engines work, depending on the scale of the texture, more or less polygons are used. So, if a texture of 128x128 is used on a face of 128x128 at a scale of 1.00, two polygons are needed to draw it. If the same 128x128 texture is applied on a face of 256x256, 8 polygons are needed to draw the texture (as the texture must be repeated 4 times to fill the whole face). However, draw the same 128x128 texture on the same 256x256 surface with a scale factor of 2, and the number of polygons needed to render the texture plummets. Maybe this will help explain better: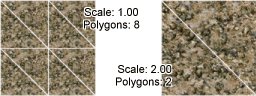
[BTW, the sky brush behaves quite differently... more on this later on] Tip #45
The world is not a matchbox. Not everything in the world is square, set to 90?, and completely straight - there is variation. What does this have to do with your map editing? Everything, really... one common thing I do is make everything square.
Tip #46
If you're really stuck for ideas, try doing what I do and start a new 'temporary' map. For example, if you're working on an SP map, close it, and then start a new DM map from scratch. Ensure you use a different motif to what you were doing last, just so you can be that little more creative (well, you may differ, but that's what works best for me). Then, just try placing a few brushes down, and play around... Once you tire of all that, you should be able to go back to your previous map, just with a couple more ideas... Well, maybe not, but try it.
Tip #47
Something I like to do while mapping is listening to the radio... almost always Radio 1 (bearing in mind I am in the UK) as this is the centre for pop music... It's better than listening to CDs as you never quite know what is next to come in terms of record. Also, a problem with listening to a CD repeatedly is that you get bored of the songs, which is not a good thing if you want to be creative. Another problem that can occur is that your associate parts of your map with different tracks, making you think that all your ideas have been exhausted.
Well, that's what I think, anyway... I'm no psycologist. Your mileage may vary.
Tip #48
Some creatures are better suited to groups than others. Headcrabs are ideal by themselves and in groups of two or three. Houndeyes ( monster_houndeye ) are great in packs up to 5, and alien slaves (
monster_alien_slave) are good in twos, unless they spawn on the spot (ie, teleport in). The G-Man is obviously left by himself, and it should be just about impossible for the player to get more than 2 barneys together. Three identical looking security guards just don't work... three or four scientists though is good, as they have different skins.Tip #49
The sky is quite different to normal world brushes in that it is made up of 12 polygons, always. That is, the actual brushes aren't split like normal textures into polygons, but rather let the sky show through. The sky itself is constructed with 12 polygons, 2 for each view (up, down, left, right, front and behind) which are rendered behind the normal brushes (I think). The advantage of this is that they don't affect your r_speeds as much as normal brushes do. It also means you can keep the number of polygons low.
I first found this method while noclip'ing around the Kingpin maps. It involves applying the sky texture to surfaces of brushes that the player might never get to see.
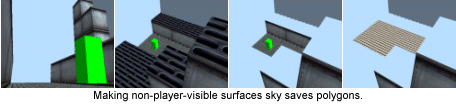
This is best used in outdoor areas where there is already a substantial amount of sky visible. Also, be careful when using this method and the light_environment entity... they can cause strange things to happen. Tip #50
Save us... Create autosave spots in your maps just before an area of major conflict between the player and a monster, or where the player could easily die. This saves them having to restart from a long long way off, which can be tedious. Use the trigger_autosave solid-entity as if it were your own.
Tip #51
The Quake engine (that Half-Life uses a modified version of) splits polygons where two brushes meet, provided neither of them are entities. That is, if two brushes were to meet, it would effectively cut one of them into sections on the surface the brushes are touching, just so the textures can be applied effectively.
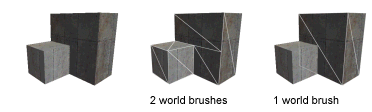
Although the polygons for the smaller brush aren't shown for the third image, that doesn't mean they aren't drawn. Instead, they are drawn as entity polygons, separate from world polygons. Entity polygons include those on monsters and doors, and buttons etc. World polygons are solely non-entity brushes, the sky, and water that isn't created via func_water (rather a brush with only !blah textures such as !C2A5).
Use this rule as best you can - for example if you are adding small details (like several tiny little lights on a huge surface) make them func_wall or func_illusinary so they don't split the huge face they are attached to. This keeps r_speeds down. Notes from the Author
Hopefully the above tips should help you with your map editing, no matter whether you're a newbie or professional, hired... err, person.
 But what you should understand is that these are only tips, not rules. There will be many times where you can ignore some of the tips I've suggested to be more creative or make your maps better. A good map doesn't necessarily need to agree with what I've said... so, use the tips you feel help, and use any techniques you have yourself. Don't limit yourself, as nicely demonstrated in tip #26.
So, overall, use these tips to your advantage. That's why I wrote them - to hopefully increase the general quality of user-made maps by providing users with what I have learnt over the years. Have fun with the tips, I expect a few better maps now!
- Article Credits
- Dave Johnston – Author
This article was originally published on Valve Editing Resource Collective (VERC).
The original URL of the article was http://collective.valve-erc.com/index.php?doc=1015285823-77031100.
The archived page is available here.
TWHL only publishes archived articles from defunct websites, or with permission.
For more information on TWHL's archiving efforts, please visit the
TWHL Archiving Project page.
1 Comment

Captain P
Commented 2 years ago2022-11-16 09:44:44 UTC
Comment #104901
A few years ago, the author, Dave Johnston, posted some corrections about these tips on his blog: https://www.johnsto.co.uk/blog/51-editing-tips-errata/
You must log in to post a comment. You can login or register a new account.