VERC: Realistic Steam Last edited 2 years ago2022-09-29 07:55:27 UTC
Introduction
Realistic steam is really quite easy to make, its a wonder its not in more levels.
Setup
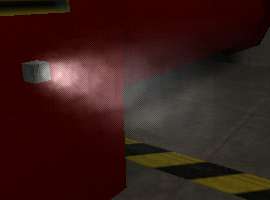
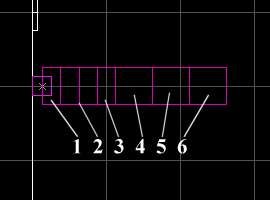
To begin, place a number of env_sprite entities in a line - the exact number and orientation of the line is up to you. In the above picture, i've placed 6 env_sprites in a row, as shown in the second picture. You'll notice that, in this example, the first three env_sprites are spaced closer together than the last three. This is due to the sprites being scaled differently - more on this later. sprites/xsmoke1.spr
Before you go further, you need to decide whether this... uh... stream of steam
is going to start on, or if it has to be triggered. If its going to start on, go into the Flag properties of the env_sprite and put a check next to Start On. If its going to be triggered on instead, give it a Name (targetname).Ok, now we're ready to copy the env_sprite we've just created a few times and make a line of steam puffs. Place them fairly close together so they overlap a bit. As I mentioned in the beginning, you'll want to change the scale of the sprites (by setting the Scale property of the env_sprite). The first sprite should be scaled smaller and each sprite should get progressively bigger.
The last thing you'll want to do is progressively lower the FX Amount (renderamt) of each env_sprite so it fades at the far end of the steam burst. In the example picture at the beginning, the last env_sprite has an FX Amount of 16 (6% solidity).
Oops, I lied. Ok, NOW the last thing you'll want to do is change the Framerate setting of each env_sprite. If they're all using the same framerate, all the puffs will look identical and the steam effect won't have the nice randomness that makes it look good. In the example map, the six sprites have framerates of 10, 14, 18, 22, 26, and 30. For your own use, you'll want to adjust the framerates until you have something you like. Ok, that is it.
Notes
There are a few twists you can use. If you want the steam to shoot out rather than just turn on, you can give each env_sprite a different name then use a multi_manager to trigger them with a fraction of a second pause between each. One thing to keep in mind, if you are going to use a multi_manager that triggers itself, make sure you put a check next to Multithreaded in the multi_manager Flags properties.If you want the steam to cause damage, put a trigger_hurt over the steam area and set the Damage Type to Burn. If the steam is going to be triggered on and off, you can also trigger the trigger_hurt on and off. (If the steam starts off, enable the Start Off flag in the trigger_hurt Flag properties).
Example
For a more concrete illustration, check out the example map linked below.- Categories
- Archived Articles
- VERC Archive
- VERC - Half-Life
- VERC - mapping
- Tutorials
- Mapping
- Examples Required
- Article Credits
- Chris 'autolycus' Bokitch – Author
This article was originally published on Valve Editing Resource Collective (VERC).
The original URL of the article was http://collective.valve-erc.com/index.php?doc=1046748015-97868500.
The archived page is available here.
TWHL only publishes archived articles from defunct websites, or with permission.
For more information on TWHL's archiving efforts, please visit the
TWHL Archiving Project page.
Comments
You must log in to post a comment. You can login or register a new account.