VERC: Torching Open A Door (Half-Life) Last edited 5 years ago2019-04-14 03:56:16 UTC
You are viewing an older revision of this wiki page. The current revision may be more detailed and up-to-date.
Click here to see the current revision of this page.
Introduction
In the Half-Life: Uplink demo, at one point you see a group of grunts cut open a steel door, presumably with an oxygene-acetylene torch. Here's how it was done.Simply put, this effect is made up of two things - an (invisible) env_laser that puts the decals where the door is being "cut", and an env_beam that shows the torch "flame". There is a double set of path_corners around the area that will be cut, one close to the cutting surface, and one about 16 (in the example map, 18) units from the surface. There is one func_train on each path. The env_beam uses one func_train for the beginning of the flame, and the other for the end of the flame (so the whole beam follows around the door). The env_laser uses the func_train closest to the cutting surface as a target (meaning the env_laser starts at a stationary point but the end follows the func_train around the cutting surface).
Setup
First, lets setup the path_corners and func_trains.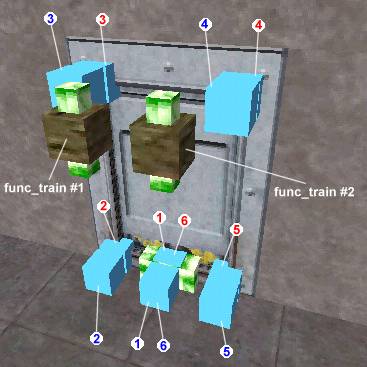
Select the path_corner named weld_torch_path_6 and set its Fire On Pass (message) property to weld_door_mm. Select the path_corner named weld_laser_path_6 and set its Fire On Pass (message) to weld_laser_beam_1.
Create the func_train - just a small cube with an origin brush (these are both parts of the same func_train). Turn it into a func_train entity, then copy it so there's two of them as shown in the picture.
Select func_train #1 and press Alt+Enter to bring up its properties. Set its Name (targetname) to weld_torch_train_1. Set its Render Mode (rendermode) to Color (1). Set its FX Amount (renderamt) to 0. The last two things make the train invisible. Set its First stop target (target) to weld_torch_path_1. Set the Speed (speed) to 25. Last, click on the Flags properties tab, and enable the "Not solid" flag.
Select func_train #2 and set it up the same as above, but give it a Name (targetname) of weld_laser_train_1 and a First stop target (target) of weld_laser_path_1.
Congratulations, you now have two invisible func_trains that don't do anything!
Now we'll setup the beam and laser effects.
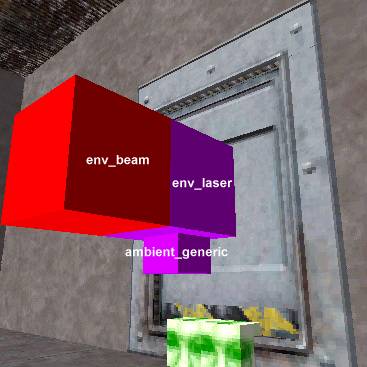
Now, as for the env_laser, this is pretty simple as well. The env_laser's beam (which will be invisible) starts at a stationary position (ie: the location of the entity) and ends at one of the func_trains. It leaves burn decals around the cutting area. This is its only purpose. Set the Name (targetname) to weld_laser_beam_1. Set the Target of Laser (LaserTarget) to weld_laser_train_1. Set the Brightness (renderamt) to 0. Set the Damage/second (damage) to 0. Click on the Flags properties and enable the "EndSparks" and "Decal End" flags.
Last, the env_beam. This is what will show the torch flame. One end of it will be attached to one func_train, and the other end to the second func_train. Set the Name (targetname) to weld_torch_beam_1. Set the Start entity (LightningStart) to weld_laser_train_1. Set the Ending entity (LightningEnd) to weld_torch_train_1. Set the Brightness (renderamt) to 200. Set the Beam Color (rendercolor) to " 0 0 255 ". Set the Life (life) to 0 so it is continuously on. Make sure Sprite Name (texture) is set to sprites/laserbeam.spr. Click on the Flags properties and enable the "Toggle" flag.
We've now got an ambient_generic that doesn't make any sound and an env_laser and env_beam that don't do anything. Woo hoo!
Now we'll setup the door and some miscellaneous entities.
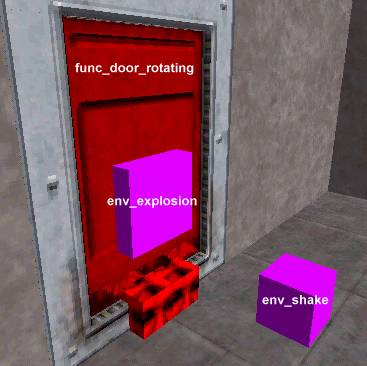
The env_shake is also pretty simple to setup. It's location should be somewhere close to the door, as in the example map, but its exact position is not that important. Set the Name (targetname) to weld_door_exp_1. Set the Amplitude (amplitude) to 12. Leave the Effect radius (radius) at 500. Leave the Duration (duration) at 1. Set the Frequency (0.1 = jerk, 255 = rumble) (frequency) to 40.
And now, the door itself. Create the door as shown in the picture, and also create an origin brush below it. (If you're not familiar with where the origin brush should be placed, consult the picture above and the example map, linked below. Select the door brush and the origin brush and turn them into a func_door_rotating entity. Set the Name (targetname) to weld_door_1. Set the Speed (speed) to something fast, like 512 for example. Set the Delay before close (wait) to -1. This prevents the door from returning to its closed state if it happens to bonk the player. Set the Damage inflicted when blocked (dmg) to 5000. If you get hit by this flying steel door, its likely you'll get banged up but good. Set the Distance (distance) to 90. Click on the Flags properties and enable the "Toggle" flag, as well as the "X axis" or "Y axis" flags, as necessary.
As with the previous two steps, we now have another set of entities that will do absolutely nothing if you compile the map now. This is about to change.
Let's get this coordinated!
To coordinate all of these entities, we'll use two multi_manager entities. The first is triggered by some event in the level, be it a trigger_once (as in the example map), a timer, a button, or whatever other event. The second multi_manager gets triggered when the func_trains reach their last path point.
Select the first multi_manager and give it a Name (targetname) of weld_laser_mm. Turn off SmartEdit mode and give it the following keys and values.
- weld_torch_beam_1, 0 - turns on the torch "flame" (env_beam) and sound (ambient_generic)
- weld_torch_train_1, 0 - starts the torch func_train moving
- weld_laser_beam_1, 0 - turns on the laser for decaling
- weld_laser_train_1, 0 - starts the laser func_train moving
- weld_torch_beam_1, 0 - turn off the torch "flame" (env_beam) and sound (ambient_generic)
- weld_door_exp_1, 3 - trigger the door explosion (env_explosion)
- weld_door_1, 3 - trigger the door to "open" (more appropriately, "fly to the ground")
Ok, finally, you've got it all made and it actually does something.
 Now make something cool with it.
Resources
Below is a list of entities related to this tutorial.1 Comment
You must log in to post a comment. You can login or register a new account.
path_corner's by using both aboundingboxbrush (center of path) and anoriginbrush (center of beam targets) for thefunc_train's. while traveling on the path both trains would align their `boundingbox`-es to the path, but have different origins, so the beams and lasers continue to work.'But why bother?', you ask? Well, less entities mean less surface area for mistakes.