VERC: Creating A Retinal Scanner Last edited 5 years ago2019-04-22 00:58:36 UTC
You are viewing an older revision of this wiki page. The current revision may be more detailed and up-to-date.
Click here to see the current revision of this page.
Introduction
One of the interesting effects from Half-Life that people want to use is that of barney opening a door by using a retinal scanner. The effect is broken down into a number of smaller parts -- the player triggers (via a trigger_once) the whole sequence
- the barney walks over to the scanner performs his "retina" animation (scripted_sequence)
- the scanner model (a func_button) is activated so it flashes
- some sounds (ambient_generic) are played to show that the scanner is operating
- the scanner blue screens and must be rebooted (oops, nevermind that)
- the door (func_door) is triggered open
Setup
The Door and Scanner
First things first, lets setup the basic components. Make the door. It can be simple or complex. Whatever. That's up to you. Give it a Name (targetname) - the example map usesdoor1 . Also, set its Delay before close (wait) to -1 so it stays open.For the scanner, insert one of the prefab retinal scanners which are located in the
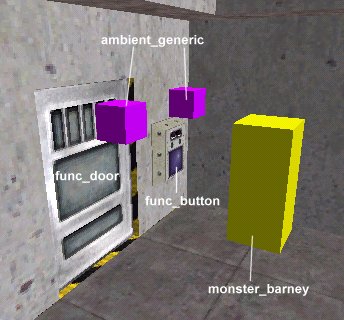
Usable Objects prefab library (included with the editor). The bottom of the scanner should be 28 units above the ground so that its at the right height to interact with barney's scripted_sequence animation. Once you've got it in your map, select it and press Alt+Enter to bring up its entity properties (it's a func_button). Set its Name (targetname) to something (for this example, I've used scanner1).We'll also create the sounds that the scanner will appear to make. Create two ambient_generic entities. Place one over the scanner and one over the door. Select the one over the scanner and press Alt+Enter to bring up its properties. Give it a Name (targetname) of
blip1. Set the Path/filename.wav of WAV (message) to buttons/blip1.wav. In the flags properties, set the Medium Radius, Starts Silent, and Is NOT Looped flags. Setup the ambient_generic over the door exactly the same but name it kachunk1 and set its Path/filename.wav of WAV (message) to buttons/button4.wav.While were at it, place a barney (monster_barney) beside the scanner. In his flag properties, enable the Pre-Disaster flag to stop his annoying chatter.
 You should now have something similar to what is pictured below.
The Retinal Scanner Animation
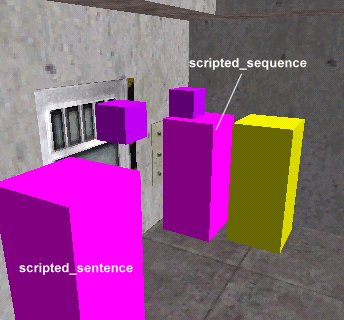
Now we'll setup the the scripted_sequence that makes barney perform the animation to make him operate the retinal scanner. Place a scripted_sequence enity right up against the scanner object. Set its angle so it is facing the scanner. Give it a Name (targetname) - this example usesss_retina1. Set the Target Monster (m_iszEntity) to monster_barney. Set the Action Animation (m_iszPlay) to retina - this is the animation that will be played. Set Move to Position ( m_fMoveTo ) to Walk (1). When the scripted_sequence is activated, Barney will walk over to its location before performing the animation.We'll also throw in a scripted_sentence so barney says something appropriate. The location of the scripted_sentence isn't really important. Set its Name (targetname) to something - this example uses
hevyes. Set the Sentence Name (sentence) to !BA_HEVYES. The ! causes the sentence to be streamed in rather than stored in memory. The BA_HEVYES calls the sentence "Go right on through sir, looks like you're in the barrel today." Set the Speaker Type (entity) to monster_barney. Set the Listener Type (listener) to player. This will make barney focus on the player as he speaks.Your scene should now look something like this -
Coordination
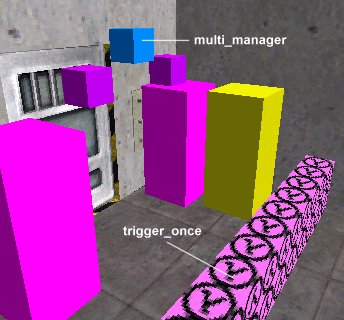
Ok, now we need to coordinate everything we've just created. This can be accomplished quite simply with a trigger_once and a multi_manager. First, place the trigger_once brush entity just before the barney (see the picture below for reference). Set the Target (target) of the trigger_once toopendoor1 (this will be the name of the multi_manager which we're also about to define.) The whole sequence of events will be triggered when the player walks into this trigger_multiple.Place a multi_manager somewhere in the general vicinity, and give it a Name (targetname) of
opendoor1. Turn off SmartEdit mode and add the following key/value pairs -
ss_retina, 0 - This makes barney walk to the scripted_sequence spot and perform the retina animation.hevyes, 0.5 - While he's walking to the script spot, he'll look over at the player and say his sentence.scanner1, 2.5 - This activates the scanner which, being a func_button, changes its texture to the "in action" texture for a short time (3 seconds), then turns off.blip1, 3.3 - This plays a blip sound.blip1, 3.8 - This plays the blip sound again. (will appear as blip1#1)blip1, 4 - Once more, the blip sound. (will appear as blip1#2)kachunk1, 4.5 - Plays a final "kachunk" kind of sound.door1, 5.5 - Finally, this opens the door.
Example
For a more concrete illustration, check out the example map linked below.- Categories
- Archived Articles
- VERC Archive
- VERC - Half-Life
- VERC - mapping
- Tutorials
- Mapping
- Examples Required
Comments
You must log in to post a comment. You can login or register a new account.


