VERC: How To Make A Pop Machine Last edited 2 years ago2022-09-29 07:54:59 UTC
Introduction
A pop machine. You've all seen 'em. You've all used 'em. How do you make 'em? Lemme tell ya.This tutorial will demonstrate how to make a pop machine with usable buttons. Pressing these buttons will drop a can of pop into the open slot. If it eats your change, you're also allowed to smack this machine with a crowbar in which case the front will shatter and out will pour all the cans of pop. Woo! Free pop! Ok, on with the tutorial.
Setup
Ok, the most difficult thing about making the pop machine is the actual brush construction. It's a pain in the ass. Fortunately, I provided a brush model of the machine in the example map so you don't have to make it yourself.
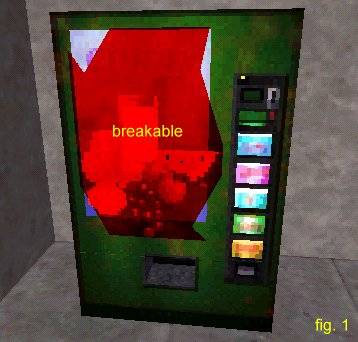
pop_break (for this example). Make sure the Material type (material) value is set to Glass (1). Press the Hide button now and then close the entity properties dialog.Note: pressing the Hide button will cause the selected object (in this case, the func_breakable) to be turned into a VisGroup object. If you are not familiar with VisGroups, refer to Grouping and VisGrouping in the User's Guide section of the editor help file.
pop_drop (for this example). Set the Lip (lip) value to 2. Set the Sounds (sounds) value to Quick Combolock (4). Set the Delay before reset (wait) value to Stays Pressed (-1). Last but definitely not least, set the angle value to the direction the button should move in when pressed. In this example, the angle value should be 180.Now, click on the "copy" button on the entity properties dialog. Without closing the properties dialog, click on the next button on the pop machine. Press Ctrl+T to make it an entity, then press the "paste" button on the entity properties dialog. Repeat this until all five of the pop machine buttons are done.
Note: You will have to set the angle of each individual func_button entity because pasted entity properties do not carry over angle or flag values.
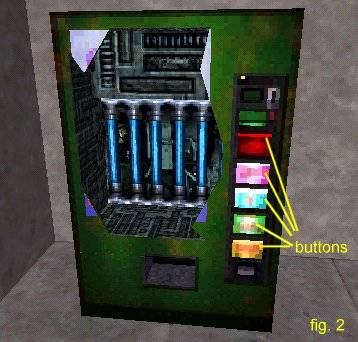
pop_drop. Each time one of the buttons is used, a can of pop will appear here. Set the Capacity (health) to 5. Only one can of pop for each flavor? No wonder the scientists beat up these machines! Set its Beverage Type (skin) to Random (6). Last, set the angle value of the env_beverage to point in the direction you want the end of the can to face. In this example I've used an angle of 90.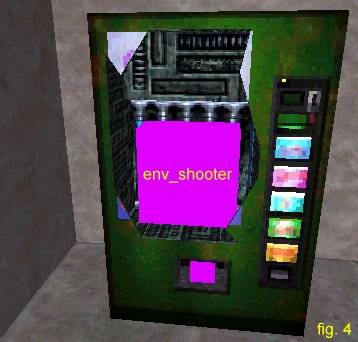
pop_break. Set the Number of gibs (m_iGibs) to 30. Delay between shots (delay) should be left at 0. Gib velocity (m_flVelocity) can be left at 200. Course variance (m_flVariance) can be left at 0.15. The higher this number, the more spread out the cans will be. Gib life (m_flGibLife) should be left at 4. Set the Model (shootmodel) to models/can.mdl. Set the Material sound (shootsounds) to Metal (2). The angle of the env_shooter entity should point in the direction you want it to shoot. For this example, an angle of 0 is fine.Now, the last thing to do is select the base machine (the part that isn't the breakable front panel or the pushable front buttons) and press Ctrl+T. Turn it into a func_wall. This is necessary to make the machine look proper once it has been "lighted". Since light bounces aren't applied to non-world objects (ie: brush entities), there would have been a difference in the lighting on the func_breakable area.
Example
For a more concrete illustration, check out the example map linked below.- Categories
- Archived Articles
- VERC Archive
- VERC - Half-Life
- VERC - mapping
- Tutorials
- Mapping
- Examples Required
- Article Credits
- Chris 'autolycus' Bokitch – Author
This article was originally published on Valve Editing Resource Collective (VERC).
The original URL of the article was http://collective.valve-erc.com/index.php?doc=1047435936-15625300.
The archived page is available here.
TWHL only publishes archived articles from defunct websites, or with permission.
For more information on TWHL's archiving efforts, please visit the
TWHL Archiving Project page.
Comments
You must log in to post a comment. You can login or register a new account.