Weapons Programming - Standard Weapons Last edited 4 years ago2020-02-19 01:36:55 UTC
You are viewing an older revision of this wiki page. The current revision may be more detailed and up-to-date.
Click here to see the current revision of this page.
Half-Life Programming
- Weapons Programming - High-Level Overview
- Weapons Programming - Custom Ammo Types
- Weapons Programming - Standard Weapons
This guide will walk through how to add a "regular" weapon to your Half-Life mod. In this case, "regular" means a gun that shoots bullets and reloads. In this article we'll be implementing the Desert Eagle pistol from Opposing Force into standard Half-Life. This guide assumes that you have experience programming in C++, and a programming environment and your custom mod already set up.You can view the commit containing all the code changes in this tutorial on GitHub by clicking here.
First we need to assign the weapon a new ID, as well as define some other constants. These are in weapons.h, so open it now. Towards the top of the file, find the list of
There's two things to note here before we continue. First, the value returned by
Note: Another resource type referenced in the
In relation to the HUD: we've taken a shortcut with the HUD sprites by copying the files directly from Opposing Force. Take a short break from programming to look at the files you copied from the sprites folder - specifically, the sprites/weapon_eagle.txt file. This file should be named the same as your weapon's classname, and must be present in order for the weapon to appear in the HUD. The file format is explained in detail in the High-Level Overview article, so be sure to read through it.
If you try to run
The client event code simply plays the sound and animation that the player would expect to see when they fire the weapon. The event is loaded by the weapon's class, in the
That's all for loading the event, now let's implement the event handler. Go to hl_events.cpp and add a method definition for
At the top of the public block:
The
Taking a look at how the Desert Eagle in Opposing Force behaves, this is what we want for the laser spot:
Increasing the accuracy - this is done as part of the
Go into the
In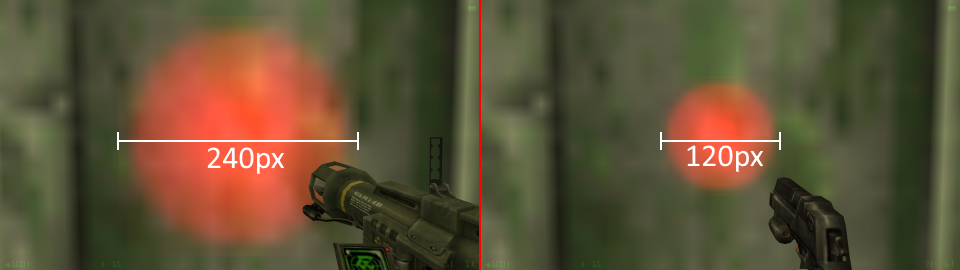 Fortunately, this only takes a very small tweak to your code to get the same effect. In
Get the files from Opposing Force
Since this article isn't about modelling, animating, or sound design, we're just going to take the assets we need from the Opposing Force folder. Copy the following files into your mod, from the gearbox folder:- events/eagle.sc
- models/p_desert_eagle.mdl
- models/v_desert_eagle.mdl
- models/w_desert_eagle.mdl
- sound/weapons/desert_eagle_fire.wav
- sound/weapons/desert_eagle_reload.wav
- sound/weapons/desert_eagle_sight.wav
- sound/weapons/desert_eagle_sight2.wav
- sprites/320hudof01.spr
- sprites/640hudof01.spr
- sprites/640hudof02.spr
- sprites/ofch1.spr
- sprites/weapon_eagle.txt
Defining weapon constants
Let's start up by doing some of the less-important admin tasks related to adding a new weapon. For the purposes of this article, the Desert Eagle will share ammo with the .357 magnum, so we won't need to worry about adding a new ammo type. If you want a custom ammo type for your weapon, check Custom Ammo Types and the Zoomable Weapons article.First we need to assign the weapon a new ID, as well as define some other constants. These are in weapons.h, so open it now. Towards the top of the file, find the list of
#define statements for each weapon. Add a new line for the new weapon. The value should be unique per weapon, so just increment the number of the last weapon.
#define WEAPON_NONE          0
#define WEAPON_CROWBAR       1
// ... more lines here
#define WEAPON_SNARK        15
#define WEAPON_DESERT_EAGLE 16#define CROWBAR_WEIGHT 0
#define GLOCK_WEIGHT 10
#define PYTHON_WEIGHT 15
// ... more lines here
#define TRIPMINE_WEIGHT 10
#define DESERT_EAGLE_WEIGHT 15MAX_CARRY block, so move on to the MAX_CLIP block. Add the relevant line to the end of this group.
#define GLOCK_MAX_CLIP       13
#define PYTHON_MAX_CLIP      6
// ... more lines here
#define SNARK_MAX_CLIP       WEAPON_NOCLIP
#define DESERT_EAGLE_MAX_CLIP 7DEFAULT_GIVE constant as well.
#define GLOCK_DEFAULT_GIVE          13
#define PYTHON_DEFAULT_GIVE         6
// ... more lines here
#define HIVEHAND_DEFAULT_GIVE       8
#define DESERT_EAGLE_DEFAULT_GIVE 7AMMO_GIVE section. That's it for constants.
Creating a bare-bones weapon class
The next step is to get the gun in-game. By the end of this section, it'll be available and selectable as a weapon, but it won't do anything useful. Some tutorials will recommend that you copy and paste an existing weapon to get started. This is certainly faster, but let's write the weapon from scratch so that we have a good handle on programming a new weapon.Class declaration
The first thing to do is to define the class inside the weapons.h file. Open it now, and add this after theCSqueak definition:
class CDesertEagle : public CBasePlayerWeapon
{
public:
    void Spawn();
    void Precache();
    int iItemSlot() { return 2; }
    int GetItemInfo(ItemInfo *p);

    int AddToPlayer(CBasePlayer *pPlayer);
    void PrimaryAttack();
    void SecondaryAttack();
    BOOL Deploy();
    void Holster(int skiplocal = 0);
    void Reload();
    void WeaponIdle();

    virtual BOOL UseDecrement()
    {
#if defined( CLIENT_WEAPONS )
        return TRUE;
#else
        return FALSE;
#endif
    }
private:

};There's two things to note here before we continue. First, the value returned by
iItemSlot will be 1 greater than the value used for iSlot in GetItemInfo later. Think of the iItemSlot value being 1-indexed, and the iSlot value being 0-indexed. Second, the UseDecrement method is defined in that way in order to handle client predictions. It's odd, but that's how it is.
Basic class implementation
Now to get started on the real stuff. Create a new file called deserteagle.cpp in the dlls directory of your solution folder. Avoid using VS to create this file, because it'll probably put it in the wrong folder and make everything a mess. Then include the file in both of your projects:- For the hldll project, expand "Source Files" and then "dlls" and add the file to this directory using "Add -> Existing Item..."
- For the cl_dll project, expand "Source Files", and then "_hl/dlls" and add this file to this directory using "Add -> Existing Item..."
CDesertEagle class. We'll start with a very empty implementation of each method:
#include "extdll.h"
#include "util.h"
#include "cbase.h"
#include "weapons.h"
#include "player.h"

// These correspond directly to the sequences in the weapon's view model
enum desert_eagle_e {
    DESERT_EAGLE_IDLE1 = 0,
    DESERT_EAGLE_IDLE2,
    DESERT_EAGLE_IDLE3,
    DESERT_EAGLE_IDLE4,
    DESERT_EAGLE_IDLE5,
    DESERT_EAGLE_SHOOT,
    DESERT_EAGLE_SHOOT_EMPTY,
    DESERT_EAGLE_RELOAD,
    DESERT_EAGLE_RELOAD_NOT_EMPTY,
    DESERT_EAGLE_DRAW,
    DESERT_EAGLE_HOLSTER,
};

LINK_ENTITY_TO_CLASS(weapon_eagle, CDesertEagle)

void CDesertEagle::Spawn()
{

}

void CDesertEagle::Precache()
{

}

int CDesertEagle::GetItemInfo(ItemInfo* p)
{
    return 0;
}

int CDesertEagle::AddToPlayer(CBasePlayer* pPlayer)
{
    return FALSE;
}

void CDesertEagle::SecondaryAttack()
{

}

void CDesertEagle::PrimaryAttack()
{

}

BOOL CDesertEagle::Deploy()
{
    return FALSE;
}

void CDesertEagle::Holster(int skiplocal)
{

}

void CDesertEagle::Reload()
{

}

void CDesertEagle::WeaponIdle()
{

}Bare minimum weapon code
Let's make the changes needed for the bare minimum functionality for a weapon: allowing the user to select the weapon in the HUD, and show the weapon model when it's equipped. To get to that point, we need to implement the following methods:- Spawn
- Precache
- GetItemInfo
- AddToPlayer
- Deploy
- Holster
Precache the weapon
For weapons and in-game items, we need to make sure they get precached when the map loads. Open weapons.cpp and fine theW_Precache method. You'll see a bunch of calls to UTIL_PrecacheOther and UTIL_PrecacheOtherWeapon. All you need to do is add a new line to this method for your new weapon's classname. Ignore the #if !defined... lines, they're not important. Add this line in the same place as the other precache calls, underneath the weapon_357 line is a good place.
UTIL_PrecacheOtherWeapon("weapon_eagle");Spawn
TheSpawn method is called when the weapon entity appears in the world - when the gun is lying on the ground, ready to be picked up. Unless the weapon is given to the player by default, this is how the player will get your weapon. The Spawn method looks very similar for most weapons. See the comments for the details of each line in this function.
void CDesertEagle::Spawn()
{
    // Define the classname of the entity
    // This is the name you should use to reference this entity name in your code base.
    pev->classname = MAKE_STRING("weapon_eagle");

    // Precache the weapon models and sounds
    // This might be called by the engine separately, but it's best to call it here as well just in case.
    Precache();

    // Set the weapon ID
    m_iId = WEAPON_DESERT_EAGLE;

    // Tell the engine about the weapon's world model
    SET_MODEL(ENT(pev), "models/w_desert_eagle.mdl");

    // Set the default ammo value for the weapon
    m_iDefaultAmmo = DESERT_EAGLE_DEFAULT_GIVE;

    // Set up some default behaviour for the weapon
    // This will tell the engine that the weapon should "fall" to the ground when it spawns.
    // It also sets up the behaviour so that the weapon is equipped when the player touches it.
    FallInit();
}
Precache
ThePrecache method is responsible for telling the engine what resources (sounds and models, mostly) that the weapon needs to have loaded in order to function correctly. This usually means the models for the weapon (world, model, and player) and the sounds for the weapon (shoot, reload, etc). Hopefully everything here is pretty understandable without extra explanation.
void CDesertEagle::Precache()
{
    // Precache models
    PRECACHE_MODEL("models/v_desert_eagle.mdl");
    PRECACHE_MODEL("models/w_desert_eagle.mdl");
    PRECACHE_MODEL("models/p_desert_eagle.mdl");
    PRECACHE_MODEL("models/shell.mdl");

    // Precache sounds
    PRECACHE_SOUND("weapons/desert_eagle_fire.wav");
    PRECACHE_SOUND("weapons/desert_eagle_sight.wav");
    PRECACHE_SOUND("weapons/desert_eagle_sight2.wav");
}PRECACHE_MODEL call. You only need to precache models or sounds when you directly reference them somewhere in the code. The models/shell.mdl file is used by the client-side code later, to eject an empty shell after a shot.Note: Another resource type referenced in the
Precache method are "events" - used for client prediction. We won't go into detail for events or client prediction yet - that's covered later in this article.
GetItemInfo
TheGetItemInfo method populates a ItemInfo struct in order to send information about the weapon to the client. Without this method, the weapon cannot be used in any way. The method should return TRUE (or 1) when it's done. Most of the values here should be fairly obvious, so just take a look at the implementation and comments below. Remember that we're reusing the 357 ammo, so it's referenced a few times here.
int CDesertEagle::GetItemInfo(ItemInfo* p)
{
    // This should match the classname - the HUD uses it to find the matching .txt file in the sprites/ folder
    p->pszName = STRING(pev->classname);

    // The "primary" ammo type for this weapon and the maximum ammo of that type that the player can hold
    p->pszAmmo1 = "357";
    p->iMaxAmmo1 = _357_MAX_CARRY;

    // Same as above, but for "secondary" ammo. This should be NULL and -1 for weapons with no secondary
    p->pszAmmo2 = NULL;
    p->iMaxAmmo2 = -1;

    // The size of a full clip
    p->iMaxClip = DESERT_EAGLE_MAX_CLIP;

    // Special weapon flags - leave this as 0 for now, this is covered in a different article
    p->iFlags = 0;

    // The "slot" in the HUD that the weapon appears in. This is a pistol, so it goes into slot 1 with the others
    p->iSlot = 1;

    // The "position" in the HUD that the weapon is added to. We'll put this after the magnum (which is in slot 1)
    p->iPosition = 2;

    // Set the ID and auto-switching weights of the weapon
    p->iId = m_iId = WEAPON_DESERT_EAGLE;
    p->iWeight = DESERT_EAGLE_WEIGHT;

    return TRUE;
}
AddToPlayer
This method is called when the weapon is picked up by (or given to) the player. Typically, this method just calls the default implementation inCBasePlayerWeapon, and then sends a message to the client so the HUD can show the weapon icon in the "history" section.
int CDesertEagle::AddToPlayer(CBasePlayer* pPlayer)
{
    // AddToPlayer returns TRUE if the weapon was picked up
    if (CBasePlayerWeapon::AddToPlayer(pPlayer))
    {
        // Send a message to the client so the pickup icon can be shown
        MESSAGE_BEGIN(MSG_ONE, gmsgWeapPickup, NULL, pPlayer->pev);
            WRITE_BYTE(m_iId);
        MESSAGE_END();
        return TRUE;
    }
    return FALSE;
}
Deploy
TheDeploy method is quite simple for most weapons - you just call DefaultDeploy with the appropriate arguments. That's what we'll do for the Desert Eagle as well:
BOOL CDesertEagle::Deploy()
{
    return DefaultDeploy(
        "models/v_desert_eagle.mdl", // Weapon view model
        "models/p_desert_eagle.mdl", // Weapon player model
        DESERT_EAGLE_DRAW, // "Draw" animation index for the view model
        "onehanded",       // Third person animation set for the weapon. We'll use the generic "onehanded" animation set
        UseDecrement(),    // Flag whether or not to do client prediction or not
        pev->body          // The weapon model's "body" pointer
    );
}onehanded here - this string refers to the animation set that should be used when the weapon is being fired by another player. For weapons that are similar to the stock weapons, you can use an existing animation set, which is what we're doing here. For weapons that require a different pose, you'll need to edit all of the models in the models/player/ folder in order to add a new animation set. This only applies to multiplayer and even then, is an optional change since it involves a lot of work. You can see the existing animation sets by opening any player model in a viewer and looking at the sequences named ref_aim_something, crouch_aim_something, ref_shoot_something, and crouch_shoot_something, where something is the name of the animation set.
Holster
Holster is slightly more complex than Deploy, but not by much. This method should cancel any reload that's currently taking place, and then hide the weapon from view. For most weapons, this is done with a "holster" animation, but you can also just use the default implementation of the Holster method, which just hides the weapons from view.
void CDesertEagle::Holster(int skiplocal)
{
    // Cancel any reload in progress
    m_fInReload = FALSE;

    // Delay the next player's attack for about the same time as the holster animation takes
    m_pPlayer->m_flNextAttack = UTIL_WeaponTimeBase() + 0.5;

    // Play the "holster" animation
    SendWeaponAnim(DESERT_EAGLE_HOLSTER);
}UTIL_WeaponTimeBase() - this is a client-side call that will return a set delay, if required by the client for prediction purposes. When setting delay values in weapons code, you should always add UTIL_WeaponTimeBase() to the value to ensure the client prediction works properly.
Client changes
Before we finish up here, we need to make sure the client and HUD knows about the new weapon, so it can handle it properly. In the client project, open hl_weapons.cpp. Towards the top of this file, you'll see some variables defined for each weapon. Add a definition for the new weapon here.// HLDM Weapon placeholder entities.
CGlock g_Glock;
// ... more code ...
CSqueak g_Snark;
CDesertEagle g_DesertEagle; // Add this lineHUD_InitClientWeapons method. Here you'll see a series of HUD_PrepEntity calls - one for each weapon. Add a new line for your weapon.
// Allocate slot(s) for each weapon that we are going to be predicting
HUD_PrepEntity( &g_Glock    , &player );
// ... more code ...
HUD_PrepEntity( &g_Snark    , &player );
HUD_PrepEntity( &g_DesertEagle, &player ); // Add this lineHUD_WeaponsPostThink. There's a switch statement here that you'll need to add a case to:
switch ( from->client.m_iId )
{
    case WEAPON_CROWBAR:
        pWeapon = &g_Crowbar;
        break;

    // ... more code ...

    // Add this case statement
    case WEAPON_DESERT_EAGLE:
        pWeapon = &g_DesertEagle;
        break;
}
Reviewing your progress
If you've followed the tutorial up until this point, you should be able to compile your mod, and rungive weapon_eagle in the console to verify that the weapon is showing up. Run give item_suit as well, if you don't have one, so you can see the weapon in the HUD. It won't shoot at the moment or do anything useful - but you should be able to select it and see the weapon model in-game.In relation to the HUD: we've taken a shortcut with the HUD sprites by copying the files directly from Opposing Force. Take a short break from programming to look at the files you copied from the sprites folder - specifically, the sprites/weapon_eagle.txt file. This file should be named the same as your weapon's classname, and must be present in order for the weapon to appear in the HUD. The file format is explained in detail in the High-Level Overview article, so be sure to read through it.
If you try to run
impulse 101, you'll notice that your weapon isn't given to the player. Let's take care of that and one other small thing before we continue. Open player.cpp and search for the CheatImpulseCommands function. Somewhere in the case 101: section, add a line for your weapon:
case 101:
    gEvilImpulse101 = TRUE;
    // ... code ...
    GiveNamedItem( "weapon_eagle" ); // Add this line
    // ... more code ...
    gEvilImpulse101 = FALSE;
break;CBreakable::pSpawnObjects. Add your weapon classname to this array. This list corresponds to the FGD file - don't forget to add it to the FGD when you're making changes to it.
const char *CBreakable::pSpawnObjects[] =
{
    NULL,                // 0
    // ... code ...
    "weapon_hornetgun",  // 21
    "weapon_eagle", // 22 <- add this line
};
Implement shooting mechanics
Let's get to the real code - shooting and reloading. At the end of this section, the weapon will shoot, reload, and do idle animations. The gun will be fully functional - except the Desert Eagle's iconic laser sight, which we'll add later. You might be able to guess which methods need to be implemented for these features, but here they are anyway:- Client-side event code in ev_hldm.cpp
- PrimaryAttack
- Reload
- WeaponIdle
Client-side event code
Weapon firing happens on the server-side, but most of the actual effects happen on the client side. Without the client-side changes we're about to make, the shooting animation will look very strange. The shooting animation happens on the client side before the server applies the actual damage, so the game feels more responsive to players in multiplayer.The client event code simply plays the sound and animation that the player would expect to see when they fire the weapon. The event is loaded by the weapon's class, in the
Precache method. Before we can do that, however, we need a new variable to hold the event resource. Go to weapons.h and add this field to the private section of your CDesertEagle class:
class CDesertEagle : public CBasePlayerWeapon
{
public:
    // no changes in the public section
private:
    unsigned short m_usFireDesertEagle;
};Precache method:
// Precache fire event
m_usFireDesertEagle = PRECACHE_EVENT(1, "events/eagle.sc");That's all for loading the event, now let's implement the event handler. Go to hl_events.cpp and add a method definition for
EV_FireDesertEagle at the top of the file, and a pfnHookEvent call for your event inside Game_HookEvents:
extern "C"
{
// ... code ...
void EV_FireDesertEagle( struct event_args_s *args );
}

void Game_HookEvents( void )
{
    // ... more code ...
    gEngfuncs.pfnHookEvent("events/eagle.sc", EV_FireDesertEagle);
}extern "C"
{
// ... code ...
void EV_FireDesertEagle( struct event_args_s *args );
}//======================
// DESERT EAGLE START
//======================
// Exactly the same enum from deserteagle.cpp, these
// values correspond to sequences in the viewmodel file
enum desert_eagle_e {
DESERT_EAGLE_IDLE1 = 0,
DESERT_EAGLE_IDLE2,
DESERT_EAGLE_IDLE3,
DESERT_EAGLE_IDLE4,
DESERT_EAGLE_IDLE5,
DESERT_EAGLE_SHOOT,
DESERT_EAGLE_SHOOT_EMPTY,
DESERT_EAGLE_RELOAD,
DESERT_EAGLE_RELOAD_NOT_EMPTY,
DESERT_EAGLE_DRAW,
DESERT_EAGLE_HOLSTER,
};
void EV_FireDesertEagle( event_args_t *args )
{
// Just a bunch of variables and boilerplate copy/paste code
int idx;
vec3_t origin;
vec3_t angles;
vec3_t velocity;
int empty;
vec3_t ShellVelocity;
vec3_t ShellOrigin;
int shell;
vec3_t vecSrc, vecAiming;
vec3_t up, right, forward;
idx = args->entindex;
VectorCopy(args->origin, origin);
VectorCopy(args->angles, angles);
VectorCopy(args->velocity, velocity);
empty = args->bparam1;
AngleVectors(angles, forward, right, up);
shell = gEngfuncs.pEventAPI->EV_FindModelIndex("models/shell.mdl");// brass shell
// If the entity firing this event is the player
if (EV_IsLocal(idx))
{
// Render a muzzleflash
EV_MuzzleFlash();
// Show the weapon animation (a different one if this was the last bullet in the clip)
gEngfuncs.pEventAPI->EV_WeaponAnimation(empty ? DESERT_EAGLE_SHOOT_EMPTY : DESERT_EAGLE_SHOOT, 0);
// Apply some recoil to the player's view
V_PunchAxis(0, -4.0);
}
// Eject an empty bullet shell (the numbers here are mostly magic, experiment with them or just use whatever, it's not too important)
EV_GetDefaultShellInfo(args, origin, velocity, ShellVelocity, ShellOrigin, forward, right, up, -9.0, 14.0, 9.0);
EV_EjectBrass(ShellOrigin, ShellVelocity, angles[YAW], shell, TE_BOUNCE_SHELL);
// Play the "shoot" sound
gEngfuncs.pEventAPI->EV_PlaySound(idx, origin, CHAN_WEAPON, "weapons/desert_eagle_fire.wav", gEngfuncs.pfnRandomFloat(0.92, 1), ATTN_NORM, 0, 98 + gEngfuncs.pfnRandomLong(0, 3));
// Fire some bullets (this will do some prediction stuff, show a tracer, play texture sound, and render a decal where the bullet hits)
EV_GetGunPosition(args, vecSrc, origin);
VectorCopy(forward, vecAiming);
EV_HLDM_FireBullets(idx, forward, right, up, 1, vecSrc, vecAiming, 8192, BULLET_PLAYER_357, 0, 0, args->fparam1, args->fparam2);
}
//======================
// DESERT EAGLE END
//======================PrimaryAttack
This method is called, as you might expect, when the player presses the "Fire" key, which is usually the mouse1 button. This method should make sure the gun is allowed to fire (check if the player's underwater, check if the clip is empty, etc), and then actually perform the firing. The following code is very similar to the existing code for the .357 magnum:void CDesertEagle::PrimaryAttack()
{
// Don't fire underwater - waterlevel 3 indicates that the player's head is underwater
if (m_pPlayer->pev->waterlevel == 3)
{
// Play a "click" and don't allow another primary attack for a short time
PlayEmptySound();
m_flNextPrimaryAttack = UTIL_WeaponTimeBase() + 0.15;
return;
}
// Check if the clip is empty
if (m_iClip <= 0)
{
if (!m_fInReload && m_fFireOnEmpty)
{
// If the player has fired previously, but is still holding the attack button down,
// just play the empty "click" sound until the player releases the button.
PlayEmptySound();
m_flNextPrimaryAttack = UTIL_WeaponTimeBase() + 0.2;
}
return;
}
// If we get to this point - we're shooting!
m_pPlayer->m_iWeaponVolume = NORMAL_GUN_VOLUME;
m_pPlayer->m_iWeaponFlash = NORMAL_GUN_FLASH;
// Decrease the number of bullets in the clip
m_iClip--;
// Add a muzzleflash to the player effects
m_pPlayer->pev->effects |= EF_MUZZLEFLASH;
// Player "shoot" animation
m_pPlayer->SetAnimation(PLAYER_ATTACK1);
// Set global vectors in the engine (don't ask)
UTIL_MakeVectors(m_pPlayer->pev->v_angle + m_pPlayer->pev->punchangle);
// Shoot bullets!
Vector vecSrc = m_pPlayer->GetGunPosition();
Vector vecAiming = m_pPlayer->GetAutoaimVector(AUTOAIM_10DEGREES);
Vector vecDir = m_pPlayer->FireBulletsPlayer(
1, // Number of bullets to shoot
vecSrc, // The source of the bullets (i.e. the gun)
vecAiming, // The direction to fire in (i.e. where the player is pointing)
VECTOR_CONE_10DEGREES, // The accuracy spread of the weapon
8192, // The distance the bullet can go (8192 is the limit for the engine)
BULLET_PLAYER_357, // The type of bullet being fired
0, // Number of tracer bullets to fire (none in this case)
0, // Set to non-zero to override the amount of damage (usually, leave this as 0)
m_pPlayer->pev, // Attacker entity
m_pPlayer->random_seed // The random seed
);
int flags;
#if defined( CLIENT_WEAPONS )
flags = FEV_NOTHOST;
#else
flags = 0;
#endif
PLAYBACK_EVENT_FULL(flags, m_pPlayer->edict(), m_usFireDesertEagle, 0.0, (float*)&g_vecZero, (float*)&g_vecZero, vecDir.x, vecDir.y, 0, 0, (m_iClip == 0) ? 1 : 0, 0);
// If the clip is now empty and there's no more ammo available, update the HEV
if (!m_iClip && m_pPlayer->m_rgAmmo[m_iPrimaryAmmoType] <= 0)
{
// HEV suit - indicate out of ammo condition
m_pPlayer->SetSuitUpdate("!HEV_AMO0", FALSE, 0);
}
// The desert eagle can fire quite quickly with no laser spot, so use a 250ms delay
m_flNextPrimaryAttack = m_flNextSecondaryAttack = UTIL_WeaponTimeBase() + 0.25;
// Set the time until the weapon should start idling again
m_flTimeWeaponIdle = UTIL_WeaponTimeBase() + UTIL_SharedRandomFloat(m_pPlayer->random_seed, 10, 15);
}Reload
Compared to the two previous methods, the reload method is thankfully very easy to implement. We simply check to make sure that the player needs to reload and has enough ammo to reload, and if those are true, then we call theDefaultReload function.
void CDesertEagle::Reload()
{
    // Don't reload if the player doesn't have any ammo
    if (m_pPlayer->ammo_357 <= 0) return;

    int iResult;

    // The view model has two different animations depending on if there are any bullets in the clip
    if (m_iClip == 0) iResult = DefaultReload(DESERT_EAGLE_MAX_CLIP, DESERT_EAGLE_RELOAD, 1.5);
    else iResult = DefaultReload(DESERT_EAGLE_MAX_CLIP, DESERT_EAGLE_RELOAD_NOT_EMPTY, 1.5);

    if (iResult)
    {
        // If the reload happened, then reset the weapon's idle time
        m_flTimeWeaponIdle = UTIL_WeaponTimeBase() + UTIL_SharedRandomFloat(m_pPlayer->random_seed, 10, 15);
    }
}
WeaponIdle
WeaponIdle must be implemented to make sure idle animations are shown while the player isn't doing anything while holding the gun. It can also be used to randomly switch between different idle animations to keep things interesting. The Desert Eagle model has 5 idle animations, so we use the random number utility to switch between each of them:
void CDesertEagle::WeaponIdle()
{
    // This is used in conjunction with the PlayEmptySound function.
    // This resets a flag so the "click" for an empty weapon can be replayed after a short delay
    ResetEmptySound();

    // Despite the name, this will SET the autoaim vector.
    // 10 degrees is what the magnum uses, so we'll use the same.
    m_pPlayer->GetAutoaimVector(AUTOAIM_10DEGREES);

    // Exit out of the method if the weapon time hasn't passed yet or if the clip is empty
    if (m_flTimeWeaponIdle > UTIL_WeaponTimeBase() || m_iClip <= 0) return;

    // Weapon idle is only called after the weapon hasn't been used (fired or reloaded)
    // for a while. In this case we want to play one of the idle animations for the weapon.
    // The desert eagle view model has 5 different idle animations, and we'll give each one
    // a 20% chance of playing, using the random number util function.
    int iAnim;
    float flRand = UTIL_SharedRandomFloat(m_pPlayer->random_seed, 0, 1);

    if (flRand <= 0.2)
    {
        // The numbers here (76.0 / 30.0) are a way to represent the time taken by the
        // animation, so the next idle animation isn't played before the current one has
        // been completed. This animation is 76 frames long, and runs at 30 frames per second.
        iAnim = DESERT_EAGLE_IDLE1;
        m_flTimeWeaponIdle = UTIL_WeaponTimeBase() + (76.0 / 30.0);
    }
    else if (flRand <= 0.4)
    {
        iAnim = DESERT_EAGLE_IDLE2;
        m_flTimeWeaponIdle = UTIL_WeaponTimeBase() + (61.0 / 24.0);
    }
    else if (flRand <= 0.6)
    {
        iAnim = DESERT_EAGLE_IDLE3;
        m_flTimeWeaponIdle = UTIL_WeaponTimeBase() + (50.0 / 30.0);
    }
    else if (flRand <= 0.8)
    {
        iAnim = DESERT_EAGLE_IDLE4;
        m_flTimeWeaponIdle = UTIL_WeaponTimeBase() + (76.0 / 30.0);
    }
    else
    {
        iAnim = DESERT_EAGLE_IDLE5;
        m_flTimeWeaponIdle = UTIL_WeaponTimeBase() + (61.0 / 30.0);
    }

    // Play the idle animation
    SendWeaponAnim(iAnim, UseDecrement(), pev->body);
}
Optional: Adding the laser spot
The laser spot is very specific to the Desert Eagle and it's unlikely that most of your weapons will use one. But for the sake of completion, let's add it in as well. For most of the implementation of the laser spot, we'll be looking at the RPG (as it already has a laser spot).Update the class declaration
First, open weapons.h and add the following changes to theCDesertEagle class. These changes are directly from the CRpg class and are required for the laser spot to work. Note that the CLaserSpot class is referenced here - so make sure your CDesertEagle is defined after the CLaserSpot class to avoid compile errors.At the top of the public block:
#ifndef CLIENT_DLL
    int Save(CSave& save);
    int Restore(CRestore& restore);
    static TYPEDESCRIPTION m_SaveData[];
#endifWeaponIdle():
void UpdateSpot();
BOOL ShouldWeaponIdle() { return TRUE; };

CLaserSpot* m_pSpot;
int m_fSpotActive;Save and Restore methods need to be added now that we've added a custom field to the class - m_fSpotActive. This will be a flag to detect when the spot is active. To maintain this state between saves, we need to implement save/restore for the class. This is also why the field needs to be public - so the save/restore code can access it. We won't need to save the actual laser spot object (m_pSpot), since we can create this as-needed.The
UpdateSpot method is where the logic will go to .... update the spot. The other change - ShouldWeaponIdle is slightly more nuanced. By default, the WeaponIdle method is only called when the player isn't doing something else (such as shooting or reloading). By overriding ShouldWeaponIdle, we can force the WeaponIdle method to always be called. We do this so we can always call UpdateSpot so it can stay up-to-date.
Implement save/restore
Go to weapons.cpp next and scroll to the very end to find the save/restore logic for each of the default weapons. If you take a look at some of them, you'll see a very standard pattern for this. Simply implement this pattern for the desert eagle class, and that's all you need to do. Here's the code to add:TYPEDESCRIPTION CDesertEagle::m_SaveData[] =
{
DEFINE_FIELD(CDesertEagle, m_fSpotActive, FIELD_INTEGER),
};
IMPLEMENT_SAVERESTORE(CDesertEagle, CBasePlayerWeapon);Make the changes to the weapon code
Finally, we need to implement the laser spot logic in the weapon code itself. Open deserteagle.cpp, and let's get started. Most of these changes are directly from theCRpg class, so take a look there for more information.Taking a look at how the Desert Eagle in Opposing Force behaves, this is what we want for the laser spot:
- By default, the laser is off
- The laser is toggled by pressing the secondary attack button
- The laser plays a sound when toggled
- When the laser is turned on, the gun shoots slower, but is more accurate
- The laser disappears while the player is shooting or reloading, but reappears afterwards
- If the laser is enabled and the player switches to another weapon and then back, the laser turns on (and plays the sound) when the weapon is re-selected
Precache
First, add this line to thePrecache method. This simply ensures that the laser spot's resources are precached properly.
UTIL_PrecacheOther( "laser_spot" );Holster
Next, we'll change theHolster code so that the laser is killed when the weapon is unequipped:
#ifndef CLIENT_DLL
    // If the laser spot exists, kill it
    if (m_pSpot)
    {
        m_pSpot->Killed(NULL, GIB_NEVER);
        m_pSpot = NULL;
    }
#endif
WeaponIdle
First, add a call toUpdateSpot() to the very top of the WeaponIdle function, above ResetEmptySound(). Next, if you take a close look at the idle animations for the Desert Eagle in Opposing Force, you'll notice that 3 of the idle animations only play when the laser is off, and the other 2 only play when the laser is on. We'll update this method so that this behaviour is the same as well. Here's the updated version of this function:
void CDesertEagle::WeaponIdle()
{
    // Update the laser spot
    UpdateSpot();

    // This is used in conjunction with the PlayEmptySound function.
    // This resets a flag so the "click" for an empty weapon can be replayed after a short delay
    ResetEmptySound();

    // Despite the name, this will SET the autoaim vector.
    // 10 degrees is what the magnum uses, so we'll use the same.
    m_pPlayer->GetAutoaimVector(AUTOAIM_10DEGREES);

    // Exit out of the method if the weapon time hasn't passed yet or if the clip is empty
    if (m_flTimeWeaponIdle > UTIL_WeaponTimeBase() || m_iClip <= 0) return;

    // Weapon idle is only called after the weapon hasn't been used (fired or reloaded)
    // for a while. In this case we want to play one of the idle animations for the weapon.
    // The desert eagle view model has 5 different idle animations, 1-3 will play when the laser
    // is off, and 4-5 will play when the laser is on.
    int iAnim;
    float flRand = UTIL_SharedRandomFloat(m_pPlayer->random_seed, 0, 1);

    // When the laser is on, we'll add 1 to the random result so that laser off
    // animations play when the value is between 0 and 1, and laser on animations
    // play when the value is between 1 and 2.
    if (m_fSpotActive) flRand += 1.01; // Add an extra .01 to ensure it's always > 1

    // Laser off animations
    if (flRand <= 0.333)
    {
        // The numbers here (76.0 / 30.0) are a way to represent the time taken by the
        // animation, so the next idle animation isn't played before the current one has
        // been completed. This animation is 76 frames long, and runs at 30 frames per second.
        iAnim = DESERT_EAGLE_IDLE1;
        m_flTimeWeaponIdle = UTIL_WeaponTimeBase() + (76.0 / 30.0);
    }
    else if (flRand <= 0.667)
    {
        iAnim = DESERT_EAGLE_IDLE2;
        m_flTimeWeaponIdle = UTIL_WeaponTimeBase() + (61.0 / 24.0);
    }
    else if (flRand <= 1)
    {
        iAnim = DESERT_EAGLE_IDLE3;
        m_flTimeWeaponIdle = UTIL_WeaponTimeBase() + (50.0 / 30.0);
    }
    // Laser on animations
    else if (flRand <= 1.5)
    {
        iAnim = DESERT_EAGLE_IDLE4;
        m_flTimeWeaponIdle = UTIL_WeaponTimeBase() + (76.0 / 30.0);
    }
    else
    {
        iAnim = DESERT_EAGLE_IDLE5;
        m_flTimeWeaponIdle = UTIL_WeaponTimeBase() + (61.0 / 30.0);
    }

    // Play the idle animation
    SendWeaponAnim(iAnim, UseDecrement(), pev->body);
}
Reload
When the player reloads, we want to hide the laser. Add this inside theif (iResult) block in the Reload function:
#ifndef CLIENT_DLL
        // If the player is reloading, hide the laser until the reload is complete
        if (m_pSpot && m_fSpotActive)
        {
            m_pSpot->Suspend(1.6);
            m_flNextSecondaryAttack = UTIL_WeaponTimeBase() + 1.6;
        }
#endif
PrimaryAttack
There's three changes we want to make to thePrimaryAttack method: the accuracy should be better, shots should be slower, and the laser should be hidden for a short time during the fire animation. Let's take care of each of these.Increasing the accuracy - this is done as part of the
FireBulletsPlayer call. We'll simply change VECTOR_CONE_10DEGREES to VECTOR_CONE_1DEGREES when the spot is active. This is what we end up with:
Vector vecDir = m_pPlayer->FireBulletsPlayer(
    1,                     // Number of bullets to shoot
    vecSrc,                // The source of the bullets (i.e. the gun)
    vecAiming,             // The direction to fire in (i.e. where the player is pointing)
    m_fSpotActive ? VECTOR_CONE_1DEGREES : VECTOR_CONE_10DEGREES,  // The accuracy spread of the weapon
    8192,                  // The distance the bullet can go (8192 is the limit for the engine)
    BULLET_PLAYER_357,     // The type of bullet being fired
    0,                     // Number of tracer bullets to fire (none in this case)
    0,                     // Set to non-zero to override the amount of damage (usually, leave this as 0)
    m_pPlayer->pev,        // Attacker entity
    m_pPlayer->random_seed // The random seed
);m_flNextPrimaryAttack, towards the end of the method. We'll double the delay if the spot is active. Here's the result:
// The desert eagle can fire quite quickly with no laser spot, so use a 250ms delay
// When the spot is active, the delay should be 500ms instead.
m_flNextPrimaryAttack = m_flNextSecondaryAttack = UTIL_WeaponTimeBase() + (m_fSpotActive ? 0.5 : 0.25);#ifndef CLIENT_DLL
// Hide the laser until the player can shoot again
if (m_pSpot && m_fSpotActive)
{
m_pSpot->Suspend(0.6);
m_flNextSecondaryAttack = UTIL_WeaponTimeBase() + 0.6;
}
#endifUpdateSpot method to make sure it stays up-to-date. This goes right at the end:
// Keep the laser updated
UpdateSpot();
SecondaryAttack
Like the RPG, the secondary attack will toggle the laser spot on and off. However, the Desert Eagle also has sounds that play when the laser is toggled, so we'll add code for that as well. This is whatSecondaryAttack should look like:
void CDesertEagle::SecondaryAttack()
{
    // Toggle the laser
    m_fSpotActive = !m_fSpotActive;

#ifndef CLIENT_DLL
    // If the laser is being turned off, kill the laser
    if (!m_fSpotActive && m_pSpot)
    {
        m_pSpot->Killed(NULL, GIB_NORMAL);
        m_pSpot = NULL;
    }
#endif

    if (m_fSpotActive)
    {
        // If the spot is being turned on, play the ON sound and delay for a short time
        EMIT_SOUND(ENT(m_pPlayer->pev), CHAN_ITEM, "weapons/desert_eagle_sight.wav", 1, ATTN_NORM);
        m_flNextSecondaryAttack = UTIL_WeaponTimeBase() + 0.25;
    }
    else
    {
        // If the spot is being turned off, play the OFF sound and delay for a slightly longer time
        EMIT_SOUND(ENT(m_pPlayer->pev), CHAN_ITEM, "weapons/desert_eagle_sight2.wav", 1, ATTN_NORM);
        m_flNextSecondaryAttack = UTIL_WeaponTimeBase() + 0.5;
    }
}
UpdateSpot
Finally, the new method:UpdateSpot. This is just a copy-paste from the CRpg class. Here's the code:
void CDesertEagle::UpdateSpot(void)
{
#ifndef CLIENT_DLL
    // If the spot is active
    if (m_fSpotActive)
    {
        // Make sure the spot entity has been created
        if (!m_pSpot)
        {
            m_pSpot = CLaserSpot::CreateSpot();
        }

        // Perform a TraceLine to find the point that the laser shines on
        UTIL_MakeVectors(m_pPlayer->pev->v_angle);
        Vector vecSrc = m_pPlayer->GetGunPosition();
        Vector vecAiming = gpGlobals->v_forward;

        TraceResult tr;
        UTIL_TraceLine(vecSrc, vecSrc + vecAiming * 8192, dont_ignore_monsters, ENT(m_pPlayer->pev), &tr);

        // Put the laser spot at the end of the trace
        UTIL_SetOrigin(m_pSpot->pev, tr.vecEndPos);
    }
#endif
}
A small tweak
The weapon is basically complete at this point: but there's one missing feature - when the laser is active, and the weapon is switched to from another weapon, you want to play the "laser on" sound when the laser appears. Now, you could probably do something in theDeploy function to handle this, but there's a different way. Instead of playing the "laser on" sound inside SecondaryAttack, we could play it when the laser is created in the UpdateSpot method.Go into the
SecondaryAttack method, and cut the EMIT_SOUND line for when the laser is being turned on. Keep it in the clipboard, because we'll be pasting it into UpdateSpot next.In
SecondaryAttack:
if (m_fSpotActive)
{
    // If the spot is being turned on, play the ON sound and delay for a short time
    // Note: The "on" sound is handled by the UpdateSpot function so it works on Deploy as well!
    m_flNextSecondaryAttack = UTIL_WeaponTimeBase() + 0.25;
}
else
// ... more code ...UpdateSpot and add the EMIT_SOUND line in:
// Make sure the spot entity has been created
if (!m_pSpot)
{
    m_pSpot = CLaserSpot::CreateSpot();

    // Play the "laser on" sound here, so it plays after a Deploy as well as a SecondaryAttack
    EMIT_SOUND(ENT(m_pPlayer->pev), CHAN_ITEM, "weapons/desert_eagle_sight.wav", 1, ATTN_NORM);
}
// ... more code ...
Another small tweak
If you compare your new Desert Eagle to Opposing Force... it looks pretty good! But if you look closely at the laser spot, you might notice that in OP4, it's actually quite a bit smaller. In fact, if you compare the scales of the laser spots for the RPG and Desert Eagle, it's actually half the size of RPG's.UpdateSpot, when creating the laser spot, simply set it's scale to 0.5. That's it!
// Make sure the spot entity has been created
if (!m_pSpot)
{
    m_pSpot = CLaserSpot::CreateSpot();
    m_pSpot->pev->scale = 0.5;

    // Play the "laser on" sound here, so it plays after a Deploy as well as a SecondaryAttack
    EMIT_SOUND(ENT(m_pPlayer->pev), CHAN_ITEM, "weapons/desert_eagle_sight.wav", 1, ATTN_NORM);
}CLaserSpot class in order to make the sprite it uses more configurable.
Make the changes to your FGD
This is the last step of adding any new entity to your mod - update the FGD so you can place it in your editor! For weapons, doing this is very simple, since they rarely have any special keyvalues. Just add this to your FGD file:@PointClass base(Weapon, Targetx) studio("models/w_desert_eagle.mdl") = weapon_eagle : "Desert Eagle" []Breakable base class, just add your number and description for the weapon to the end:
@BaseClass base(Targetname,Global) = Breakable
[
    ...
    spawnobject(choices) : "Spawn On Break" : 0 =
    [
        0: "Nothing"
        ...
        21: "Hornet Gun"
        22: "Desert Eagle"
    ]
    ...
]
Enjoy!
You're finally finished! Hopefully you've been compiling your mod and checking the results as you go, but just in case you haven't, do that now! Click here to see the full source code for this tutorial.- Categories
- Tutorials
- Programming
- Goldsource Tutorials
- Article Credits
-
 Penguinboy
–
Original author
Penguinboy
–
Original author
5 Comments
You must log in to post a comment. You can login or register a new account.
@sadpepe: The classname in this tutorial is
weapon_eagle, it's possible that in your console and in the impulse 101 code, you typed deagle by mistake. The names need to match or nothing will happen.@The Skeleton: If you are not willing to spend a bit of time to learn, then programming is not for you. This tutorial is intended to be useful, not to entertain you.
@Chris I Guess: Start with the Half-Life Programming - Getting Started guide. It will tell you how to get these files. Note that if you don't know how to code, editing the HL SDK is going to be a very painful learning experience.