VERC: How To Create An Airstrike Last edited 2 years ago2022-09-29 07:54:57 UTC
Introduction
This tutorial will lead you through the creation of an air strike table. What's an air strike table? you ask? It will allow you to target a specific point in your level and send an airstrike raining down on the targetted position.Setup
The air strike is setup in four parts - a set of momentary_rot_button entities (part 1) that control a set momentary_door entities (part 2) that determine the position the func_mortar_field (part 3) will strike at when the func_button (part 4) is pressed. The entities are shown in the picture below (taken from Worldcraft's 3D view).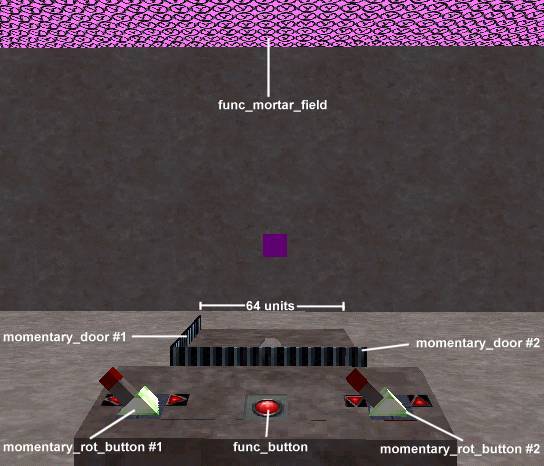
momentary_rot_buttons and momentary_doors
These two sets of entities act as the positioning devices for the air strike. The momentary_rot_buttons act as controllers to move the momentary_doors around and the momentary doors act as the actual position indicators for the strike. In the picture above, momentary_rot_button #1 is the X controller, and momentary_door #1 is the X position indicator. Likewise, momentary_rot_door #2 is the Y controller, and momentary_door #2 is the Y position indicator.momentary_rot_button #1 and momentary_door #1
These are the X control devices. Set the Name (targetname) of the button toxcontroller. This will be used for reference later by the func_mortar_field. Set the Targeted Object (target) to xposition. Set the Name (targetname) of the momentary_door to xposition as well. The rest of the button's properties and flags should be setup as you normally would. The same goes for the door, except that you should set the Lip (lip) to a value equal to the distance it should travel. As shown in the picture above, the example map uses an air strike table 64 units wide. Finally, set the angle of the momentary_door to point in the direction opposite to the direction you want the door to move.
momentary_rot_button #2 and momentary_door #2
These should be setup the same as above, replacingxcontroller with ycontroller and xposition with yposition. If the air strike table is square, the same Lip (lip) value for the momentary_door can also probably be used.
func_mortar_field and func_button
The func_mortar_field is where the mortars actually drop from. It must be triggered to drop the bombs, which is where the func_button comes in.The func_mortarfield is quite simple to setup. First, set its Name (targetname) to
mortar. This is what the func_button will target. The Spread Radius (m_flSpread) determines the mortar strike's accuracy. The value is the number of units of variance from a direct hit. The Repeat Count (m_iCount) value is equal to the number of bombs that will be dropped. One is pretty devastating, so more is better!  The Targeting (m_fControl) value determines how the func_mortarfield will be controlled. For this example, you want to have selected the
 Table (2). Last, you have to specify the X Controller (m_iszXController) and Y Controller (m_iszYController). For this example, you'll want to use the values xcontroller and ycontroller, respectively, which correspond to the Name (targetname) values of the X and Y controller momentary_rot_buttons)Finally, you need to setup a trigger to activate the func_mortar_field. In this example, we're using a func_button, but anything capable of triggering an event can be used. Simply set the Targeted Object (target) of the button to
mortar. Setup any other properties/flags as you normally would. Now, when the button is pushed, the air strike is triggered and bombs are dropped at the position indicated on the table.A lot of this information will be more easily understood if you can examine the example map as you're going through it.
Example
For a more concrete illustration, check out the example map linked below.- Categories
- Archived Articles
- VERC Archive
- VERC - Half-Life
- VERC - mapping
- Tutorials
- Mapping
- Examples Required
- Article Credits
- Chris 'autolycus' Bokitch – Author
This article was originally published on Valve Editing Resource Collective (VERC).
The original URL of the article was http://collective.valve-erc.com/index.php?doc=1047437464-86983400.
The archived page is available here.
TWHL only publishes archived articles from defunct websites, or with permission.
For more information on TWHL's archiving efforts, please visit the
TWHL Archiving Project page.
Comments
You must log in to post a comment. You can login or register a new account.


