Tutorial: Setting up TrenchBroom for GoldSource games Last edited 4 months ago2024-07-28 22:10:43 UTC
This is a brief, step-by-step guide on how to set up TrenchBroom for GoldSrc games.
If not, you may go to TrenchBroom releases on GitHub, scroll down a little bit and find a download for your platform/operating system.
Also, if you would like to learn how to use TrenchBroom in general, dumptruck_ds's tutorial videos as well as TrenchBroom's own manual are great resources.
If you are new to making maps in general, it is also a good idea to read up on other mapping guides: Lastly, note that TrenchBroom does not yet offer full support for Half-Life. For instance, while it can load Half-Life textures, sprites and models, it doesn't have a file browser where you can conveniently pick a sprite or model, instead you have to type paths to them manually. This may change in future updates.
1. Launch TrenchBroom and click New map...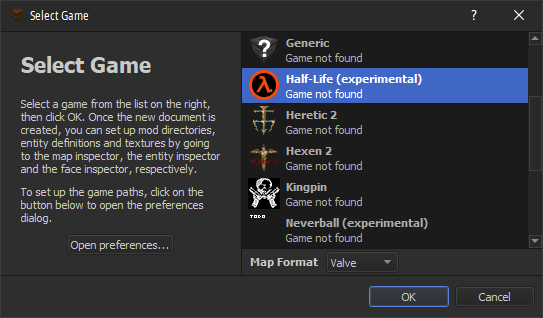 2. Click Open preferences... and select Half-Life.
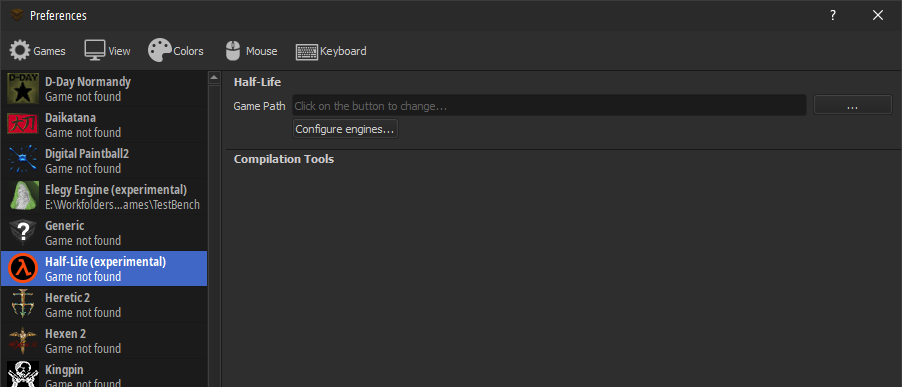 3. Set Game Path to your Half-Life installation directory.
Navigate to the folder where the game configuration files are located. That'll be different depending on the platform: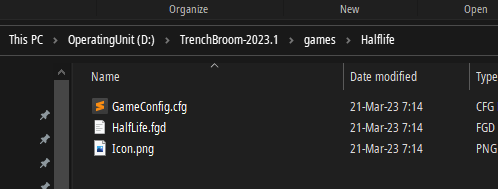 TrenchBroom comes with a basic Half-Life FGD, however we also need
1. Create a new file, call it anything you'd like, for example
2. Open it with your preferred text editor (Notepad, Notepad++, VSCode...)
3. Write the following text:
This change will make TrenchBroom load
Just to make sure, here is how your FGD should look in the end: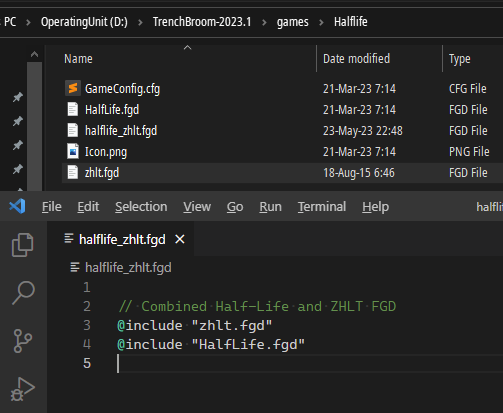
 You will be greeted by TrenchBroom's default layout and an almost empty map.
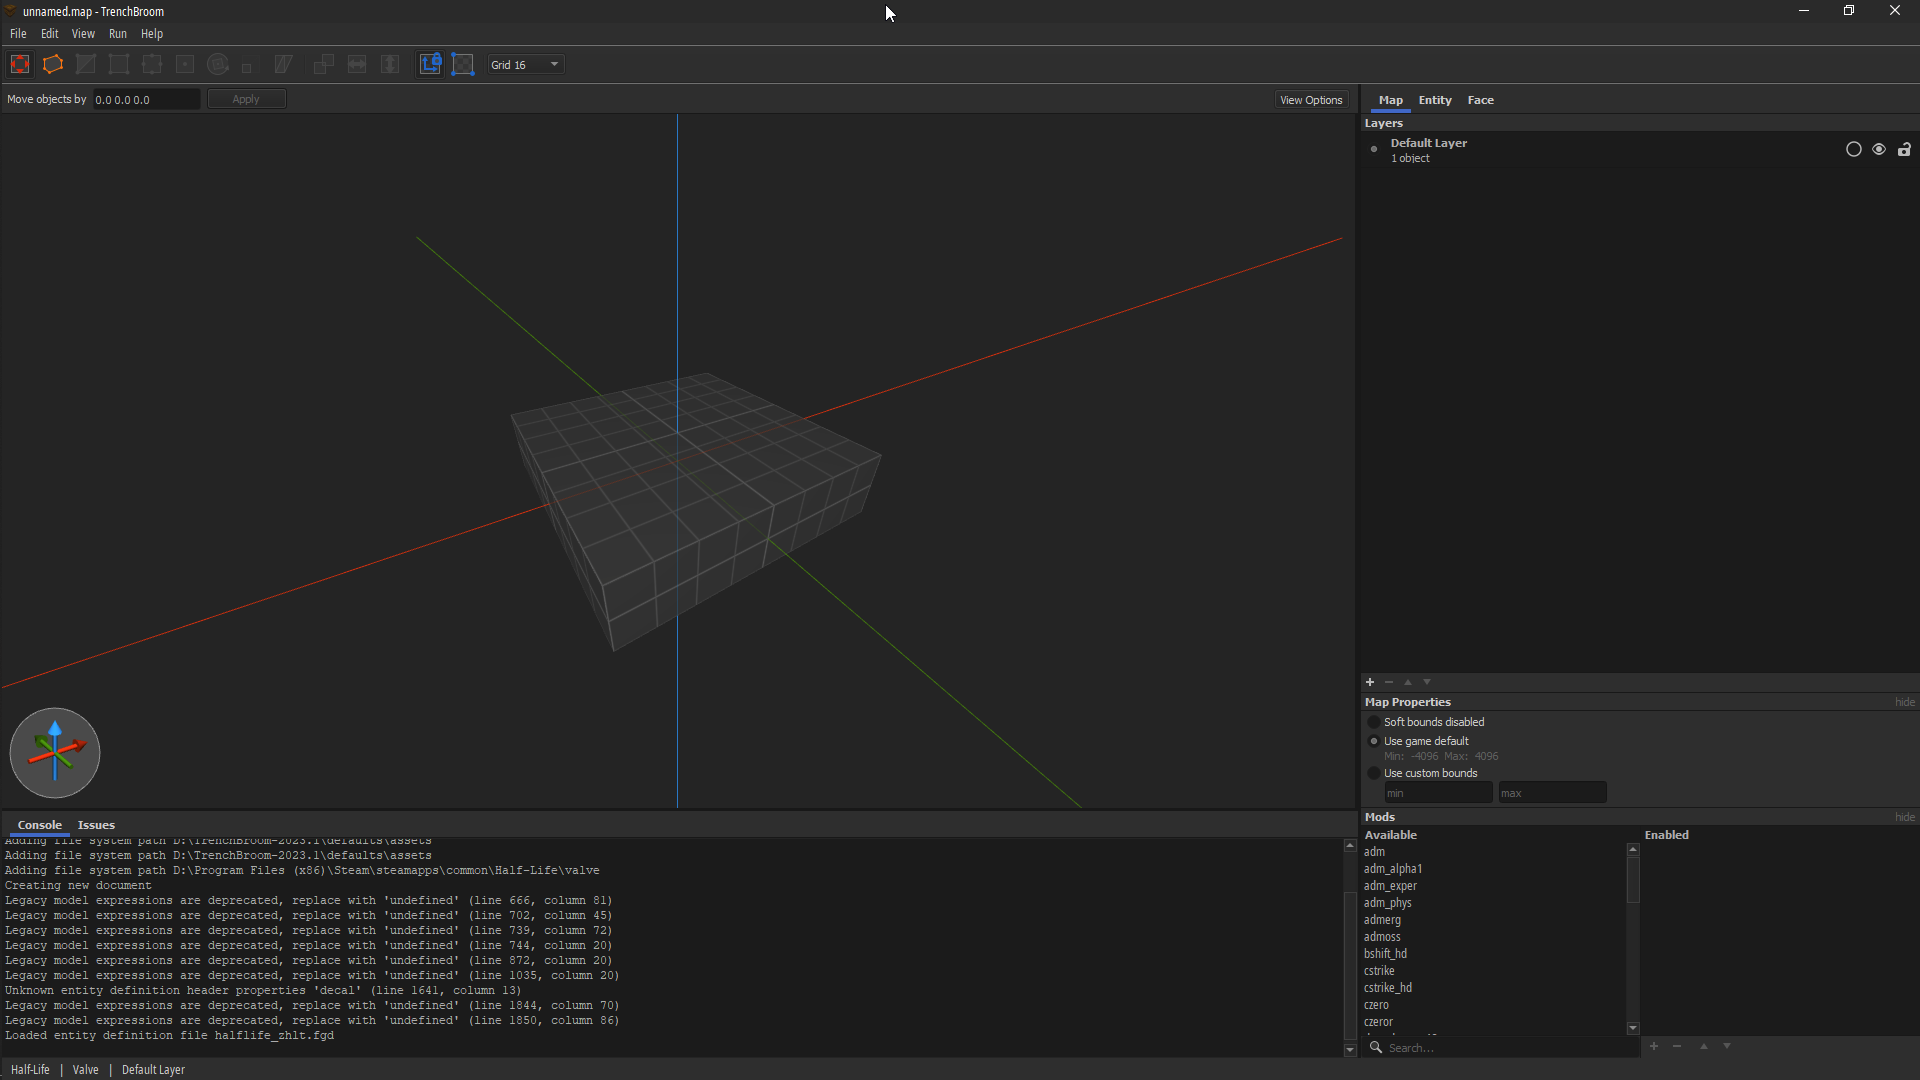 Hello, brush!
Take a moment to familiarize yourself with TrenchBroom's user interface. If you aren't mapping for Half-Life, you may select a game/mod folder in the Mods section in the bottom-right corner.
Hello, brush!
Take a moment to familiarize yourself with TrenchBroom's user interface. If you aren't mapping for Half-Life, you may select a game/mod folder in the Mods section in the bottom-right corner.
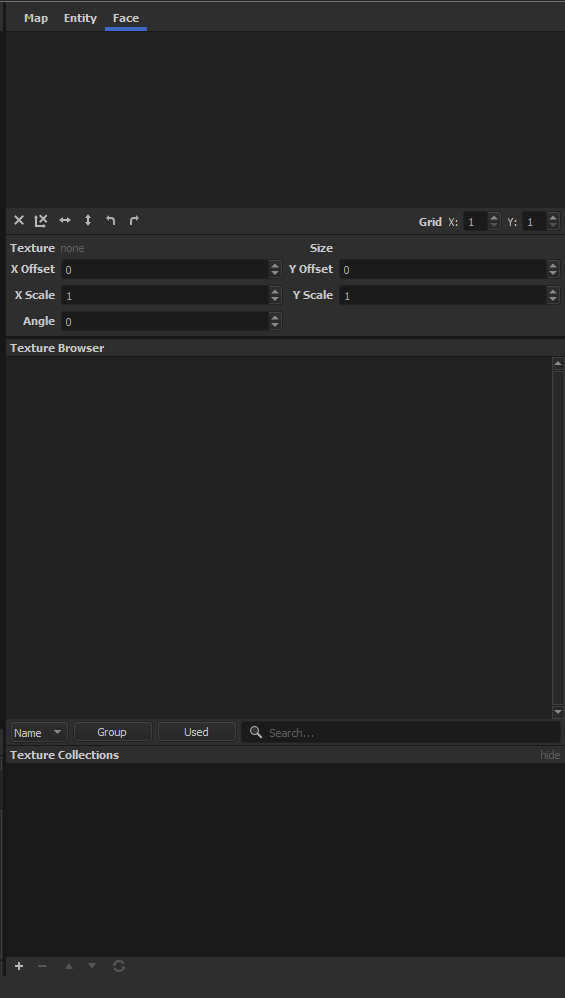 The next step is to load textures. Go to the Face tab in the upper-right corner.
Look at Texture Collections in the bottom-right corner, and click on the + icon. Browse to a WAD file (e.g.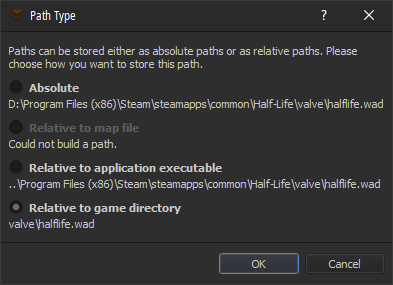 TrenchBroom will ask you if you want to build a relative path to the WAD, or use an absolute path. Prefer relative paths if they are in your game folder. If they are elsewhere, such as
Note that you will have to load WADs every time you create a new map.
Now, after you've made a little room and placed an info_player_start, move on to the next section!
1. Go to Run -> Compile Map.... You will see a Compile window with empty compilation profiles.
2. Create a compilation profile by clicking on the + icon at the bottom of Profiles, you may name it however you like (e.g. "Default")
3. Set Working Directory to
4. Add the following compilation steps:
1. Export Map You may now press Compile.
What happens from this moment onward is essentially equivalent to launching the Command Prompt on Windows and doing this:
Quake's built-in config has fields for setting tool paths, but Half-Life lacks these options by default. You have to add these fields manually:
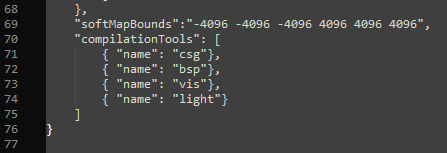 It should look like this
Now if you go to the Half-Life's entry in the Preferences menu, it will have a "Compilation Tools" section, similarly to the Quake entry.
It should look like this
Now if you go to the Half-Life's entry in the Preferences menu, it will have a "Compilation Tools" section, similarly to the Quake entry.
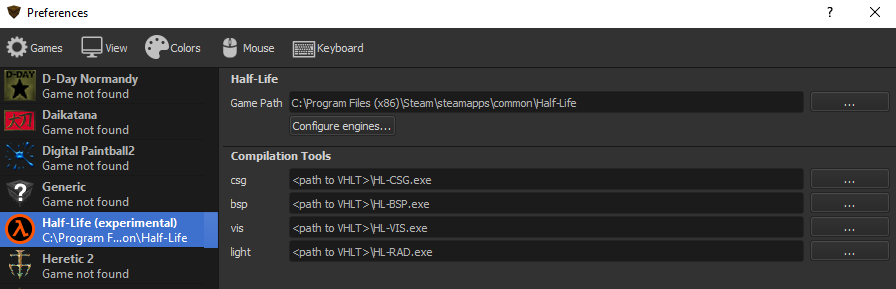 That wasn't here before!
After setting the paths there, you may use
That wasn't here before!
After setting the paths there, you may use 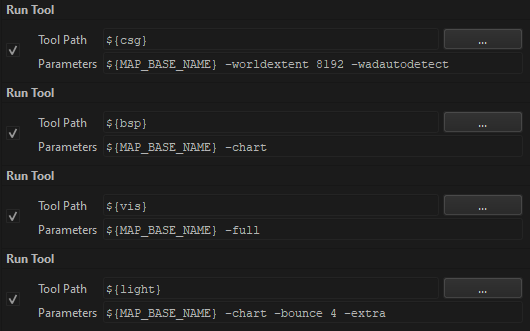 Your compilation profile may look like this
This works just fine, but the manual cautions against doing so:
But where is that folder? As stated, it depends on your platform: This one, right here
If you've followed the guide so far, all you have to do now is copy the files from
This one, right here
If you've followed the guide so far, all you have to do now is copy the files from
For this example, the error was:
Before we start
This guide assumes you have already installed TrenchBroom and are a bit familiar with it.If not, you may go to TrenchBroom releases on GitHub, scroll down a little bit and find a download for your platform/operating system.
Also, if you would like to learn how to use TrenchBroom in general, dumptruck_ds's tutorial videos as well as TrenchBroom's own manual are great resources.
If you are new to making maps in general, it is also a good idea to read up on other mapping guides: Lastly, note that TrenchBroom does not yet offer full support for Half-Life. For instance, while it can load Half-Life textures, sprites and models, it doesn't have a file browser where you can conveniently pick a sprite or model, instead you have to type paths to them manually. This may change in future updates.
Settings
First, you should let TrenchBroom know where Half-Life is located. Without that information, it won't know where to look for game files.1. Launch TrenchBroom and click New map...
- Windows: this is the folder where
hl.exeis located. By default, this isC:\Program Files (x86)\Steam\steamapps\common\Half-Life. - Linux: this is the folder where
hl.shis located. By default, this is$HOME/.steam/steam/steamapps/common/Half-Life($HOMEis the environment variable that is the path to your personal Unix user folder which is usually/home/<Unix user>).
FGD files
FGDs describe what entities the game can offer to the map editor. Different games like Counter-Strike may offer different entity types. (bomb spots,func_vehicle etc.)Navigate to the folder where the game configuration files are located. That'll be different depending on the platform:
- Windows: this is the folder where
TrenchBroom.exeis located. - macOS:
TrenchBroom.app/Contents/Resources - Linux:
<prefix>/share/trenchbroom, where<prefix>is the installation prefix.
games/Halflife.
zhlt.fgd. Without it, we wouldn't have certain special entities like func_detail.
Now, there is a problem. TrenchBroom cannot load multiple FGD files at once. For that, we'll create a combined FGD. Do the following:1. Create a new file, call it anything you'd like, for example
halflife_zhlt.fgd2. Open it with your preferred text editor (Notepad, Notepad++, VSCode...)
3. Write the following text:
// Combined Half-Life and ZHLT FGD
@include "zhlt.fgd"
@include "HalfLife.fgd"GameConfig.cfg, go to line 17, and change it as follows:
Before:
"entities": {
    "definitions": [ "HalfLife.fgd" ],
    "defaultcolor": "0.6 0.6 0.6 1.0",
    "setDefaultProperties": true
},
After:
"entities": {
    "definitions": [ "halflife_zhlt.fgd" ],
    "defaultcolor": "0.6 0.6 0.6 1.0",
    "setDefaultProperties": true
},halflife_zhlt.fgd by default, so you don't have to switch to it every time.Just to make sure, here is how your FGD should look in the end:
Creating a new map
Once you've set that up, make sure that your Map Format is set to Valve. The Standard map format is actually the Quake map format and isn't recommended for GoldSrc. (in fact, even Quake mappers use the Valve format, since it has better texture projection capabilities)Hello, brush!Look at Texture Collections in the bottom-right corner, and click on the + icon. Browse to a WAD file (e.g.
Half-Life/valve/halflife.wad) and open it.
E:/GoldSrcMapping/textures/zhlt.wad, definitely use absolute paths.
Note that you will have to load WADs every time you create a new map.
Now, after you've made a little room and placed an info_player_start, move on to the next section!
Setting up VHLT
Unlike textures, this process is only done once, and it is perhaps the most tedious and confusing for newcomers. However, don't worry, it is fairly straightforward.1. Go to Run -> Compile Map.... You will see a Compile window with empty compilation profiles.
2. Create a compilation profile by clicking on the + icon at the bottom of Profiles, you may name it however you like (e.g. "Default")
3. Set Working Directory to
${GAME_DIR_PATH}4. Add the following compilation steps:
1. Export Map
- File Path:
${WORK_DIR_PATH}/${MODS[-1]}/maps/${MAP_BASE_NAME}.map - This will export the map to the game's maps directory. It is not a bad idea to have your original map file separate from the exported one.
- Tool Path:
<path to VHLT>/HL-CSG.exe - Parameters:
"${WORK_DIR_PATH}/${MODS[-1]}/maps/${MAP_BASE_NAME}.map" -nowadtextures -clipeconomy
- Tool Path:
<path to VHLT>/HL-BSP.exe - Parameters:
"${WORK_DIR_PATH}/${MODS[-1]}/maps/${MAP_BASE_NAME}.map" -chart
- Tool Path:
<path to VHLT>/HL-VIS.exe - Parameters:
"${WORK_DIR_PATH}/${MODS[-1]}/maps/${MAP_BASE_NAME}.map"
- Tool Path:
<path to VHLT>/HL-RAD.exe - Parameters:
"${WORK_DIR_PATH}/${MODS[-1]}/maps/${MAP_BASE_NAME}.map" -chart
What happens from this moment onward is essentially equivalent to launching the Command Prompt on Windows and doing this:
xcopy mymap.map "C:/Program Files (x86)/Steam/steamapps/common/Half-Life/valve/maps"
"C:/VHLT/HL-CSG.exe" "C:/Program Files (x86)/Steam/steamapps/common/Half-Life/valve/maps/mymap.map" -nowadtextures -clipeconomy
"C:/VHLT/HL-BSP.exe" "C:/Program Files (x86)/Steam/steamapps/common/Half-Life/valve/maps/mymap.map" -chart
"C:/VHLT/HL-VIS.exe" "C:/Program Files (x86)/Steam/steamapps/common/Half-Life/valve/maps/mymap.map"
"C:/VHLT/HL-RAD.exe" "C:/Program Files (x86)/Steam/steamapps/common/Half-Life/valve/maps/mymap.map" -chartcp mymap.map $HOME/.steam/steamapps/common/Half-Life/valve/maps
$HOME/VHLT/hlcsg $HOME/.steam/steamapps/common/Half-Life/valve/maps/mymap.map -nowadtextures -clipeconomy
$HOME/VHLT/hlbsp $HOME/.steam/steamapps/common/Half-Life/valve/maps/mymap.map -chart
$HOME/VHLT/hlvis $HOME/.steam/steamapps/common/Half-Life/valve/maps/mymap.map
$HOME/VHLT/hlrad $HOME/.steam/steamapps/common/Half-Life/valve/maps/mymap.map -chartObject names Objects/Maxobjs Memory / Maxmem Fullness
------------ --------------- --------------- --------
models 1/512 64/32768 ( 0.2%)
planes 20/32768 400/655360 ( 0.1%)
vertexes 20/65535 240/786420 ( 0.0%)
nodes 6/32767 144/786408 ( 0.0%)
texinfos 4/32767 160/1310680 ( 0.0%)
faces 16/65535 320/1310700 ( 0.0%)
* worldfaces 16/32768 0/0 ( 0.0%)
clipnodes 18/32767 144/262136 ( 0.1%)
leaves 2/32760 56/917280 ( 0.0%)
* worldleaves 1/8192 0/0 ( 0.0%)
marksurfaces 16/65535 32/131070 ( 0.0%)
surfedges 68/512000 272/2048000 ( 0.0%)
edges 35/256000 140/1024000 ( 0.0%)
texdata [variable] 67732/33554432 ( 0.2%)
lightdata [variable] 7860/50331648 ( 0.0%)
visdata [variable] 1/8388608 ( 0.0%)
entdata [variable] 319/2097152 ( 0.0%)
* AllocBlock 1/64 0/0 ( 1.6%)
3 textures referenced
=== Total BSP file data space used: 77884 bytes ===
Wad files required to run the map: (None)
0.09 seconds elapsed
----- END hlrad -----
#### Finished with exit status 0map mymap, or whatever the filename of your map is.
(Optional) Tool paths as variables
You may want to create multiple compilation profiles for different tasks, such as a profile for recompiling only the entities on a map, for example, and typing in the full paths to the tools' executables in Run Tool every time might get annoying. Fortunately, it's possible to specify tool paths in the Preferences menu as variables.Quake's built-in config has fields for setting tool paths, but Half-Life lacks these options by default. You have to add these fields manually:
1. Open
2. Add the following section at the end:
GameConfig.cfg.2. Add the following section at the end:
"compilationTools": [
    { "name": "csg"},
    { "name": "bsp"},
    { "name": "vis"},
    { "name": "light"}
]${csg}, ${bsp}, ${vis} and ${light} instead of <path to VHLT>/toolname.exe when creating a compile task.
Your compilation profile may look like this(Optional) Overriding the game configuration files
So far, we've been customizing our configs and FGDs in the resources folder for the game, which the manual refers to as<ResourcePath> since its location varies between platforms. Thus, GameConfig.cfg and the FGDs we modified earlier are in currently in <ResourcePath>/games/Halflife.This works just fine, but the manual cautions against doing so:
The folderWell, where should we keep our configs then?<ResourcePath>/gamescontains a.cfgfile for each supported game, and additional folders which can contain additional resources related to the game such as icons, palettes or entity definition files.
It is not recommended to change these builtin game configurations, as they will be overwritten when an update is installed. [emphasis added]
To modify the existing game configurations or to add new configurations, you can place them in the folderWhat the manual proposes is to override the configurations - TrenchBroom will automatically substitute files in<UserDataPath>/games, where the value of<UserDataPath>is again platform dependent.
<ResourcePath> for files in <UserDataPath>, if they have the same names.But where is that folder? As stated, it depends on your platform:
- Windows:
C:\Users\<username>\AppData\Roaming\TrenchBroom - macOS:
~/Library/Application Support/TrenchBroom - Linux:
~/.TrenchBroom
<UserDataPath> by clicking the folder icon near the bottom-left corner of the Preferences menu.
This one, right here<ResourcePath>/games/Halflife to <UserDataPath>/games/Halflife, and make any further changes you want over there.
Troubleshooting
Chances are, you may run into some problems while following this guide.Problem: I can't see any entities!
Check TrenchBroom's console, chances are you may see error messages like this:Failed to parse included file: At line 1753, column 222: Expected '[', but got ':' (raw data: ':') (line 1753)@SolidClass = worldspawn : "This is the world entity. Each map can only contain one, and it's automatically created for you." : "http://twhl.info/wiki.php?id=162": "http://twhl.info/wiki.php?id=162"Problem: I am getting "Finished with exit status 1"
This means the compile has failed. You are likely seeing something like this:----- BEGIN hlrad -----
Command line: E:\Workfolders\Half-Life\VHLT-ADM-v35\ADM-RAD.exe "D:\Program Files (x86)\Steam\steamapps\common\Half-Life/valve/maps/twhl_tut_1.map" -chart
Arguments: "D:\Program Files (x86)\Steam\steamapps\common\Half-Life/valve/maps/twhl_tut_1.map" -chart -low
>> There was a problem compiling the map.
>> Check the file D:\Program Files (x86)\Steam\steamapps\common\Half-Life\valve\maps\twhl_tut_1.log for the cause.
----- END hlrad -----For this example, the error was:
Problem: Error: ::LoadLump() texture __TB_EMPTY not found!
This means you did not assign a texture to at least one face. You must make sure every surface has a texture, even if it won't be visible in-game.Problem: Warning: LEAK in hull 0
For this one, refer to Tutorial: How to fix those leaks. TrenchBroom supports, as of lately, VHLT pointfiles, so you can easily locate leaks.- Categories
- Tutorials
- Beginner Tutorials
- Goldsource Tutorials
- Mapping
- Article Credits
-
 Bl00dWolf
–
Original author
Bl00dWolf
–
Original author
-
 Admer456
–
Maintenance
Admer456
–
Maintenance
-
 Mota
–
Additional config information
Mota
–
Additional config information
3 Comments
You must log in to post a comment. You can login or register a new account.
From the github release: