Forum posts

Posted 4 months ago2023-12-09 00:53:09 UTC
in MESS 1.2 has been released! Post #348172
MESS 1.2.2 is available now

Another hotfix, this fixes an issue with the id() function not returning the targetname of the parent macro entity.

I've also added another template behavior for setting the speed of scrolling textures in brush entities other than func_conveyor.
Posted 4 months ago2023-12-02 22:48:22 UTC
in MESS 1.2 has been released! Post #348138
MESS 1.2.1 is now available!

This is a hotfix that fixes a problem with the configuration system that prevented template entities and behaviors from being loaded. :roll:

It also adds a 'template_entities\custom' directory where custom template entities and behaviors can be stored without the risk of being overwritten by a future update.
Posted 5 months ago2023-11-30 00:26:27 UTC
in MESS 1.2 has been released! Post #348117
MESS 1.2 has been released! :)

Besides a lot of small improvements and bugfixes, this update introduces a set of template entities and behaviors that are useful for advanced and novice mappers alike. There's an entity for triggering random targets, a multi-target variant of game_counter, an entity that can periodically trigger a target, a Counter-Strike specific entity that triggers its target when a new round starts, and so on. There's also a target pattern system that lets you write 
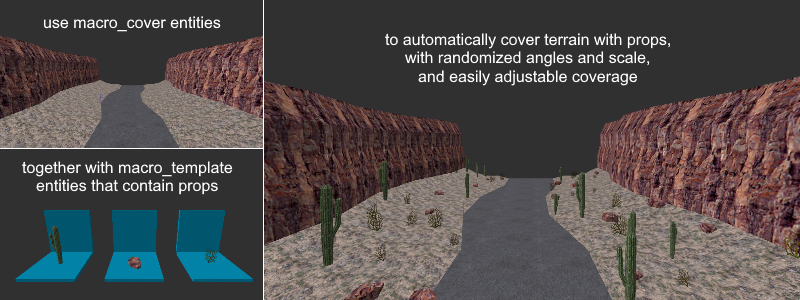
+door1 and train -> newpos instead of having to manually create a trigger_relay or trigger_changetarget. Advanced users can even make their own template entities and behaviors, and share them with others via .zip files.

Macro entities have also been improved: templates can now be given multiple names and macro entities can reference multiple templates, with custom weights, making it easier to create sets of related templates. Macro entities can also reference templates inside other maps, and macro_insert can now create multiple instances.

And if you're using TrenchBroom, you can add {_tb_group} to entity names and targetnames inside linked groups to produce unique names per group.
User posted image
User posted image
User posted image
Download links: Documentation: Notable changes & bugfixes:
  • Added a template entity library (mtl_trigger_random, mtl_trigger_counter, cs_trigger_roundstart, and more).
  • Added several template behaviors (target patterns, automatic multi_manager expansion, env_sprite angles fix, _tb_group support).
  • Templates can now have multiple names, and macro entities can reference multiple templates.
  • Macro entities can reference templates inside other maps.
  • Geometry scaling along individual axis.
  • Template properties now act as local variables.
  • macro_brush now also copies point entities from the selected template.
  • Several attribute-related scripting improvements (empty key removal, array keys, accessing parent entity attributes).
  • Automatic merging of brush entities.
  • Linux support (untested!).
  • MScript has been improved - it now supports functional programming.
  • Fixed that map files could not be read on certain systems, depending on culture settings.
  • Fixed incorrect handling of jmf worldspawn entities, and unwanted origin attributes.
  • Fixed that TrenchBroom map files could not be read (and vice versa).
Or go to the download page for a full list of changes and bugfixes.
Special thanks to Windawz, Loulimi and kimilil for their feedback, and all the others that contacted me about MESS during the past 3 years.
I'm not familiar with MMOD, but it looks like it doesn't support Opposing Force and Blue Shift-specific entities.

The only effect of adding these entity definitions to your .fgd file is that your level editor now lets you place these entities in a map. But that is of no use if the game or mod that you're mapping for doesn't support these entities - it will just ignore them, or maybe throw an error.
Posted 1 year ago2023-01-09 20:07:40 UTC
in Coding issue: Monster infighting! Post #347224
I'm not very familiar with the ins and outs of the HL codebase, but m_hEnemy->pev = pevAttacker doesn't look right - you're not checking whether m_hEnemy is null, but also, you're modifying the current target instead of switching to another target. If I understand things correctly then you need to set m_hEnemy to GetMonsterPointer(pevAttacker).

Actually, it looks like CBaseMonster has a mechanism for remembering previous enemies, so I would try using the PushEnemy function instead of changing m_hEnemy directly.
Posted 1 year ago2022-12-10 22:23:24 UTC
in Button/Trigger to set the state to zero Post #347159
I don't know if I still have that test map, but here's how it worked if I remember correctly.

Normally, you trigger entities directly by using their name as the target of a trigger or button or something:
trigger --(toggle)--> target entity

To turn an entity off, you trigger a trigger_relay instead, and use that trigger_relay to send an 'off' signal (trigger state) to the final target:
trigger --(toggle)--> trigger_relay ('off') --(off)--> target entity

Not all entities can handle 'off' signals however - some entities are always toggled, regardless of what signal they receive. For those, you could put a button_target in-between. If you send an 'off' signal to a button_target that is on, then it will trigger its target and turn itself off. If you send an 'off' signal to it while it's already off, then it will not trigger its target:
trigger --(toggle)--> trigger_relay ('off') --(off)--> button_target --(toggle, if button_target changed state)--> target entity

So the idea is to use a button_target to 'remember' the state of the final target. It's not perfect: you have to make sure that the button_target always has the same state as the final target. That can be tricky, for example with func_doors, which ignore triggers while they're still moving (for example, your button_target receives an off signal, toggles the func_door to close it, and turns itself off, but the func_door was still moving to its open position, so it ignored the toggle, and thus ends up being open, not closed), so in some cases even more elaborate setups may be needed.

Either way, I suppose this technique could be useful in some cases.
Posted 1 year ago2022-11-04 01:07:16 UTC
in Button/Trigger to set the state to zero Post #347043
You can use a trigger_relay to send an off (or on) signal to other entities. However, not all entity types check the kind of signal that they receive, so some will get toggled regardless.

In some cases it's useful to kill an entity instead (if you don't need it afterwards). In other cases you may need a mechanism that keeps track of an entity's state. A while ago I experimented with using a button_target for that - it has the useful property of only triggering its target when its state changes. So if you send an off signal to a button_target that's already off, it won't trigger its target.
Posted 1 year ago2022-10-03 20:14:35 UTC
in Func_Button Never Works (HL1) Post #346930
What happens here is that when you type "func_button" in the entity properties' Class field, you start with "f", and Jack then automatically selects the first entity type whose name starts with "f" - which is likely func_breakable. That's where the default health of 1 comes from. This accumulation of unwanted keys and values (properties) only seems to happen when you change the class of an entity by typing in a new classname. If you select a new classname via the dropdown box, then keys from the previous type are removed (unless you modified their value).

You can also create entities of a specific type by right-clicking on a selected brush(es) in any of the 2D/3D views. Selecting the 'Tie to entity' option in the context menu then lets you choose from all available brush entity types.
Can you open C:\Users\Alex\Documents\xash port\valve\maps\c1a0.wad with Wally or HL Texture Tools to verify that it's a 'good' wad file?
This recently came up on Discord as well. The303 pointed out that ripent.exe (one of the programs that's included in ZHLT / VHLT) can export and import textures from/into bsp files:

ripent.exe -textureexport "C:\where\is\your\valve\maps\mapname.bsp"
This will export embedded textures to a mapname.wad file in the same directory.

ripent.exe -textureimport "C:\where\is\your\valve\maps\mapname.bsp"
This will import textures from a mapname.wad file in the same directory, overwriting the embedded textures in the specified .bsp file.

And if, for some reason, you need to remove embedded textures, you can do so with WadMaker:
wadmaker.exe -remove "C:\where\is\your\valve\maps\mapname.bsp"
Posted 1 year ago2022-05-16 20:19:52 UTC
in Getting rid of the players weapons Post #346530
I suppose you're looking for player_weaponstrip?
I assume you're talking about level transitions? Did you try following this tutorial about changing levels?
As Oskar already said, you'll always have some quality loss, but the Paint program that comes with Windows is terrible for color conversions like this, pretty much any tool will produce better results. You could use a powerful image editor like GIMP or Photoshop, or a more advanced Paint-like program like Paint.NET, but a tool like Irfanview is also a good choice if you just need to convert some existing images.

Here's a comparison I did a while ago (this was for textures, which require the same conversion). As you can see, with Irfanview you'll hardly see any quality loss even with images that contain a lot of different colors and gradients. For 'easier' images like the cobblestone texture, any half-decent tool is good enough already:
User posted image
Posted 2 years ago2022-02-24 22:26:00 UTC
in Problems when level changes [Coding] Post #346293
So you've made the mega-health item responsible for reducing the players health back to 100? I can see why that causes problems: if the mega-health item isn't included when transitioning to another level, it won't exist in that other level, and so it can't reduce the players health. There's also another problem: if you pick up multiple mega-health items, all of them will eventually be reducing the players health back to 100, so the more of these items you pick up, the faster you'll lose any extra health.

I would move this health-reducing code somewhere to the player code (right after the call to 
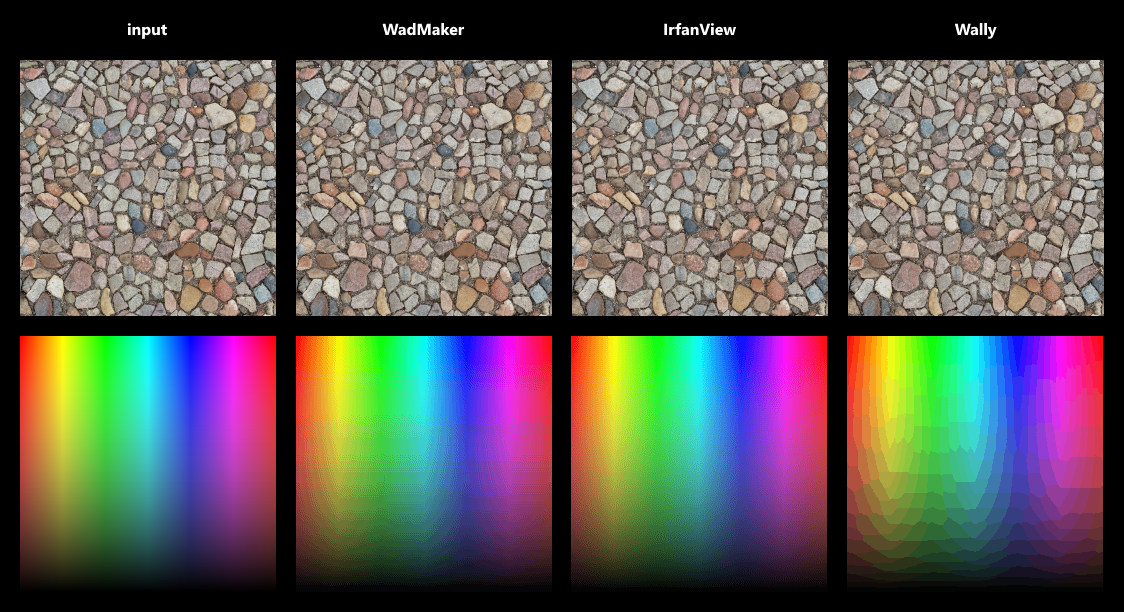
CheckTimeBasedDamage seems like a reasonable spot), so it'll always work no matter which level you move to, and you'll avoid the rapid-health-reducing bug as well. This also means that mega-health items can delete themselves once they've been picked up, just like other items.

PS: calling programmers 'Lords of Coding' feels awkward... :\
Posted 2 years ago2022-02-05 23:57:17 UTC
in trigger a sprite to appear and disappear Post #346260
I'm not quite sure, but you could try adding a game_score entity, again with the same targetname as the airstrike multi_manager:
{
"classname" "game_score"
"targetname" "strike_mm"
"points" "1"
}
Posted 2 years ago2022-02-05 23:00:15 UTC
in trigger a sprite to appear and disappear Post #346258
Sure, just duplicate your env_sprite and adjust the origin of each copy. As long as they all have the same targetname, they'll all be triggered at the same time.
Posted 2 years ago2022-02-05 22:09:37 UTC
in trigger a sprite to appear and disappear Post #346256
Your sprite now has the same name as the multi_manager that handles the airstrike sequence, so its visibility will only be toggled each time the airstrike sequence starts. So when the airstrike is started for the first time, your sprite will become visible, and will remain so. When the airstrike is started a second time, your sprite will become invisible. The third airstrike will make it visible again, and so on.

That's why you need to add a new multi_manager (with the same name as the airstrike multi_manager, so it will start at the same time):
{
"classname" "multi_manager"
"targetname" "strike_mm"
"usaflagdoc" "0"
"usaflagdoc#1" "45"
}
And this is how your sprite entity should look like:
{
"origin" "1 -949 -1440"
"scale" "1.0"
"model" "sprites/usaflagdoc.spr"
"rendercolor" "255 255 255"
"renderamt" "255"
"rendermode" "4"
"renderfx" "14"
"framerate" "20"
"classname" "env_sprite"
"targetname" "usaflagdoc"
}
Posted 2 years ago2022-02-05 21:21:40 UTC
in trigger a sprite to appear and disappear Post #346254
Ah, I see. Well, the first problem is that the names that you're using in your multi_manager do not match the targetname of your sprite. If your sprite contains "targetname" "usaflagdoc", then your multi_manager should contain "usaflagdoc" "0" and "usaflagdoc#1" "45".

But the second problem is that an env_glow cannot be enabled/disabled... so you'll have to use an env_sprite instead. Just change "classname" "env_glow" to "classname" "env_sprite". An env_sprite with a targetname will initially be disabled, and it will become visible when triggered (and invisible when triggered again).

While we're at it, sprites are only updated 10 times per second, so with a framerate of 20, every second sprite frame will be skipped.
Posted 2 years ago2022-02-05 18:46:36 UTC
in trigger a sprite to appear and disappear Post #346250
You can make that sprite get triggered at the same time as the sirens by adding the following line to it:
"targetname" "strike_siren"
Or if you prefer the bunker door timing:
"targetname" "bunker_maindoor"
For custom timings, you could add a new multi_manager with the same name as the multi_manager that's handling the whole sequence, so they get activated at the same time:
{
"classname" "multi_manager"
"targetname" "strike_mm"
"your_sprite_targetname" "0"
"your_sprite_targetname#1" "10"
}
You can adjust the 0 and 10 to whatever times (in seconds) that you like. Just as with the siren or main door timings, this also requires your sprite to have a name, but now you should use a name that isn't used anywhere else, to ensure that your multi_manager will be the only entity that's triggering your sprite:
"targetname" "your_sprite_targetname"
Posted 2 years ago2022-02-04 23:44:54 UTC
in trigger a sprite to appear and disappear Post #346248
It looks like the 'strike_mm' multi_manager is what orchestrates the whole airstrike sequence. It immediately activates the sirens and disables them after 45 seconds, and after 20 seconds it closes the main door and opens it again after 64 seconds, among other things.

There are several things you can do. The easiest approach is to give your sprite the same name as the sirens ('strike_siren') or as the bunker door ('bunker_maindoor'), so it will be triggered alongside the sirens or the bunker door. But that depends on whether you're happy with those timings.

If you want a different timing for your sprite, then you'll have to add some entries to the 'strike_mm' multi_manager. The problem is that a multi_manager can only trigger up to 16 targets, and this one is already triggering 15, so you can only add one entry. So you'll need to create a new multi_manager, and either make 'strike_mm' trigger it, or give it the same name as 'strike_mm', so it gets triggered at the same time. You can then add two entries to this new multi_manager, for enabling and disabling your sprite.
Posted 2 years ago2022-01-21 10:02:55 UTC
in info_node on func_wall Post #346213
func_walls have an internal `FL_WORLDBRUSH` flag set, so they're treated as world brushes when the node-graph is generated. The only other entity that also has this flag set is func_breakable, but only when its Material Type is set to 'Unbreakable glass' and when its Render Mode is not set to 'Normal'.

I don't know if these internal flags can be written to, but if so then you could try adding a flags property to an entity and setting it to 33554432 (that'll set the 26th bit, which is the FL_WORLDBRUSH flag).

If that doesn't work then the next thing I would try is to generate the node-graph using a custom version of the map (one with additional func_walls). Apparently HL will only rebuild a .nod file if the .bsp file is newer, so it should be possible to trick HL by first creating a normal .bsp, backing it up, then creating a custom .bsp (extra func_walls), using that to generate the .nod file, and then restoring the normal .bsp file. It might even be possible to strip the info_nodes from the normal .bsp if you need to save space for other entities. Fully automating this process might be a bit tricky because HL must be launched to build the node-graph...
I'm not familiar with how env_sky works, but if you're using Vluzacn's ZHLT tools then you could try putting a reversed info_overview_point in your sky room. That will cause the VIS process to mark that room as visible from anywhere else, which I think will also affect the transfer of entities between server and client.
Posted 2 years ago2021-12-19 13:45:11 UTC
in Changing a texture's palette Post #346130
All of the popular wad-making tools can convert true-color RGB images to the 8-bit indexed format that HL uses. So if you're using Wally or HL Texture Tools then there are only a few cases where you need to work with palettes directly (when adjusting water fog color/intensity and when making custom decals). The typical workflow is to make a true-color texture in Photoshop/Gimp/Krita/whatever, using all the modern image-editing tools that they provide, and then export it to a bmp/png file which can then be added to a wad file with a wad-making tool.

Personally I don't like working with palettes at all, and I don't like having to export files and then having to manually update a wad file, so a while ago I made a new tool called WadMaker. It lets you create (or update) a wad file from a directory full of images (or Photoshop/Krita/Gimp files) with just a single action. Here's a tutorial on how to get started: Making textures with WadMaker (it's a command-line tool so it's not as easy to get started with as Wally or HL Texture Tools). For Gimp file support you'll need to do a bit of configuration, see WadMaker: Converting Gimp files, or follow the instructions in the wadmaker.config file.
Can admin rename this thread to a more suitable name, so someone with the same problem can find this thread and script more easily?
As you wish.
I've updated the script with a fix for the UV offset (it now adds 1 to the result of half_float(t) before multiplying it with the texture height), and added a note about the minimum Python version. It turns out that formatted strings were introduced in Python 3.6. I haven't used Python much the past few years but I figured a Python script would be easier to share (and to analyze and modify!) than an executable. And it should run on almost any OS. ;)
I knew I had some model-loading code lying around but that turned out to be far from finished, so this took a bit longer than intended. It's indeed just a normalized half-float to absolute integer conversion, so I think I misinterpreted the .smd coordinates format, but working with mdl files directly is more accurate anyway so I didn't investigate the smd approach any further. So, here's a Python script (requires Python 3.6 or higher) for converting Xash models to GoldSource's format (be sure to change the input_path and output_path variables on lines 6 and 7 before you run the script):
import struct


def main():
    # Change these paths depending on which Xash model you want to convert:
    input_path = r'C:\your\models\folder\bpop2.mdl'
    output_path = r'C:\your\models\folder\bpop2_converted.mdl'

    # Read texture sizes:
    print(f'Reading \'{input_path}\'.')
    with open(input_path, 'rb') as file:
        data = bytearray(file.read(-1))

    texture_sizes = read_texture_sizes(data)
    if len(texture_sizes) == 0:
        # No texture information? Let's look for a *t.mdl file:
        try:
            texture_file_path = input_path[:-4] + 't.mdl'
            print(f'Reading \'{texture_file_path}\'.')
            with open(texture_file_path) as file:
                texture_sizes = read_texture_sizes(file.read(-1))
        except Exception as e:
            print(f'Failed to read \'{texture_file_path}\', unable to obtain texture size information.')
            raise e
    print(f'Texture sizes: {texture_sizes}\n')

    # Convert UV data from Xash' normalized half-float format to GoldSource's absolute int16 format:
    converted_count = 0
    print('Converting UV coordinates.')
    bodypart_count, bodypart_offset = struct.unpack_from('<ii', data, 204)
    for bodypart in range(bodypart_count):
        model_count, model_offset = struct.unpack_from('<ixxxxi', data, bodypart_offset + (bodypart * 76) + 64)
        for model in range(model_count):
            mesh_count, mesh_offset = struct.unpack_from('<ii', data, model_offset + (model * 112) + 72)
            for mesh in range(mesh_count):
                vertex_offset, skin = struct.unpack_from('<ii', data, mesh_offset + (mesh * 20) + 4)
                texture_size = texture_sizes[skin]
                offset = vertex_offset
                while True:
                    sequence_length = abs(struct.unpack_from('<h', data, offset)[0])
                    offset += 2
                    if sequence_length == 0:
                        break

                    for vertex in range(sequence_length):
                        s, t = struct.unpack_from('<HH', data, offset + 4)
                        struct.pack_into('<hh', data, offset + 4, round(half_float(s) * texture_size[0]), round((1 + half_float(t)) * texture_size[1]))
                        offset += 8
                        converted_count += 1
    print(f'Converted {converted_count} UV coordinates.\n')

    # Save the modified data to the output file:
    print(f'Writing \'{output_path}\'.')
    with open(output_path, 'wb') as file:
        file.write(data)
    print('Finished.')
#

def read_texture_sizes(data):
    texture_count, texture_offset = struct.unpack_from('<ii', data, 180)
    return [struct.unpack_from('<ii', data, texture_offset + (i * 80) + 68) for i in range(texture_count)]
#

def half_float(value):
    isPositive = (value & 0x8000) == 0
    exponent = (value & 0x7C00) >> 10
    fraction = value & 0x03FF

    if exponent == 0:
        if fraction == 0:
            return 0.0
        else:
            return (1 if isPositive else -1) * pow(2, -14) * (fraction / 1024.0)
    elif exponent == 31:
        if fraction == 0:
            return float('inf') if isPositive else float('-inf')
        else:
            return float('nan')
    else:
        return (1 if isPositive else -1) * pow(2, exponent - 15) * (1.0 + (fraction / 1024.0))
#


if __name__ == '__main__':
    main()
EDIT: Fixed the UV offset issue.
I fixed up my previous post so the code is now proper Python, instead of Python-esque pseudo-code.
For example, how to interpret 32.03125 ? It's not in the 0.0-1.0 range.
That probably means I guessed the wrong texture size. Or there's something else going on. Perhaps you could share this model so I can do some proper testing?
Posted 2 years ago2021-11-15 20:57:39 UTC
in Adding a bit more enemies Post #346063
Yes, it's possible to change entities in existing maps. One tool that you can use is BSPEdit, which lets you edit the 'raw' entity data in a bsp file. Editing that data by hand can be error-prone, so you may find it easier to copy-paste it into an empty .map file and then modify the entities with Hammer or JACK, then copy-paste them from the modified .map file back into the bsp file (.map and .bsp files use the same format for entity data). Oh, and it's also a good idea to make a backup before you're going to modify a bsp file.
As far as I know .smd files use normalized UV coordinates (0.0-1.0 range), but HL models store them as 16-bit integer 'texture pixel' coordinates instead (0-width and 0-height range). To translate between these, a compiler has to multiply UV coordinates by texture size - and consequently a decompiler has to divide UV coordinates by texture size. So to get back to the raw values as stored in the .mdl file, you'll have to multiply them by texture size, and then interpret the raw values as a half-floats (I assume they're using the IEEE 754 format).

I don't know how large that pop2.bmp texture is, but assuming that it's 512x512, I would expect the following normalized UV coordinates:
28.638672 (U) x 512 (texture width) = 14663.000064 -> 14663 (raw model U value) -> 0.6601563 (when interpreted as a half-float)
40.001953 (V) x 512 (texture height) = 20480.999936 -> 20481 (raw model V value) -> 32.03125 (when interpreted as a half-float)

Where the formula for half-float interpretation is something like this (in Python/pseudo-code):
def interpret_as_half_float(value):
    isPositive = (value & 0x8000) == 0
    exponent = (value & 0x7C00) >> 10
    fraction = value & 0x03FF

    if exponent == 0:
        if fraction == 0:
            return 0.0
        else:
            return (1 if isPositive else -1) * pow(2, -14) * (fraction / 1024.0)
    elif exponent == 31:
        if fraction == 0:
            return float('inf')
        else:
            return float('nan')
    else:
        return (1 if isPositive else -1) * pow(2, exponent - 15) * (1.0 + (fraction / 1024.0))
Disclaimer: I haven't tested this with an actual model, so I could be getting things wrong.
EDIT: Fixed a bug related to the inf/nan case (the special exponent value is 31, not 15).
I just finished a tutorial (with lots of pictures) for WadMaker: Making textures with WadMaker. Feedback is welcome. :)
Posted 2 years ago2021-09-21 20:36:50 UTC
in How to make a random generator? Post #345947
Yes, that's also possible. The catch is that the button press should enable and then quickly disable the beam, so that it can only trigger one random entity, instead of continuing to trigger random entities. Here's how you can do that:
  1. In the env_beam's properties, disable the 'Start On' flag and enable the 'Toggle' flag, so you can disable the beam by triggering it again.
  2. Set the env_beam's 'Life' property to 0.1 seconds - or longer, if you don't want it to be reusable too soon.
  3. Create a multi_manager, and make it trigger the env_beam twice. First with a delay of 0, then with a delay that matches the env_beam's 'Life' property.
  4. Set the 'Target' property of your func_button to the name of this multi_manager.
Posted 2 years ago2021-09-18 17:36:55 UTC
in How to make a random generator? Post #345938
Unfortunately Half-Life doesn't provide something like a trigger_random entity, but eventually some mapper(s) came up with a technique to trigger random entities. By using a high-damage env_beam that randomly targets one of several info_targets, and by placing func_buttons in front of those targets, you can trigger different entities depending on which info_target the beam decides to strike. It's described in more detail in the following tutorials: A Random Event Generator and Random entity triggering.

If you want to trigger multiple things at the same time, you can give them the same name (so they'll always be triggered together), or you can trigger a multi_manager, an entity that can trigger multiple entities (see Tutorial: Multi_manager for more info).
SpriteMaker is now available, and WadMaker has a few improvements and bugfixes (and some example configurations for setting up automatic Gimp and Aseprite file conversions)! See the first post in this thread for download links and a full changelog.
As far as I understand putting options/switches before (positional) arguments is a fairly wide-spread convention. C#'s standard library doesn't have anything for command-line parsing, so it's a trade-off between managing a dependency versus writing your own.

I marked your Github issues as enhancements. I think they're all good ideas that shouldn't take too much time to implement. Right now I'm working on finishing up SpriteMaker but I think I can spend some time on a MESS update after that.

Did you manage to resolve your expression error? One way to debug things would be to add a 'dummy entity' inside a template, using its attributes for 'logging' things. I also find it useful to have a compile mode in JACK that only runs MESS and then opens the modified map file with JACK.
You'll need to specify a log level (off, error, warning, info or verbose). Try setting it to warning or verbose and see if that gives you enough information. If that doesn't help, then what sort of error are we talking about? What does the expression look like?
Here's the documentation for macro_remove_if:
macro_remove_if
Used inside templates. When an instance of a template is created, anything inside the bounding box of this entity is excluded from that instance if the removal condition is true.

Attributes
  • Removal condition (condition) - The condition that determines whether the contents of this entity must be excluded. none (empty) and 0 will prevent removal.
So yeah, you put it around brushes and entities just like you do with macro_template. The condition attribute behaves the same as other attributes, so you'll need braces if you want to use scripting. Even though that's almost always what you want, I decided that consistent attribute behavior was more important than shaving off a few braces. Both macro_template and macro_remove_if only apply to things that are fully inside their bounding box.

For an example on how to use macro_remove_if, take a look at examples\templates\rathunt\message_system.rmf. It's a template map that omits certain entities based on the attributes of the instance-creating entity, and it also uses a macro_remove_if to limit the recursion of a sub-template.
Thanks!

The problem with scaling is that it also affects the 'scale' attribute of point entities. But I could split that up into two attributes: one for entities ('Scale') and one for geometry ('Geometry scale'). That would also solve the problem where you want to scale up geometry but not entities. As for negative scales, that's currently not working correctly, I'll have to look into that.

As for producing rotated instances, that's exactly what macro_insert's 'Angles' property is for. Can you show me the results you get and what you expected to get? As well as the attributes of the macro entities involved?
I did investigate Gimp's file format a while ago, but the main problem is that it doesn't contain a flattened image. I'd have to implement layer compositing, but that's a fair bit of extra work. The same problem applies to Aseprite and Paint.NET files.

But WadMaker can be configured to use external (command-line) conversion tools, and there seem to be several tools that can convert .xcf files (Gimp's batch mode, xcf2png, ImageMagick, Irfanview). So if you can get one of these tools to work, then it's just a matter of creating a wadmaker.config file in your source image folder and adding a line like the following (where {input} is the full input .xcf path, and {output} is a .png file in a temporary folder):
*.xcf    converter: '"C:\Tools\XcfConverter.exe"' arguments: '-in="{input}" -out="{output}"'
The above is just an example. Once I'm done with SpriteMaker I'll update the documentation with .xcf and .aseprite file conversion examples.

As for automatic resizing, if you're talking about allowing images of arbitrary size then I don't think that's a good idea due to quality loss. But if you're working with high-res source images (say, 2x as large) then I guess a scaling factor setting could be useful. I'll think about it. For now, you could perhaps use the above converter approach to resize your images.
You don't need to do this. The compile tools will combine all world brushes into a single mesh and will remove any faces on the outside, so it's no problem if brushes are sticking out. That's also why decompiling gives such poor results: there's just not enough information in a bsp file to reconstruct the original brushwork.

1. If you really want to, you can use the vertex manipulation tool (Shift + V) to move the corners of your floor brush around. This mode also lets you create new edges (by selecting two existing vertices (white) or edges (yellow) and pressing Ctrl + F, or merge vertices by dragging them on top of each other. This is an advanced tool however, and using it incorrectly can produce invalid brushes, so use with care.

2. Judging from your screenshot, I can't tell whether you've got brushes with off-grid vertices, but you do have several points where the corners of two brushes join up next to the edge of another brush. That may result in tiny cracks between brushes, which is probably what's causing this 'ambiguous leaf node' error. That's one reason why I'd recommend sticking to a coarser grid size when working with 'structural' brushwork like this, and to stick to 'safe' slopes like 1:2, 1:4, etc, as that makes it easier to ensure that junction points like that are still perfectly aligned with the grid.
Posted 2 years ago2021-06-26 20:17:03 UTC
in Half-Life: Direct edit of compiled BSP files Post #345704
BSPEdit allows you to edit entity data in bsp files. You'll need to be careful to keep the data properly formatted though. It also saves bsp files in-place, so it's a good idea to make backups first.
Posted 2 years ago2021-06-13 22:41:36 UTC
in Duplicate faces when rendering HL1 BSP map? Post #345699
That's due to how sky brushes are compiled - it's not a bug in your code. Apparently sky brush surfaces are turned into double-sided faces - which is why several faces in your map are on opposite sides of the same plane, using the same vertices but in reverse order. Another quirk is that, unlike with other brushes, the tools also produce faces for the 'outside' surfaces of those sky brushes. Maybe there's a good reason for this behavior, I'm not sure.
WadMaker 1.1 is now available!
It can be downloaded here. For more information, see the readme.

New features:
  • Added support for Photoshop files (.psd, .psb) that have been saved with 'maximize compatibility' enabled.
  • Added support for Krita (.kra) and OpenRaster (.ora) files.
  • Added support for creating and extracting decal wad files (decals.wad).
  • Updated the wadmaker.config system to apply all matching rules (with more specific rules overriding less specific ones).
  • Console output is now logged to a file (only in create-wad mode). This can be disabled with a command-line option.
Bugfixes:
  • Fixed that removing an image with an uppercase name would cause updating a wad file to fail.
  • Fixed that water color was accidentally black by default.

WadMaker will automatically switch to decal mode when the ouput wad file name is 'decals.wad', and it expects input images to have an alpha channel - which it will use to create the decal texture. The average color of the input image is used as decal color. If you're not sure what format is expected, then first try extracting a decals.wad file, and take a look at the extracted images. It's also possible to enable grayscale input with a wadmaker.config setting - in that case you should also specify the decal color in the settings file.

As for Photoshop files, not all compression methods are supported because I could only find test files with raw and RLE compressed composite images. So please let me know if certain files don't work. I can add support as soon as I get some files to test with.
Posted 2 years ago2021-05-21 12:34:46 UTC
in How to make an explosive crate? Post #345658
Try a (much) larger value. The explosion magnitude affects both the amount of damage and the damage radius (apparently the radius is 2.5x the magnitude value). Also keep in mind that explosions do less damage to entities that are further away.
Posted 2 years ago2021-05-21 11:06:23 UTC
in How to make an explosive crate? Post #345656
A func_breakable with its 'Explode Magnitude' set to a value higher than 0 should do the trick.
If you're talking about writing custom game code, then the wiki here contains a guide that looks pretty comprehensive: Half-Life Programming: Getting Started. What exactly do you want to achieve?
always thought "that's way too much for me" (I was mostly used to CS mapping).
I also started out as a mapper, years ago. I eventually started experimenting with the game code and I somehow managed to make the MP5 launch a grenade with each shot, but I couldn't really do much else. Now, years later, I do programming for a living... So yeah, give it a go, and don't get discouraged if things seem complicated at first. Feel free to ask for help whenever you're stuck. :)
Thanks! Don't hesitate to ask if you have questions or feedback. :)
Disclaimer: I'm a bit of a perfectionist, so don't take what I'm about to say too seriously! ;)

spac_t0a0:
This is basically a text-only Powerpoint presentation. A slideshow can be an interesting way to provide an optional piece of lore. But here, it's essentially a slow, boring cut-scene with no skip button, with a nerve-wracking humming sound in the background and blurry text that's barely readable. The text itself is fairly long-winded.

So the background story is that there's this 'SDI' laboratory that's using prisoners like you as test subjects, and you're about to escape their facilities. How do you tell that story in an interesting way? By letting the player experience the story. Have them start out in a cell-block: that immediately tells them they're a prisoner, and gives them a goal: to escape. Make the walls look like a modern laboratory, add windows that overlook test chambers, put appropriate signs on the walls, and players can now figure out on their own that they're in a test facility. A big 'Space Dynamic Incorporated' logo in a lounge somewhere tells them the name of the place. And don't just throw enemies at the player: let some alarms go off first. Let them know that their escape has been detected and that security is on their way. Make it part of the story!

spac_uplink:
My overall impression: the architecture, texturing and lighting are very basic. Rooms are blocky, with almost no detail, and the furniture that is present is out of proportion. Most of the rooms do look like they have an actual purpose, but the lack of detail and the somewhat illogical connection between the rooms doesn't make it feel like a realistic place. The dead grunts and scientist, and the zombies and houndeyes make it feel like a standard Half-Life disaster scenario, there's no sign of a custom story.

Enemy placement suffers from a common problem in that most enemies are just passively waiting for the player to show up. It makes the first rooms feel a bit dull. The grunts on the other hand are actively invading the place, which is a good change of pace. In general I felt there were too many enemies compared to how much ammo the player had, and putting grunts on high ground so early on in a level seems unfair. Then again, they felt easier to kill and less damaging than standard HL grunts. I'm not sure whether that's a good thing: how are you going to ramp up difficulty in later levels if you already need this many grunts so early?

I kinda like the idea of having to charge into a room to grab a powerful weapon, but I don't think it worked well here: the shotgun is barely visible and the houndeyes are quickly grabbing the player's attention anyway. The same goes for the closet on the side: the ammo and armor there give you a major advantage, but that's just not visible from the outside.

Other notes:
  • The slow movement speed was quite annoying. Having to hold a button to run isn't such a great idea for a fast-paced shooter. I think it's interesting how you managed to implement it, but it's also easy to break when changing keyboard bindings.
  • Instakill barriers are frustrating, especially when they don't look like they would kill you instantly. Just let the steam apply some burning damage and push the player back. Also, a pipe would (hopefully) never be placed like that in real-life!
  • The textures in the first room (old, industrial) don't match the furniture (cubicles, desks).
  • The scientist is partially inside the table.
  • The doors are frustrating: their keycard locks often collide with the player, causing them to close again immediately, and it takes a long time before they open again.
  • The tripmine doesn't get triggered by the houndeyes - that looks like a bug. However, I do like how you can use the houndeyes to blow up the mine with their sonic attack, and how a quick-thinking player can use the explosive crate to their advantage.
  • The large crate in this room doesn't fit through either door. Logic mistakes like this are not uncommon in maps, but they're a bit jarring once you notice them.
  • The HEV not working felt like a bug. It's probably a good idea to first introduce the body armor pickup before showing a HEV charger (if you need to show one at all).
  • The weapon closet texture scaling looks strange, and parts of the text look poorly copy-pasted. Why is the MP5 hidden behind the sign?
  • The reception hall provides the most interesting combat, but players probably end up camping in the doorway, or they find their way to the closet only to continue camping there. I don't think the layout does a good job of forcing the player to make interesting decisions.
  • In the concrete alley, having a grunt launch contact grenades from a high place around a corner... I'm not sure I would classify that as 'fun'.
  • The gap between the sandbag walls looks passable, but the player is blocked by an invisible wall. If something is impassable then it should clearly look impassable to prevent frustration.
  • The 'Leave game' text in the menu is messed up somehow.
  • The download contains a lot of models and sound files. Are all of these custom? If not, you may want to remove them to reduce download size.
  • The same goes for the screenshots, there's no need to include them. But if you do want to, then save them as jpg or png files to reduce filesize.
I hope this proves useful to you, and that I didn't sound too harsh!
Judging by a previous question of yours, and by the paths in your compile log, you're working on a mod, right? Did you verify that the bsp file is actually located in the Half-Life\yourmoddirectory\maps directory (where yourmoddirectory is the name of your mod's directory)? And are you starting hl.exe with the -game yourmoddirectory argument (you can also start your mod through Steam, which does the same thing)? If you're not doing that, then you're running the base game Half-Life (not your mod), which will only look for bsp files in the Half-Life\valve\maps directory.

You should also put any custom wad files you're using in your mod's directory.
You've got several invalid brushes. It looks like you've been using vertex manipulation. That's an advanced tool that can easily produce invalid shapes, so it's better not to use it until you have a better understanding of how to keep a brush valid. Use the clipping tool (Shift+X) instead, or the shearing tool (click on a selected brush in a 2D view to cycle between resize, rotate and shear modes).

The texture scales on your brushes vary wildly. It's often a good idea to keep them consistent (most textures are designed to be used with scale 1). This is probably caused by the various texture-locking modes that J.A.C.K. has enabled by default - I usually disable them.

Your func_door_rotating's don't have origin brushes. I replied to your question about that, but what I didn't mention explicitly is that an origin brush must be part of an entity. Normally you'd create both the visible brushes and the origin brush, select all of them, and then turn them into an entity. You already have a func_door_rotating entity, so in this case you'd create an origin brush, then select both the func_door_rotating and the origin brush, then press the 'To Entity' button (Ctrl+T), and select 'Yes' when it asks you to add the selected solids to the existing entity.

As for your map not loading, what exactly do you mean with 'it doesn't load properly'? Did you check whether the bsp file got copied to the right maps folder? What happens when you start Half-Life manually and type map roomone in the console?
WadMaker & SpriteMaker are finally finished!
It can be downloaded here. For more information, see the readme, or check out the Making textures with WadMaker tutorial.

These command-line tools can turn a directory full of images into a Half-Life wad file or into a directory full of sprites - just drag the directory onto the right tool. They can also extract textures from wad and bsp files, remove embedded textures from bsp files and convert sprites back into images.

WadMaker and SpriteMaker directly support png, jpg, gif, bmp and tga files, as well as Photoshop (psd, psb) and Krita files (kra, ora), and can be configured to call external conversion tools for other formats (example configurations for Gimp and Aseprite files are included). Both tools will automatically create a suitable 256-color palette for each texture or sprite. They will also apply a limited form of dithering, which can be disabled if necessary. For transparent textures and sprites, the alpha channel of the input image is compared against a configurable threshold, but it is also possible to treat a specific input color as transparent. For water textures, the fog color and intensity are derived from the image itself, but they can also be specified explicitly. Texture-specific settings can be overridden with a plain-text wadmaker.config file in the images directory. Common sprite settings such as orientation and texture format can be set within filenames, other settings can be overridden with a spritemaker.config file.

Why did I make these tools? First, I was investigating the various Half-Life file formats anyway. Second, I wanted a faster workflow than Wally and Half-Life Texture Tools (for me, running a batch file is faster than opening a GUI tool, dragging files around, saving a wad file, and closing the GUI tool). And finally, investigating various approaches to color quantization and dithering, and reading up on color spaces and color perception turned out to be very interesting.
Changes in v1.2:
SpriteMaker:
  • Workflow: converts directories full of images to directories full of sprites, similar to how WadMaker works. Can also convert sprites back to images.
  • Efficiency: only modified files and settings are processed.
  • Configuration: common settings like sprite orientation and texture format can be configured within an image's filename. Other settings can be specified in spritemaker.config files.
  • Flexibility: accepts various image formats (png, jpg, gif, bmp, tga), Photoshop files (psd, psb) and Krita files (kra, ora). Input images can be true-color and can contain transparency, SpriteMaker will automatically generate a suitable palette. Support for other file formats can be enabled with converter rules (a global spritemaker.config file with example rules for Gimp and Aseprite files is provided).
  • Animation: animated sprites can be created with numbered image sequences, spritesheets and/or gif files.
WadMaker:
New features/changes:
  • Added support for a global configuration file (a wadmaker.config file in the executable's directory). Global rules always apply, unless overridden by a local config file.
  • The provided global config file contains example rules for converting Gimp and Aseprite files and instructions on how to enable them.
  • Custom converters are no longer forced to output png files, the output file extension must now be specified in the converter arguments.
  • Custom converters can now also use {input_escaped} and {output_escaped} placeholders, for when backslashes need to be escaped.
Bugfixes:
  • Fixed a problem where processing transparent images with very little color variation could fail with an 'At least one color must be provided.' error.
  • Fixed that the dither-scale setting was not parsed correctly, so it could only effectively be set to 0 or 1.
  • Fixed that WadMaker would fail to create a wad file if the output directory did not exist.
  • Fixed that mipmaps were not extracted correctly.
  • Fixed some cases where WadMaker would fail to create a log file or a directory.

Changes in v1.1:
WadMaker:
New features:
  • Added support for Photoshop files (.psd, .psb) that have been saved with 'maximize compatibility' enabled.
  • Added support for Krita (.kra) and OpenRaster (.ora) files.
  • Added support for creating and extracting decal wad files (decals.wad).
  • Updated the wadmaker.config system to apply all matching rules (with more specific rules overriding less specific ones).
  • Console output is now logged to a file (only in create-wad mode). This can be disabled with a command-line option.
Bugfixes:
  • Fixed that removing an image with an uppercase name would cause updating a wad file to fail.
  • Fixed that water color was accidentally black by default.