Tutorial: Render Properties Last edited 3 months ago2024-09-11 07:38:22 UTC
Introduction
Almost all visual entities (brush and point) in a map will have a set of basic rendering properties:- Render FX (
renderfx) - Render Mode (
rendermode) - FX Amount (
renderamt) - FX Color (
rendercolor)
But before we get into these properties, we will cover the types of visual entities, as the above rendering properties applies differently according to their type:
- Brush models (brush entities)
- Studio models (monsters, weapons, ammo, items, prop models, etc)
- Sprites (beams, glow effects, etc)
Visual entity types
Brush models (brush entities)
Brush entities in game uses brush models. Brush models are generated during the compiling process of a map from the brushwork of each brush entity, and all stored in the single resulting BSP file. Examples of brush entities that has visible brushwork includefunc_door, func_wall, and func_tracktrain, but excludes func_ entities that act like triggers such as func_friction, func_traincontrols, and most notably func_ladder.The game engine supports multiple brush entities sharing the same brush model in the map they're in, and the ZHLT compilers support this by using the
zhlt_usemodel keyvalue. This is notable because decals will be shared across all entities using the same brush model.
Studio models
Studio models are the usual models, used by NPCs, player models, weapons, ammo, items, props etc. In most code bases, the entities use hardcoded models (e.g.monster_barney uses models/barney.mdl and item_battery uses models/w_battery.mdl). See Reference: Entities and their models for a full list of these hardcoded values.Some entities like
cycler, monster_generic, and monster_furniture lets you specify your own models. Other code bases like SoHL, Sven Co-Op and Featureful lets you override models of normal entities.
Sprites
Sprites are 2D textures that float inside the level (versus brush-based textures) for effects like smoke and glow effects, as well as laser and lightning beams. Most sprites are authored to always face the camera and have its colour tinted with the FX Color property. Example entities includeenv_sprite and env_beam.Sprites can be in normal, additive, indexalpha or alphatest mode. In particular, indexalpha mode works similar to decals in that the tint colour is encoded in the last palette index. Keep this in mind when applying Render Color property, which multiplies the base colour. More on these in env_sprite's page.
Render properties
Render FX (renderfx)
Render FX is probably the simplest property - it sets any special effects that the entity is rendered with, such as fading in and out, flickering etc. You may need to tweak the other properties before the effect looks good though. In almost all cases, some form of opacity modulation is applied, and requires the entities to be in non-normal Render Mode. Some effects involve physical distortion of the entity's model shape and such effects only apply to models.
Available values are:
- Normal (0) - No visual effects.
- Slow Pulse (1) - Entity slowly pulses with transparency. Faint. [B/M/S]
- Fast Pulse (2) - Entity quickly pulses with transparency. Faint. [B/M/S]
- Slow Wide Pulse (3) - Entity slowly pulses with transparency. Strong. [B/M/S]
- Fast Wide Pulse (4) - Entity quickly pulses with transparency. Strong. [B/M/S]
- Slow Fade Away (5) - Seemingly unused.
- Fast Fade Away (6) - Seemingly unused.
- Slow Become Solid (7) - Seemingly unused.
- Fast Become Solid (8) - Seemingly unused.
- Slow Strobe (9) - A very slow strobe effect between visible and invisible. [B/M/S]
- Fast Strobe (10) - A medium strobe effect between visible and invisible. [B/M/S]
- Faster Strobe (11) - A very fast strobe effect between visible and invisible. [B/M/S]
- Slow Flicker (13) - Entity flickers in and out of visibility. [B/M/S]
- Fast Flicker (13) - Entity quickly flickers in and out of visibility. [B/M/S]
- Constant Glow (14) - Used with Glow render mode to cancel the mode's dissipation effect. [S]
- Distort (15) - Fast erratic fluctuation of opacity. Models exhibit distortion effect. [B/M/S]
- Hologram (Distort + fade) (16) - Same as above but also fades with distance. [B/M/S]
- Explode/Bulge Sideways (18) - Animates model to become wide, which loops (frozen animation stays wide). Same effect as
monster_gargantuadying. [M] - Glow Shell (19) - Applies Quake-like aura effect to models. FX Color specifies the glow colour, and FX Amount specifies glow offset. [M]
- Light Multiplier (21) - [Condition Zero only] Multiplies lighting by a custom value. Since this custom value can only be set through code, this FX turns the model's textures black instead in other games. [M]
Render Mode (rendermode)
Render Mode is a pretty fundamental part of the rendering properties - it sets the way in which the entity is rendered. The options are:
- 0: Normal - This is the default, plain, solid rendering mode. On sprites, FX Color will apply but FX Amount is ignored. [B/M/S]
- 1: Color - On brush entities, this replaces the entity's texture with the color specified in FX Color. The FX Amount controls the translucency. On sprites, makes the sprite appear as solid, with its original colour as defined in its palette instead of the colour in FX Color. It has no effect on models. [B/S]
- 2: Texture: Texture mode allows you to make an entity translucent. FX Amount controls the level of translucency. [B/M/S]
- The hologram on the right in the example map is using this mode. See also: Tutorial: Glass.
- 3: Glow: This mode (it's almost an effect) only works with sprites, and makes them scale down as the player approaches, and fade away as the player moves back. This is a realistic way of creating halo effects for lights. It also overlays geometry that would normally obscure sprites (providing the player can see the center of the sprite). Using Constant Glow setting in Render FX cancels this dissipation effect. FX Amount controls translucency, and FX Color sets the color of the sprite. [S]
- See also: Tutorial: Using Sprites.
- 4: Solid: Allows you to make the blue parts of masked textures (ones beginning with
{) transparent. Things like fences and grates are often masked because they are too complex to be created in geometry. Also note that decals will not render on brush entities with this mode. [B]- See the example map for demonstration.
- 5: Additive: Often used for things like steam and flare sprites. Basically the colors of the entity are 'added' to the colors behind, which gives a brighter look. Thus black parts on the entities' textures/sprites are fully transparent. [B/M/S]
- The example map demonstrates additive mode + Hologram Render FX for the hologram.
- See also: Tutorial: Using Sprites.
FX Amount (renderamt)
This property usually controls the translucency of the effect, and can have a value ranging from 0 (totally invisible) to 255 (fully opaque). It depends on the Render Mode: brush entities with Solid mode will be fully opaque for any amount greater than 0; likewise for sprites in Color mode. In Normal mode it has no effect for all entity types.
FX Color (rendercolor)
FX Color is an RGB value, each ranging from 0 to 255 (e.g. 255 0 0 is pure red). Its meaning depends on the Render Mode and the entity type.On brush entities, it is used with the Color Render Mode to render the entire brush entity as a solid colour as set in FX Color. All other details – textures, lightmaps, decals – are removed.
In all other Render Modes, the FX Color can be used to encode the speed that scrolling textures (textures whose name starts with
SCROLL) on brush entities will scroll in. func_conveyor does this programmatically based on its speed keyvalue, but you can use FX Color to set such value to any brush entity. See func_conveyor's page for the formula.On sprites, in all Render Modes except Color, this sets the colour to tint the sprite.
Note that some entities like
env_beam, while using the rendercolor key, labels it differently in SmartEdit mode.The value
0 0 0 disables this property for sprites, so use a "very close to but not actually black" colour instead.
Property relationship by entity type
To help demystify which FX works with which mode works with which entity type, this section tabulates the availability of modes and effects separated by entity model type.Brush model (brush entity)
| Render Mode | Render Amount | Render Color | Bullet decal | Lightmap | Alpha Transparency | |
|---|---|---|---|---|---|---|
| Normal (0) | – | Scroll speed | Solid | ✔ | Black, opaque | |
| Color (1) | Opacity | Colour | None | ❌ | N/A | |
| Texture (2) | Opacity | Scroll speed | Glass | ❌ | Transparent | |
| Glow (3) | Opacity | Scroll speed | Glass | ❌ | Transparent | |
| Solid (4) | Fully opaque if >0 | Scroll speed | None | ✔ | Transparent | |
| Additive (5) | Opacity | Scroll speed | Glass | ❌ | Transparent |
- In color mode, the entity will be of a pure colour as set in FX Color on screen with opacity as in FX amount. All other features – decals, lightmaps, textures – are removed.
- Bullet decals are determined based on render mode at time of impact and remains unchanged as the mode changes.
- Solid mode will have no decal whatsoever; even existing decals will be removed if the mode is changed to solid.
- Render Color encodes scroll speed for faces with
scroll*textures. Seefunc_conveyorpage for more info. Otherwise it has no other effect in non-color mode. - In modes that don't apply lightmaps, VHLT supports
zhlt_embedlightmapproperty which bakes the lightmaps onto the individual face's textures. See Tutorial: The Complete Guide to Lighting, Section 3.8 for more info.
| Render FX | Normal | Color | Texture | Glow | Solid | Additive |
|---|---|---|---|---|---|---|
| Normal (0) | N/A | N/A | N/A | N/A | N/A | N/A |
| Pulse effects (1-4) | ❌ | ✔ | ✔ | ✔ | ❌ | ✔ |
| Fade effects (5-6) | ❌ | ❌ | ❌ | ❌ | ❌ | ❌ |
| Solid effects (7-8) | ❌ | ❌ | ❌ | ❌ | ❌ | ❌ |
| Strobe effects (9-11) | ❌ | ✔ | ✔ | ✔ | ✔ | ✔ |
| Flicker effects (12-13) | ❌ | ✔ | ✔ | ✔ | ✔ | ✔ |
| Constant Glow (14) | ❌ | ❌ | ❌ | ❌ | ❌ | ❌ |
| Distort & Hologram (15-16) | ❌ | ✔ | ✔ | ✔ | ❌ | ✔ |
| Bulge Sideways (18) | ❌ | ❌ | ❌ | ❌ | ❌ | ❌ |
| Glow shell (19) | ❌ | ❌ | ❌ | ❌ | ❌ | ❌ |
Studio model
| Render Mode | Render Amount | Render Color |
|---|---|---|
| Normal (0) | – | – |
| Color (1) | Opacity | – |
| Texture (2) | Opacity | – |
| Glow (3) | Opacity | – |
| Solid (4) | Opacity | – |
| Additive (5) | Opacity | – |
| Render FX | Normal | Color | Texture | Glow | Solid | Additive | Remarks |
|---|---|---|---|---|---|---|---|
| Normal (0) | N/A | N/A | N/A | N/A | N/A | N/A | |
| Pulse effects (1-4) | ❌ | ✔ | ✔ | ✔ | ✔ | ✔ | |
| Fade effects (5-6) | ❌ | ❌ | ❌ | ❌ | ❌ | ❌ | |
| Solid effects (7-8) | ❌ | ❌ | ❌ | ❌ | ❌ | ❌ | |
| Strobe effects (9-11) | ❌ | ✔ | ✔ | ✔ | ✔ | ✔ | |
| Flicker effects (12-13) | ❌ | ✔ | ✔ | ✔ | ✔ | ✔ | |
| Constant Glow (14) | ❌ | ❌ | ❌ | ❌ | ❌ | ❌ | |
| Distort & Hologram (15-16) | ✔ | ✔* | ✔* | ✔* | ✔* | ✔* | [Note 1] |
| Bulge Sideways (18) | ✔ | ✔ | ✔ | ✔ | ✔ | ✔ | [Note 2] |
| Glow shell (19) | ✔ | ✔* | ✔* | ✔* | ✔* | ✔* | [Note 3] |
- Modes other than normal has additional opacity distortions.
- Loops (frozen entities are stuck in wide mode).
- FX Amount also controls offset of glow aura from model, clashing with non-normal render modes.
Sprites
| Render Mode | Render Amount | Render Color | Black part of additive sprites | |
|---|---|---|---|---|
| Normal (0) | No effect | Tint colour | Opaque | |
| Color (1) | Fully opaque if >0 | No effect | Opaque | |
| Texture (2) | Opacity | Tint colour | Opaque | |
| Glow (3) | Opacity | Tint colour | Transparent | |
| Solid (4) | Opacity | Tint colour | Opaque | |
| Additive (5) | Opacity | Tint colour | Transparent |
Colour tinting works by multiplying the sprite's base colour with the Render Color value. Suppose a pixel on the sprite has the colour ■magenta (
255 0 255) and the Render Color is ■yellow (255 255 0), then the resulting colour is:
// values converted to 0-1 range to
// simplify this example calculation
  R   G   B
  1.0 0.0 1.0  // base colour = magenta
x 1.0 1.0 0.0  // rendercolor = yellow
  ═══════════
1.0 0.0 0.0 // output = red255 0 0).See also: env_sprite's page.
| Render FX | Normal | Color | Texture | Glow | Solid | Additive | Remarks |
|---|---|---|---|---|---|---|---|
| Normal (0) | N/A | N/A | N/A | N/A | N/A | N/A | |
| Pulse effects (1-4) | ❌ | ✔ | ✔ | ✔ | ✔ | ✔ | |
| Fade effects (5-6) | ❌ | ❌ | ❌ | ❌ | ❌ | ❌ | |
| Solid effects (7-8) | ❌ | ❌ | ❌ | ❌ | ❌ | ❌ | |
| Strobe effects (9-11) | ❌ | ✔ | ✔ | ✔ | ✔ | ✔ | |
| Flicker effects (12-13) | ❌ | ✔ | ✔ | ✔ | ✔ | ✔ | |
| Constant Glow (14) | – | – | – | ✔ | – | – | [Note 1] |
| Distort & Hologram (15-16) | ❌ | ✔ | ✔ | ✔ | ✔ | ✔ | |
| Bulge Sideways (18) | ❌ | ❌ | ❌ | ❌ | ❌ | ❌ | |
| Glow shell (19) | ❌ | ❌ | ❌ | ❌ | ❌ | ❌ |
- Cancels out glow mode's distance-based dissipation effect. No special effects otherwise.
env_render
Main page: env_renderThe
env_render entity allows you to change the rendering properties of entities in game. This gives you greater control over the visual properties of entities as the player progresses through the level, more than the basic toggling of func_wall_toggle which you can't do to something like a func_train. It can be used to cleverly script brush entities, for example having a tank made of
func_train move into position, then swapping it with a stationary func_wall and a functional func_tank turret on top, all by firing env_render entities targeting those entities with specific render property values.
Examples
Making a hologram and a real fence
You might have noticed that in some areas in Half-Life, there are fences that the player can shoot through. It's a simple idea, but it requires a little trick to set up.You will notice that some entities, including the
monster_generic ones that are in the example map as holograms, have a flag called Not Solid that allows you to let the player to walk through them. This has obvious uses, such as... well... for making a hologram. But it won't work for fences, because, firstly, func_wall entities don't have a Not Solid flag, and even if they did, the player would be able to move though as well as bullets. But there is a way round this problem.It just so happens that
func_illusionary was designed to be, um, illusionary, so it's basically a non-solid func_wall, and can be made to display masked textures in the same way as a normal func_wall. Then, to stop the player moving though, you can simply create a 'clip' brush - Select the texture called CLIP, and create a brush. This stops the player moving through, but not bullets... and not monsters. To stop the monsters, create another brush with AAATRIGGER texture, and bind it to a func_monsterclip entity. Place all three brushes over each other, and you have a 'real' fence!
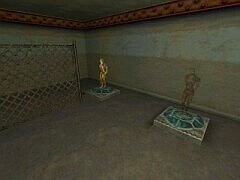 Holographic.
3 Comments
You must log in to post a comment. You can login or register a new account.
Best to keep it a non special texture for it to work properly.