VERC: The Opposing Force Opening Sequence Last edited 2 years ago2022-09-29 07:55:39 UTC
Introduction
One of the most impressive sequences in Gearbox Software's Opposing Force was the opening Osprey ride. It sets the mood nicely, and serves as a good introduction for your return to Black Mesa. If it's been a while since you've played the beginning of Op4, I suggest you load it up now and watch the Osprey ride. It is especially interesting when analyzed from a mapping perspective - Gearbox dug into their bag of tricks to pull this one off.Depending on your experience with mapping for Half-Life and Opposing Force, it may or may not be obvious to you how the Osprey ride is set up - the player and the soldiers remain stationary in a 'simulated' Osprey, while everything else outside moves past them, giving the very convincing feel of motion. Gearbox used many moving entities to make the rocks and canyons move past the player for the entire sequence. Clever, no?
The approach I'll take to examine the Op4 Osprey ride is to create a similar sequence using a simulated train. The example map I'll describe is based on the map I submitted for the Valve ERC's Train Ride Contest, which I designed as an alternate perspective to Op4's original opening. It's not meant to be an exact re-creation, but it should serve its purpose as a good example map.
The Opposing Force entities and models really lend themselves to this type of sequence, more so than standard Half-Life. First, there's the trigger_playerfreeze, which allows you to freeze the player in place while still allowing him or her to look around but not jump or shoot. Second, there are the models used in Op4's opening Osprey ride: the sitting grunts and the standing commander. These files are named
intro_*.mdl, and are typically used as a monster_generic), since there are no specific monster entities defined for these models, and thus they have no AI, so they must be controlled entirely through scripted_sequences and scripted_sentences. Also worth noting is that the models of the sitting grunts have no backs; that is, their backs are not modeled and they should be placed so that they can only be viewed from the front. Third, the monster_human_grunt_ally in Op4 includes a number of sequences where the grunt is sitting down, perfect for a simulated ride. Finally, there are two miniature models, also used as monster_generics: mini_apache.mdl and mini_osprey.mdl. They provide an easy way to give the perception of depth without having to make a humongous map using the regular-size Apache and Osprey models, which are roughly 3 times larger than the corresponding mini models.
Setup - The "Train"
I'll begin by describing the player's immediate surroundings; in this case, it's our simulated train car. Since we'll have the trigger_playerfreeze activated the entire time, we'll only need to worry about the areas that the player has a direct view of. It's best to open the map file so you can follow along.The general setup of the train interior is straightforward - there's a desk, radio equipment, some crates and lockers, etc. Note that the placement of the green crates at the front of the train just blocks the player's view out the front door - this is no coincidence. I wanted the player to only see out the two windows, but still "know" that the commander grunt was standing at a doorway. The angle and pitch of the light_environment were selected specifically for that purpose. By the way, those windows are both func_breakable, which we'll trigger during one of the upcoming explosions for some added ambience.
Entities in The Player's Vicinity
- item_suit - Placed right on top of the info_player_start so the player will immediately have a HUD.
- trigger_auto - This triggers the multi_manager mm_start when the level begins.
- multi_manager - Named mm_start, this multi_manager triggers the things that need to start right at the very beginning of the level (the trigger_playerfreeze, the moving rocks, & the shaking effect), as well as the sound of the jet flyby, which is right at the start of the level as well. Note that there are also 2 other multi_managers near the back of the train which are triggered later on in the level.
- trigger_playerfreeze - This remains active throughout the train sequence. This entity is invaluable, because with it you can control exactly what the player can see without having to resort to cameras or cut-scenes.
- env_shake - Along with the multi_manager mm_shaker, this provides the constant rocking effect to make it feel a bit more like a real, moving train. Note that mm_shaker has the multithreaded flag set, so it can trigger itself for the repeatable shaking that we need.
- ambient_generic - You no doubt have noticed the herd of ambient_generics near the windows and clustered around the radio. The majority of the goings-on in this level are conveyed via sound only. I don't actually have alien ships fly in, it just sounds that way? I'm not going to go into detail here because frankly if ambient_generics confuse you then you'll probably have serious difficulty following the rest of this tutorial.
- worldspawn - OK, perhaps not technically in the player's vicinity, but there is an important setting (under Map Properties) that should be set: Level Fade In should be Yes. This gives a bit of time for the rocks to start moving and the grunts to get into position before the player can see them.
The Grunts
- The Commander - Stationed at the doorway at the front of the train is a monster_generic with the model set to
models/intro_commander.mdl. Since that model only has animations of the commander standing, reacting, and falling out, we don't have to worry about keeping him in place with a scripted_sequence. The sequences and sentences for the commander are placed outside the train. These are used later as the level unfolds. - The 4 Intro Grunts - These are also monster_generics, using the models:
intro_saw.mdl,intro_torch.mdl,intro_medic.mdl, andintro_regular.mdl. Similar to the commander, these models only contain the sitting animations, so there is no need for any scripted_sequence to keep these guys in their seats - it's automatically taken care of. - The 2 Ally Grunts - I wanted more than just the same 4 grunts from Op4's intro riding in the train, so I stuck in two additional grunts (monster_human_grunt_ally), the gas-mask grunt and the balaclava grunt. In this case we need to make sure these guys remain seated, so we need to use scripted_sequences, placed right underneath the grunts in this map. The key settings for the scripted_sequences:
- Name: (none) - this is so the sequences will take effect immediately at the start of the level, without out a need to target them.
- Target monster: (name of grunt)
- Idle animation: sitting2 - you can really use any of the sitting animations here.
- Move to Position: Instantaneous - so the grunts teleport there instead of trying to walk or run.
- Note that the floors under both the player and the grunts are func_illusionaries. This is to set the level of the grunts correctly, to make them appear to be seated with their feet on the floor - without the illusionary floor, they all were floating in midair, even when I moved the monster_generic entities down. The func_illusionary under the player is to set his/her eye level lower to make it appear as though he/she is seated like the other grunts.
Setup - The Scenery
Here I'll describe the overall setup of the map, as well as the moving scenery. If you look at the diagram of the map's setup below you'll see that I used two sets of func_trains for the rocks/canyon walls. Gearbox used a combination of func_trains and func_rotatings for the canyon walls in the Op4 intro, and in fact there are a number of moving entities that could be used in this situation with a little ingenuity.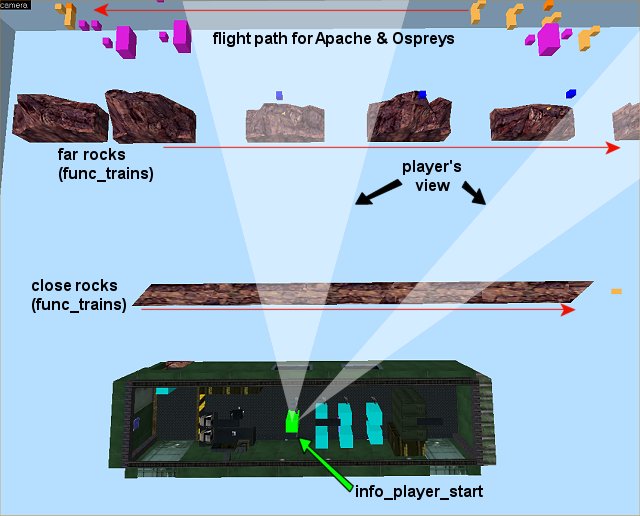 Overall setup of the map. (top view)
The Close Rocks
We'll set up the rocks close to the train as a series of identical func_trains. What I actually have is 5 func_trains traveling through 6 path_corners. When each func_train reaches the last path_corner, it teleports instantly to the first path_corner, using the first path_corner's teleport flag. Note that all these trains are named identically (close_rocks), and each one has a different starting path_corner (First stop target). So all we have to do is target the trains once (which is done with the multi_manager mm_start at the beginning of the level), and they will move indefinitely in the player's view. Note that the trains fit together seamlessly and travel at the exact same speed (550) so that it looks like a continuous piece of scenery scrolling by. One other thing you may notice is that the textures facing the player are scaled 3x in the x-direction - this adds to the feeling of motion/speed.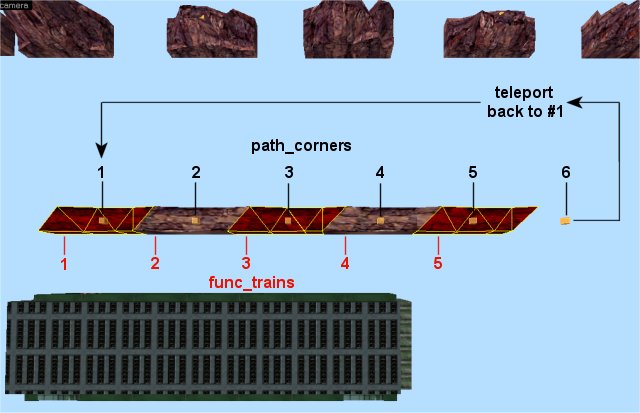 The rocks closest to the player. (top view)
The Far Rocks
The more distant rocks are set up identically to the close rocks, except this time we have separate, different rocks instead of consecutive identical rocks. I used David Hyde's excellent utility GenSurf to make these small rock formations. Again, all these func_trains are named identically (mid_rocks), each has a different starting path_corner, and their speeds are all set to 85.Setup - The Aircraft
As I mentioned above, Opposing Force includes a couple of miniature versions of normally huge models - the mini_osprey and the mini_apache. We'll use these in the level to easily give the perception of depth to the player without making our level ridiculously big. All the aircraft are monster_generics in this level, and to enable us to control their speed as well as target one with some beams, we will move them around using invisible func_trains. You could also build your own aircraft (or alien ships) with brushes, then make them func_trains or tracktrains, which is what Gearbox did for the alien ships that attacked in the Op4 Osprey ride.Take a look at the picture below. It shows a couple of the func_trains that will carry the Apache and the Ospreys. All I've done is make a box without a top big enough to hold the monster_generic entity, and textured it in the AAATRIGGER texture. This box is made into a func_train, given a name (e.g. train_far_apache), with the Render Mode set to Texture and the FX Amount set to 0, which will make it invisible to the player.
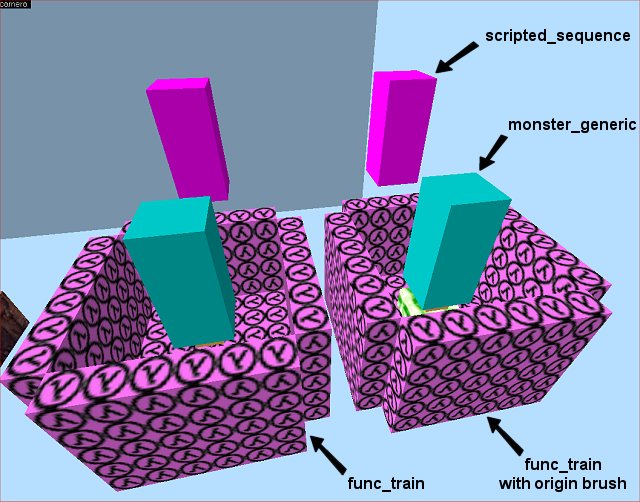 The func_trains to carry the Apache and Ospreys.
The last point to note about the Apache and Ospreys is that we need to animate them. If all we did was place the monster_generics in the map they wouldn't be animated - that is, their rotors would not be spinning. The animating is done with scripted_sequences, one for each model. The key settings for the scripted_sequences,:
- Name: (none) - this is so the sequences will take effect immediately at the start of the level, without out a need to target them.
- Target monster: (name of the monster_generic)
- Idle animation: idle for the Apache, rotor for the Ospreys
- Move to Position: No
Setup - Putting it all Together
If you've played the example map and you've managed to read this far, you hopefully have a pretty good idea for how all the sequences fit together. For a reference, here is an outline of the basic events:- The multi_manager
mm_startstarts the rocks in motion, puts the grunts in place, starts the train shaking, and sets off the next multi_manager. - The multi_manager
mm_actionstarts all the aircrafts' func_trains in motion and controls the sounds for the aircraft. This also targets the next multi_manager. - The multi_manager
mm_invasionactually commences the alien attack sequences by triggering some sounds and the commander's scripted_sentences. - Osprey #1 sets off
mm_osprey1at one of its path_corners -mm_osprey1triggers a bunch of sounds, a couple of env_explosions, a trigger_relay to kill the Osprey, a massive shake for the explosion, and sets in motion the other Osprey attacks with triggeringmm_osprey3. - The multi_manager
mm_osprey3is essentially a copy ofmm_osprey1, and it sets offmm_osprey2. - The multi_manager
mm_osprey2controls the last Osprey attack, the one that the player actually witnesses. So in addition to triggering a similar set of sounds and explosions, it also triggers 2 env_beams and the shattering windows. - The multi_managers
mm_trainattackandmm_traingoboomset off the finale sequence: alien attack sounds, a big explosion, a quick fade to black, some more sounds, and a godforsaken trigger_endsection that for some reason does not seem to want to work for me in this particular map.

Example
For a more concrete illustration, check out the example map linked below.- Categories
- Archived Articles
- VERC Archive
- VERC - Half-Life - Opposing Force
- VERC - mapping
- Tutorials
- Mapping
- Article Credits
- Unquenque – Author
This article was originally published on Valve Editing Resource Collective (VERC).
The original URL of the article was http://collective.valve-erc.com/index.php?doc=1046986958-44614200.
The archived page is available here.
TWHL only publishes archived articles from defunct websites, or with permission.
For more information on TWHL's archiving efforts, please visit the
TWHL Archiving Project page.
1 Comment

asdasasd
Commented 2 years ago2022-11-05 18:56:40 UTC
Comment #104885
Thank you 
You must log in to post a comment. You can login or register a new account.